February 27, 2012

Crawfish Season 2012 is here!

Boiled Crawfish
It's CRAWFISH SEASON!

Crawfish taste the best and are the easiest to peel from February until May. So that means it is the perfect time to enjoy this Louisiana seafood specialty. 

Crawfish Boil
Whether you boil them yourself, have someone boil them for you or pick them up from your favorite crawfish place, be sure to enjoy these spicy crustaceans while they are in season.

Ever wonder why there is a crawfish season? Why crawfish taste better and are larger in certain months? This illustrations shows the yearly time line and life cycle of the crawfish...how  tasty crawfish go from the rice fields to your boiling pot. 

Thanks to Cajun Crawfish blog for sharing it with us!
Crawfish Life Cycle Graphic


Now your ready for some hot, spicy crawfish!

 Mardi Gras Outlet's exclusive crawfish design cups are perfect for crawfish boils. Cups with the crawfish motif are available in both a clear disposable cup and a frosted dishwasher safe frost flex cup.


We also have festive red latex balloons with the matching crawfish design!
Crawfish Balloons

For complete selection, click here: Crawfish Boil Supplies


February 24, 2012

Mardi Gras Bead Craft: DIY Monogram Letter

diy monogram letter mardi gras bead craft ideas

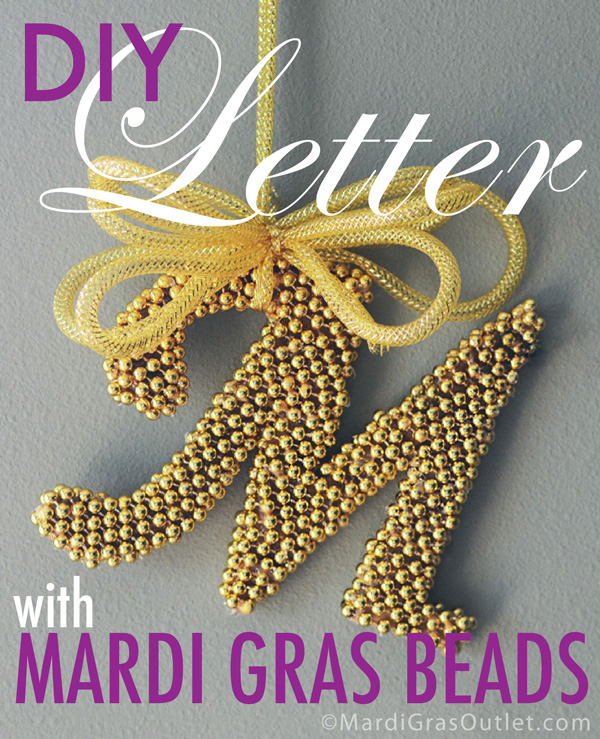
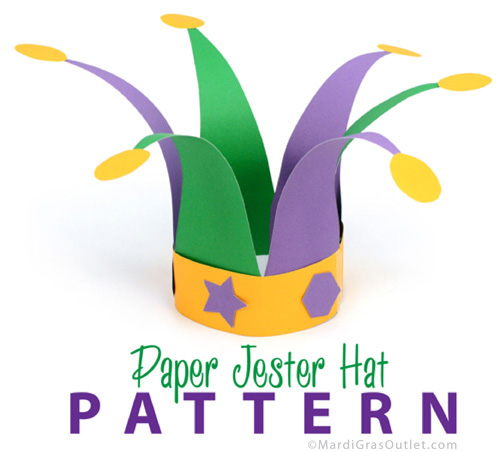
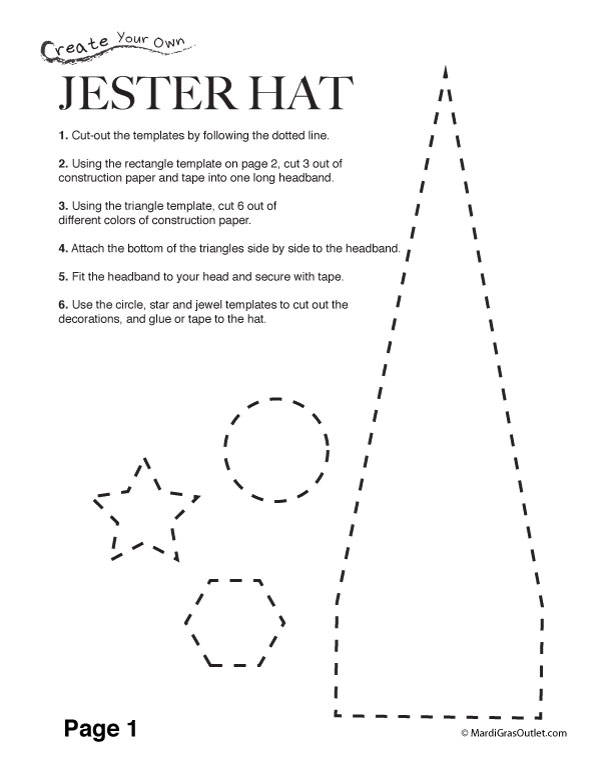
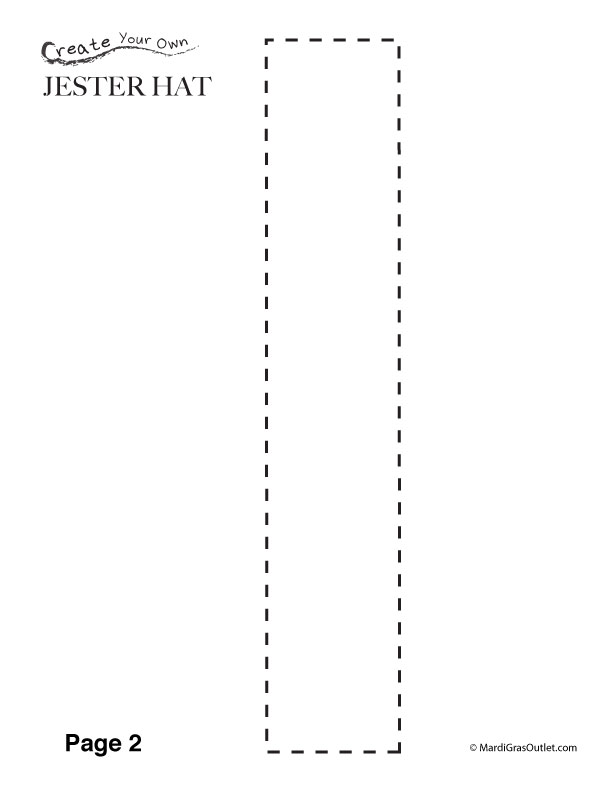
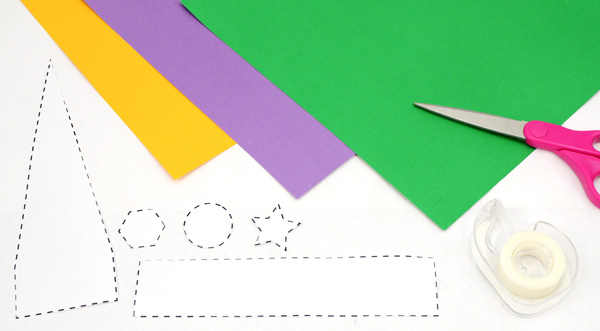
Did you go to any Mardi Gras parades this year? If so, you probably brought home lots of Mardi Gras beads along with your great memories.  Left-over Mardi Gras beads inspired us to come up with some easy Mardi Gras bead crafts.  Here are some of our ideas for reusing Mardi Gras beads.

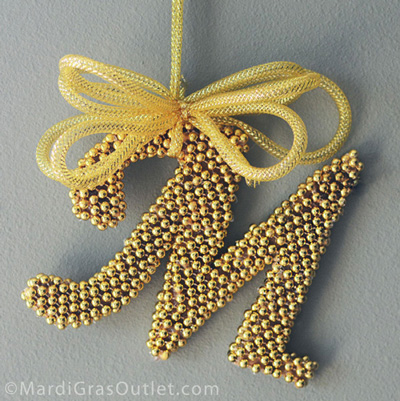
Tutorial for a decorative beaded monogram letter-
using only Mardi Gras beads, stiff cardboard and hot glue.
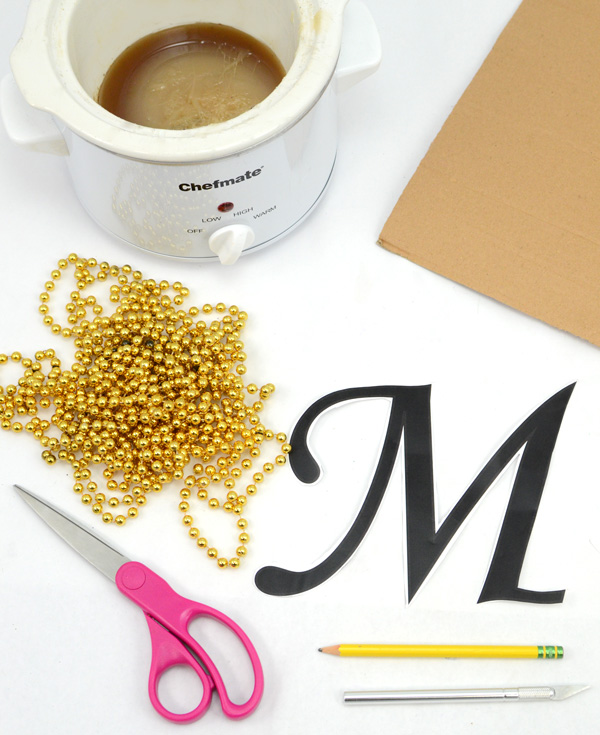
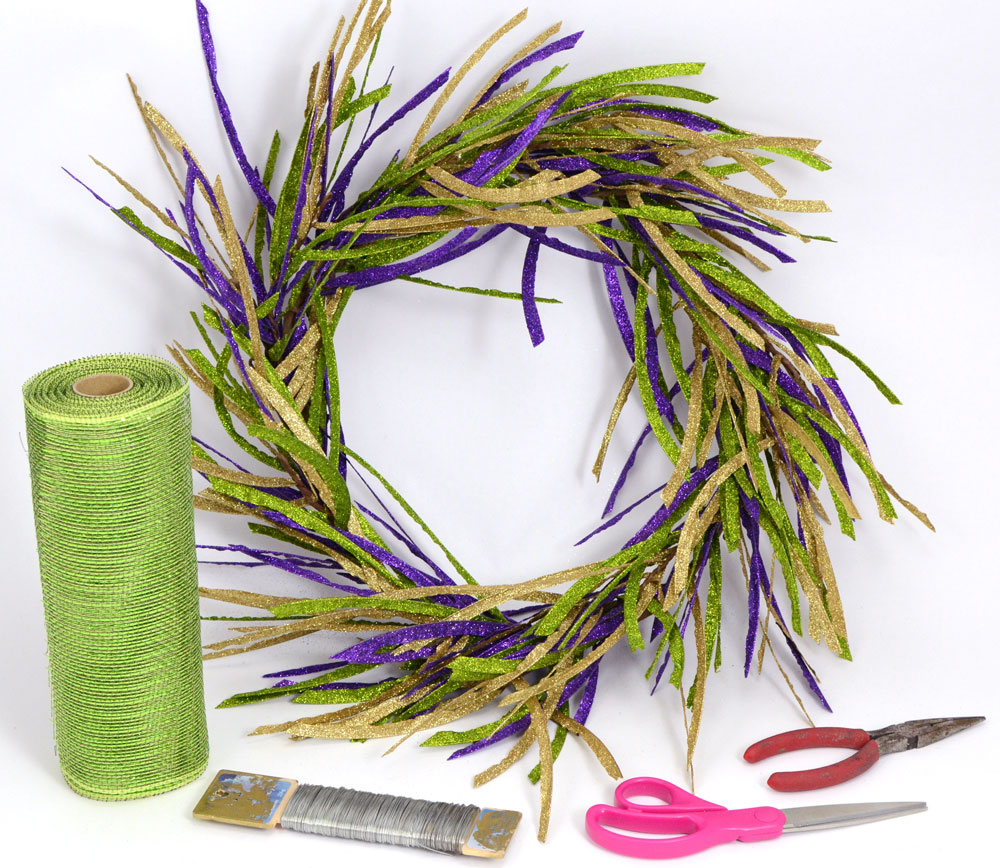
mardi gras beads crafts ideas monogram letter tutorial
SUPPLIES
*this 7-inch tall letter used 10, 33-inch strands of 7mm diameter beads
Hot Glue or Skillet Glue
Cardboard
Print-out of Letter
Scissors, Pencil & X-acto knife

*Mardi Gras beads and ribbon can be purchased  at www.MardiGrasOutlet.com. If you caught beads at Mardi Gras and if you have these common craft supplies, this project is free! Otherwise, a pack of these gold beads is only $3, and you get 48 strands which is more than enough to make several letters.
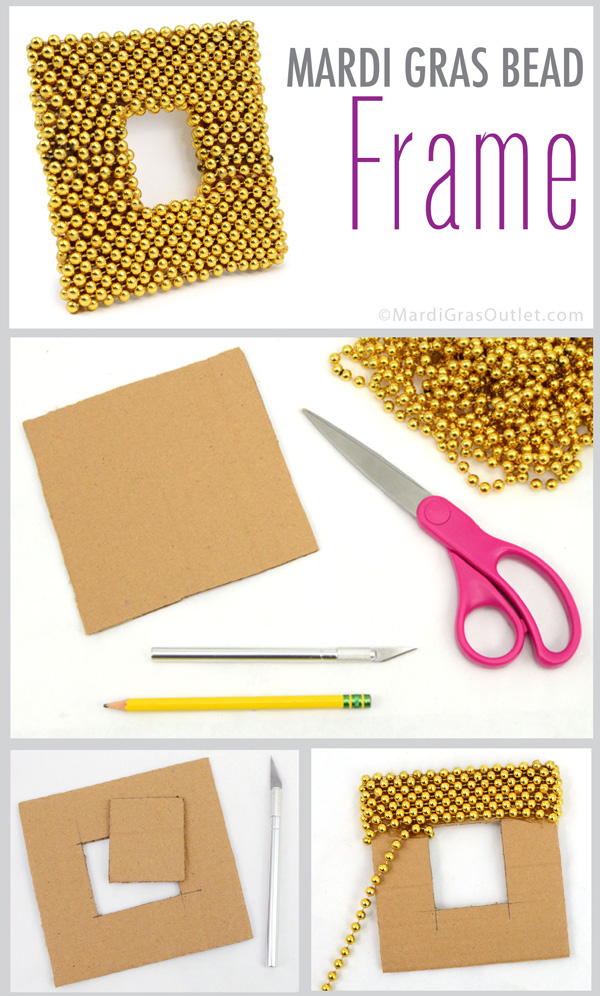
CUT-OUT THE LETTER
First, print-out a large letter of your choice on your home desktop printer. Use a word processing program on your computer and make the letter as large as you can fit onto a page. The font used here is Monotype Corsiva, and it is 7" tall by 8" wide.

Cut out the letter from the print-out, and then use a pencil to trace around the edges onto a piece of scrap cardboard. Use an x-acto knife or scissors to cut out the letter shape.
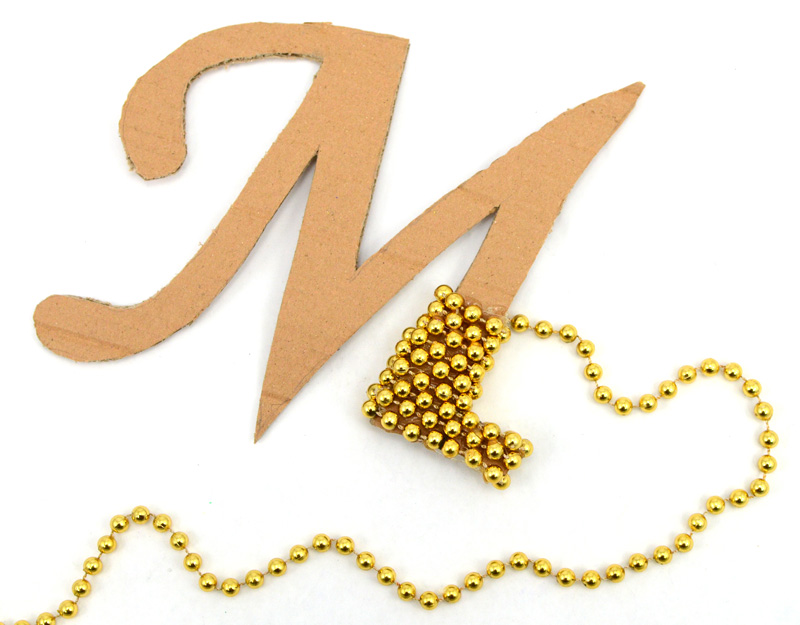
mardi gras bead craft ideas
WRAP THE LETTER
Cut each of the Mardi Gras beads into single strands. You can use gold beads like this letter or other colors. If you have multiple colors of Mardi Gras beads, simply spray paint the letter when you are done. Use hot glue or skillet glue to attach the beads to the cardboard. Skillet glue is hot glue that is heated in a pan or crock-pot.
mardi gras beads crafts ideas

Wrap the beads strands around the entire letter, back and front. Make sure the strands stay going in the same direction, and place them close together so that they interlock. This makes the gaps smaller, giving the letter a mosaic look.
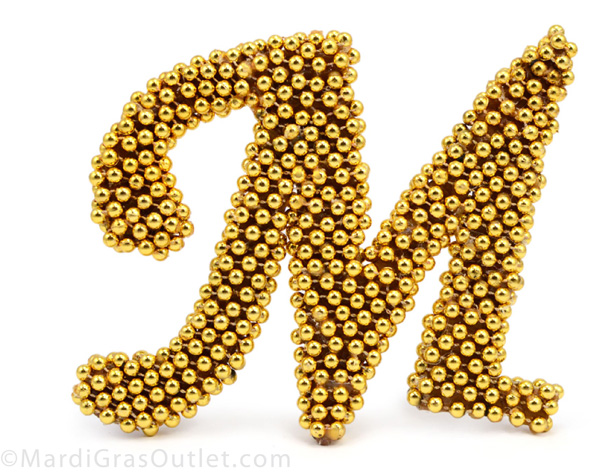
Now you have the option of spray-painting the monogram letter with the color you want, or leaving it as is. To make the letter into a wall hanging, simply tie a ribbon and a bow at the top. We used metallic gold deco flex tubing ribbon to create the bow and hanger.

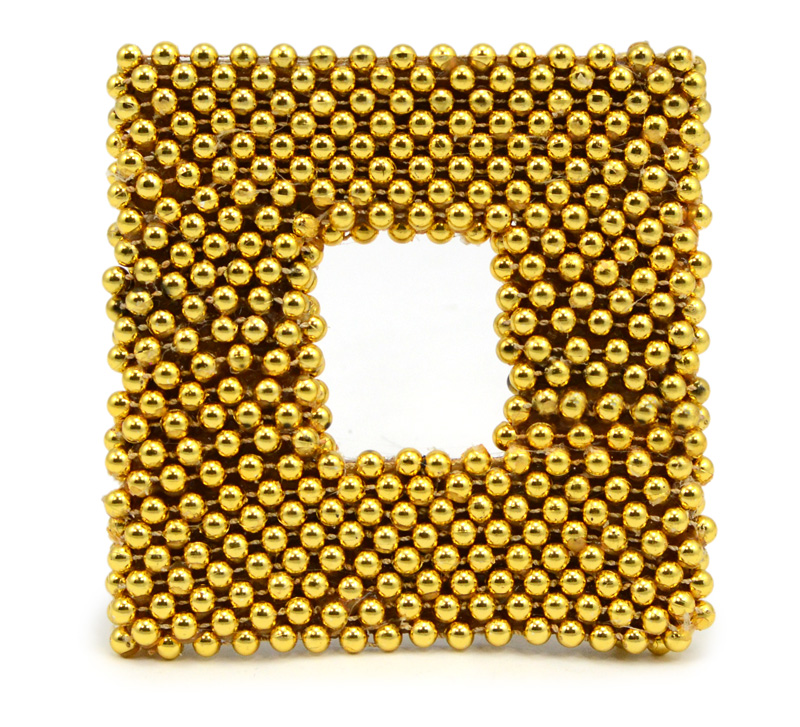
Tutorial for a beaded photo frame
The same idea for making a monogram letter can be used for almost any other shape as well. We also created a 5" square picture frame made from Mardi Gras beads, as shown below.
picture frame diy mardi gras beads craftmardi gras beads crafts ideas picture frame diy

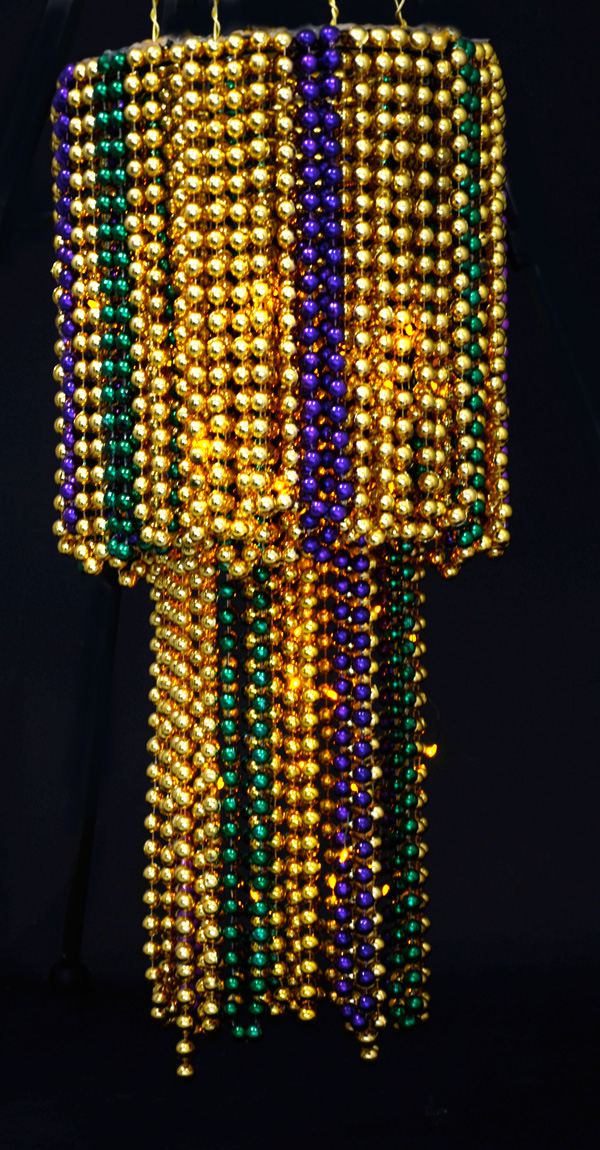
 Click here  to see a previous post for creating this beaded chandelier.


Still looking for more Mardi Gras bead crafts?

Follow Me on Pinterest
Check out our Pinterest page for lots of other inspiring Mardi Gras bead crafts. You will find lots of great ideas for reusing and recycling Mardi Gras beads such as coasters, Easter eggs, vase fillers, ornaments, decorations, lamps, mosaic art and more!

Here is a sample of what you will find:

February 19, 2012

Mardi Gras Parade Float Coloring Page

(click above to download)

Carnival season is in full swing, which means parades, beads and good times abound! Create your own parade at home (or an illustration of one ) with this free printable coloring page.  This is a great Mardi Gras art activity for kids! Display your colorful floats in a row, lined up just like a real parade. 

 Happy Mardi Gras!


You will need a PDF reader to open the file, available here for free.

For more free coloring page downloads and other printables, click below:

February 16, 2012

Mardi Gras Glitter Leaf Wreath: Three Different Ways


Transform a simple Mardi Gras glitter leaf wreath into your own personalized Mardi Gras door decoration. A year ago, we posted about how to create three different looks with one basic Mardi Gras tinsel wreath from (click here to see the post). For 2012, we wanted to do the same concept with a new style of wreath form. This basic Glitter Leaf Wreath was easily updated with inexpensive Mardi Gras accents: lime green deco meshMardi Gras ribbon and a glitter wall sign.
available at Mardi Gras Outlet.com

Option 1: Mardi Gras Sign
SUPPLIES

All of the supplies can be purchased at www.mardigrasoutlet.com, for about $34.

This first Mardi Gras wreath version uses a Mardi Gras sign and bow. You will need to use craft wire to attach both decorative accents.
First, attach the Mardi Gras sign at the bottom right of the wreath at a slight angle. Secure it on both sides with craft wire to the glitter leaf wreath form.
Use the Mardi Gras Stripe Ribbon to make a bow. Form a loop and hold in one hand. Form another loop on the opposite side and hold them in the same hand at the middle. Continue going back and forth until there are 4 loops on each side. Now cut 2, 30" long strips of ribbon and one shorter piece. Use the short length to attach the tails at the middle to the place you have been holding the loops.
Attach the bow with craft wire to the left side of the wreath.
For more detailed directions on how to make a similar bow, click here.
Option 2: Deco Mesh
SUPPLIES
Scissors, Wire Cutters

This Mardi Gras wreath version uses 10" wide poly deco mesh ribbon to add volume to the wreath. There should be enough deco mesh on the roll to fill in the wreath and to make a big bow. The supplies needed for this wreath will be about $26.
STEP 1
Open up and fluff the Glitter Leaf Wreath so that you can easily reach the brown wreath frame.
STEP 2
Cut about 10 pieces of craft wire that are 10"-12" long.
STEP 3
Cut approximately 16 pieces of the deco mesh. Each piece should be square, measuring about 10"x10".
STEP 4
Form the deco mesh sprays that you will eventually attach to the wreath frame. With a piece of mesh placed curl side up, pinch the very center and bunch it together. Make another and group the two together.
STEP 5
Use the craft wire to secure the deco mesh spray you created to the wreath frame, in between two branches. The mesh should be pointing in the same direction as the wreath's branches. Wrap the wire tightly and securely.
STEP 6
Repeat for each space between the branches, continuing all the way around the wreath.
STEP 7
Using the rest of the deco mesh roll, make a bow and attach it with craft wire at the bottom center of the wreath. For exact directions on how to make a bow with 10-inch deco mesh, CLICK HERE for our previous blog post tutorial on making a bow with 10" deco mesh.
Option 3: Bow and Ribbon
SUPPLIES

This version will cost about $25 in supplies from www.mardigrasoutlet.com.

First, form the bow. This bow was made the same way as the first version of the wreath, except there are 10 loops total. Tie the bow with craft wire, and pull and fluff out the loops. Cut a long tail, about  6 feet long, and attach at its center to the back of the bow.

Place the bow at the top of the wreath, and simply loop the ribbon tails all the way around the Glitter Leaf wreath.
One basic glitter leaf wreath transformed into three different wreaths.

February 13, 2012

Masquerade Mask Favor Centerpiece: Tutorial

mardi gras party favors centerpiece ideas how to make tutorial making mask masquerade
Party favors act as a memento of a celebration for guests. For a Mardi Gras or Masquerade party idea, combine mask favors and the centerpiece for a festive and impressive decoration. This whimsical Mardi Gras centerpiece uses glittery floral sprays and accents in purple, green and gold colors.

SUPPLIES
(8) Metallic Gold Domino Stick Masks - enough for your guests
Hot Glue
Scissors

All of the centerpiece supplies can be purchased at www.mardigrasoutlet.com. 

This will cost about $43 total if you use 8 masks, and not including Mardi Gras beads and doubloons. Many of these items have quantity discounts when you order over a certain number.
STEP 1: INSERT THE FLORAL FOAM
Using scissors, cut a piece of the dry floral foam brick that fits snugly inside the green centerpiece cylinder. You may want to place a weight underneath the foam brick to make the centerpiece more stable.

STEP 2: UNTIE THE PHILODENDRON SPRAY
The purple, green and gold Philodendron Leaf Bundle is held together by 2 brown wire ties. To separate the 3 leaf sprays, untwist the ties or cut the ties off.

STEP 3: ADD THE PHILODENDRON LEAVES
Trim the stick ends of the green and purple leaves by a few inches to lower and vary the height of each leaf. Insert the Philodendron Leaf sprays securely into the floral foam brick, all the way down. The gold leaf should be at the center and the green and purple leaves to either side.

STEP 4: ADD THE THREE SPIRAL CURLS SPRAYS
Again, trim the stick ends of two of the spiral curls sprays so that they are a few inches shorter. Secure and insert the three floral sprays into the foam brick so that they fill the spaces between the philodendron leaves.

STEP 5: ADD A FILLER
Gold Angel Grass Shred covers and hides the floral foam at the opening of the vase.

STEP 6: ADD MASKS
Insert the metallic gold domino stick masks into the vase opening. 8 masks were used here.

STEP 7: ADD THE FLEUR DE LIS ACCENT
Using hot glue, attach the Mardi Gras Fleur de Lis Ornament on the front and center of the green cylinder base. Trim the ornament tie off at the top.

You're Finished!

OPTIONAL
You can also scatter Mardi Gras beads and Mardi Gras doubloons around and underneath the masquerade centerpiece for additional party favors and decoration.

February 9, 2012

Paper Jester Hat Pattern: Mardi Gras Crafts for Kids

jester hat pattern template mardi gras kids crafts free
Mardi Gras paper crafts are a fun creative activity for children. This three-dimensional jester hat can be made with some colorful construction paper and this free printable template. All you will need are some scissors, a pencil and some tape or glue. See below for instructions. 

Click on the link above to download and print the Mardi Gras jester hat pattern on your printer. You will need to have a PDF reader to open it (free at this website). The hat instructions are also on the template page.

STEP 1: CUT OUT THE TEMPLATES
Print out both pages of the free download jester hat patterns. Follow the dotted line and cut-out each shape with scissors.

STEP 2: MAKE THE HEADBAND
Using the rectangular template on page 2, cut-out 3 pieces from construction paper. For this hat, you can use purple, green and gold, the colors of Mardi Gras, or any other colors you want. Tape the pieces end to end into one long head band.

STEP 3: CUT THE JESTER SPIKES
Using the triangle pattern, cut out 6-8 pieces out of different colors of construction paper. The number of triangles you need depend on head size.

STEP 4 & 5: CONSTRUCT THE HAT
Using glue or tape, secure the triangle bottoms side by side to the head band. Now, fit the headband to your head and secure with tape.

STEP 6: ADD ACCENTS
Use the circle, star and jewel templates on page 1 to cut out decorations for your jester hat. Glue or tape them to the hat. 

jester hat paper craft pattern mardi gras children's
Happy Crafting!

For more free coloring page downloads and other printables, click below:
FREE PRINTABLES

LinkWithin

Related Posts with Thumbnails