November 30, 2011

Gift Ideas: Fleur de Louisianne Products


If you're from Louisiana or have ever lived here, you know that Louisiana loves Fleur de lis. By combining two loves- the Fleur De Lis and our unique culture, Fleur de Louisianne designs created the perfect gift for Louisiana. Whether you need a present for family and friends in Louisiana, visitors to the state, or just someone who has a sweet spot for our culture, these Louisiana themed gifts are sure to please.


"Fleur de Louisianne" is a  product line of gifts, kitchen accessories and stationary that features a hand-drawn fleur de lis design filled with Louisiana and Cajun cultural words and phrases. This pretty graphic includes Louisiana words like: lagniappe, Who's ya mama?, roux, who dat, y'all, Mardi Gras, Cajun, Geaux, boudin, Louisiana,  jazz, creole, gumbo, merci and mais cher.

From the creators of "Fleur de Louisianne":
"Artist, Julie Siracusa has given the fleur de lis, the icon of Louisiana, a fresh look. Siracusa has always believed that keeping drawing alive in design keeps a human element present. By combining beautiful words that are unique to Louisiana in the shape of a fleur de lis the "Fleur de Louisianne" has come to life. Together, Julie Siracusa and Denise Landry have taken the "Fleur de Louisianne" from the drawing table to a great line of products."


The photograph at the top features the Fleur de Louisianne paper drink coastersnote cards and a gift set which includes a kitchen towel and roux spoon.


For those southern cooks out there, the Fleur de Louisianne product line also includes a platter, oven mitt and kitchen towel, as shown here.


Sculptural metal ornaments of fleur de lis and our boot-shaped state are prefect for the Christmas tree or as accents on a gift. Accent the neck of a nice bottle of wine with these pretty ornaments for two gifts in one- one to keep and one to enjoy!

Joyeaux Noel, cher!

Everything you have seen here is available at MardiGrasOutlet.com or in the links listed below:
Fleur de Louisianne Coasters
Stationary-Note Cards
Roux Spoon Gift Set
Oven Mitt
Kitchen Towel
Round Platter
Louisiana Ornament
Fleur de lis ornament
Louisianne ornament


Looking for even more Louisiana and Cajun themed gifts and party decorations? Click here!

November 27, 2011

DIY: Wire Christmas Tree Decorations


Perfect holiday decorations represents Christmas, but offer a fun twist on the traditional. These tree shaped wire Christmas trees are exactly that kind of modern and fresh decor. Inspired by the traditional Christmas tree shape, but made with modern gold toned aluminum wire- a new favorite craft product- these trees are easy and fun to make. In this post, you will learn how to quickly create these wire trees in any size and color you choose.  

Supplies:
Aluminum wire -2mm Gold shown here
Cone Shape -12" Styrofoam craft cone shown here
Wire cutters

Aluminum craft wire comes in various colors, millimeters and styles. The 2mm version we used for this wire tree is super easy to bend and cut. It is sturdy enough to hold a shape as well.

To make the wire trees, simply wrap the wire around the cone form. A standard 12" tall Styrofoam cone shape is used here. The form can be used multiple times for this project- so you will only need one cone shape for multiple trees.

Start at the bottom. Wrap the wire around the cone working toward the tip. And then back down again. Continue wrapping until you get the desired look you want for the tree. Make sure to sure to wrap the bottom in even circles so your tree will stand up once the form is removed.

Slide the wire off the top of the cone and adjust the wire/base as needed to make the tree stand up straight.

We created three trees like this-each one a different height- by wrapping just the top portion of the cone form to create the smaller trees.

The 12" tall large tree took approximately 12 yards of wire. The two smaller trees - approximately 3-4 yards each. In total we used less than 2 rolls of the 2mm gold wire, which you can purchase here. A great look for less than $8.00 worth of aluminum wire.


Good luck creating your own Holiday decorations this year! 


November 22, 2011

Free Printable Christmas Labels


New labels for the Christmas and Holiday season, free for you to download, print and use for anything and everything! Choose from a peppermint, a cheery Christmas tree, a big red bow or an adorable snowman. These modern designs are great for candy, cookie or treat labels, gift tags, gift bags, stickers, party cup or bottle labels or even scrap-booking.

You can even customize these as shown in our photos. First, click here to download the labels. Next, open the file with Adobe Acrobat (free at this website). You should see some high-lighted boxes over each label. This is where you can type in any words to personalize the labels before printing from your ink jet or laser printer. If you want to hand write on these, don't worry, the highlighted boxes won't show up when you print. The labels are just as cute left blank, too.


Print these out on card stock or sticker paper, depending on what you need them for, and cut out each label with a 2" circle cutter or with scissors. 

You can print the holiday labels out on sticker paper and place them on blank disc beads. These can be used for inexpensive party favors, stocking stuffer or Christmas ornaments. MardiGrasOutlet.com sells the blank discs and beads in many colors. The necklaces here use blank discs on green beadswhite blank discs and red and white beads.

To make the labels shown above, use toothpicks with two stickers back-to-back to attach the labels. These cuties can be used as cupcake toppers, appetizer flags or buffet signs. 


Enjoy!


November 16, 2011

Deco Mesh Christmas Tree made with a Tomato Cage: Tutorial


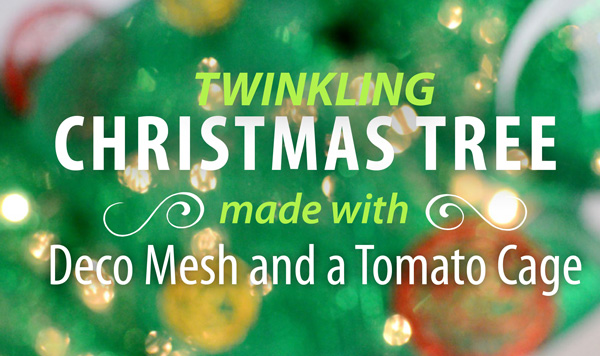
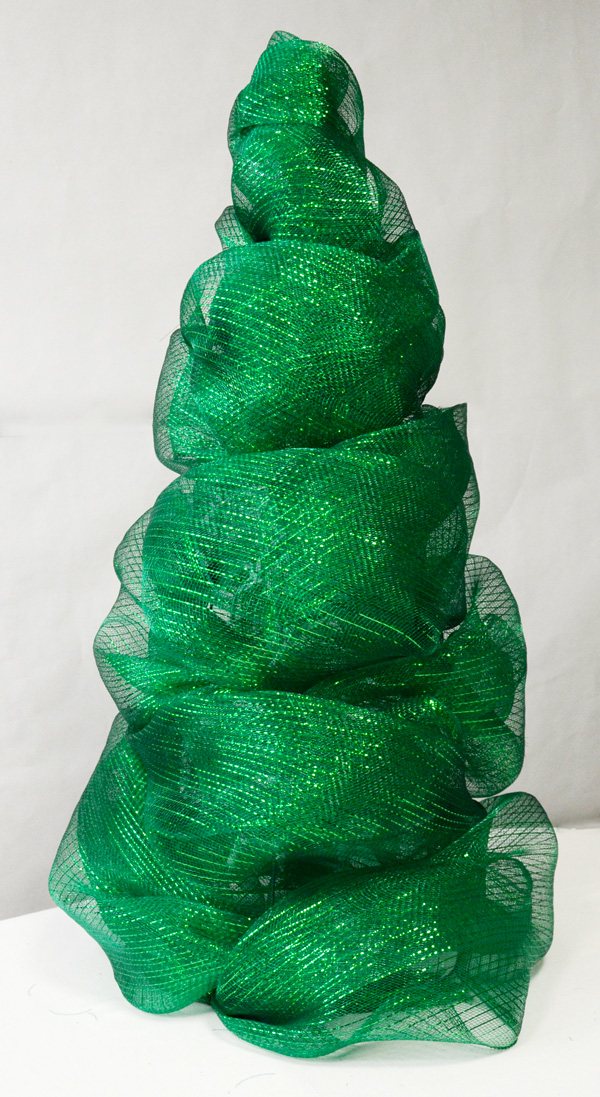
Great Christmas decorations ideally make a big impact and are inexpensive!  This cute lighted Christmas tree made with deco poly mesh and a tomato cage is both. And it's really easy to create! The tutorial below shows you how to create one with budget-friendly supplies like a simple wire tomato cage and basic green deco mesh.   At 3 feet tall, this tree makes a big statement- great for stair landings, fireplace surrounds, buffet tables, porches, front doors or  anywhere else you want a touch of Christmas cheer. You can also use it as a topiary by placing it on a planter.
deco mesh christmas tree tutorial

Deco poly mesh is a type of soft plastic netting that has a full puffy shape. It is  durable enough for the outdoors, so this Christmas tree would be a perfect way to light up an entryway or front yard. Deco mesh rolls and ribbon come in many different colors, patterns and finishes for you to choose from.

MardiGrasOutlet.com sells deco mesh and other supplies you will need for this project.
SUPPLIES:
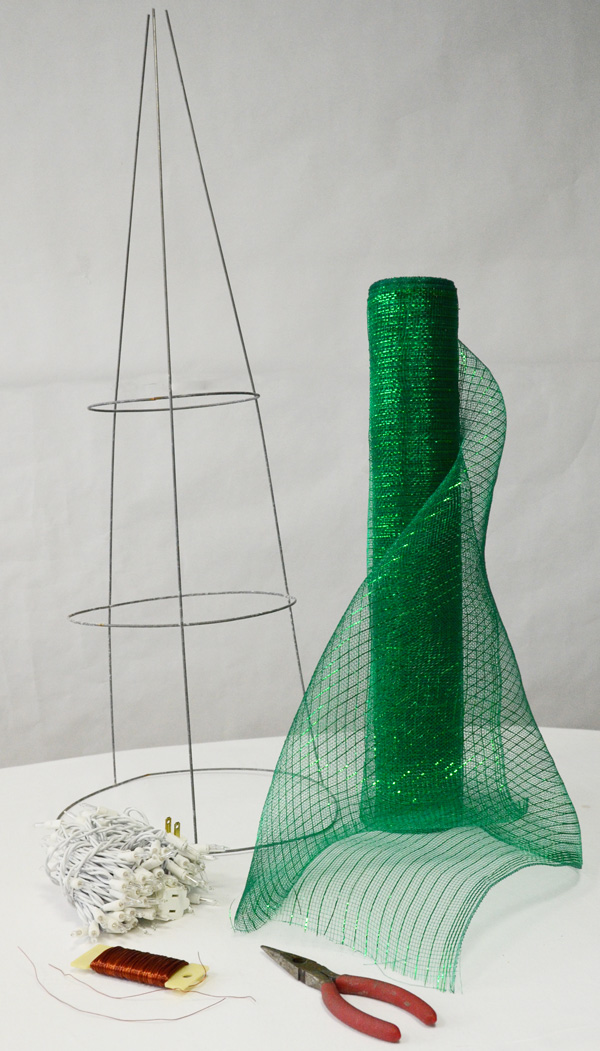
For this tree you will need:
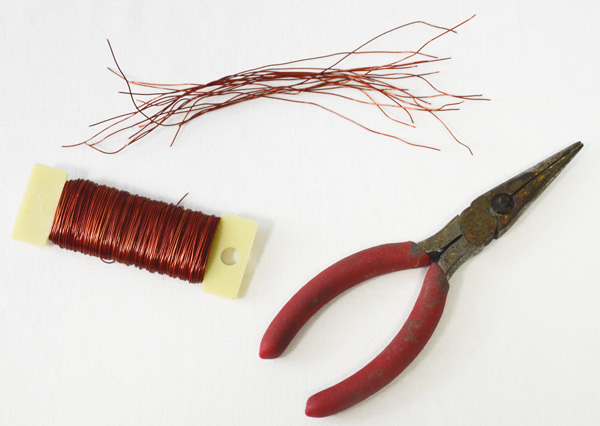
(1) Tomato cage
(1) White Christmas Lights 100-Light
Wire Cutters & Scissors

Optional
DIRECTIONS

STEP 1
Using wire cutters, cut 4"-6" lengths of craft wire. You will need around 25-30 of these to attach the white lights and the deco mesh to the tomato cage. If you are attaching ornaments, cut more wire.
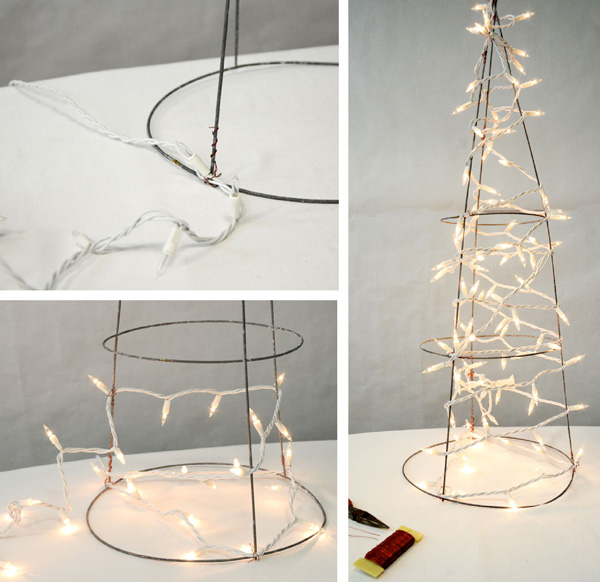

STEP 2
Start attaching the light strand to the bottom of the tomato cage. We started with the first light after the plug and twisted the craft wire around the cord and wire cage. Wrap the light cord around the tomato cage, working your way all the way up and leaving only a little slack.

Use the craft wire you cut to secure and hold up the cord. It wasn't necessary to tie craft wire every time the cord touched the tomato cage, just every once in a while.

When we reached the top of the cage, there was still a length of lights left. Simply wrap it around again
going down. Leave the plug end in the middle of the cage. The first plug should be left hanging out from the bottom, so that you can plug in your tree in later.

STEP 3
Now you can wrap the cage with the Emerald Green Deco Mesh

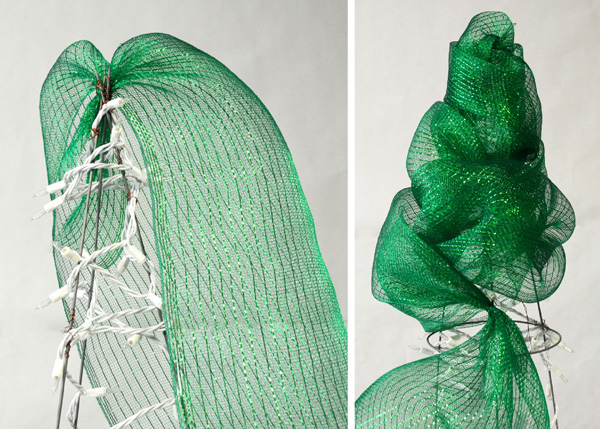
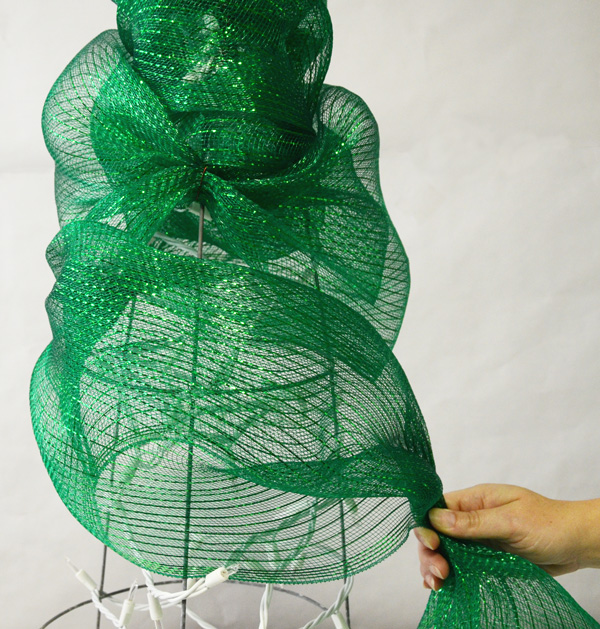
First, bunch the end of the mesh and attach to the top of the tomato cage with a piece of craft wire. Notice in the left photo how the cut end of the mesh is hidden and facing down, leaving only a nice puff for the top. Wrap the mesh around once and attach to a vertical bar.

As you bring the mesh down and around the tomato cage, bunch and attach the mesh at every other vertical bar with craft wire. It also helps to fold as you gather the mesh for better looking puffs.
Notice how each new puff hides a previous wire tie where you attached the mesh. This is why it is important to skip over the next vertical bar of the tomato cage as you go down and around.

STEP 4
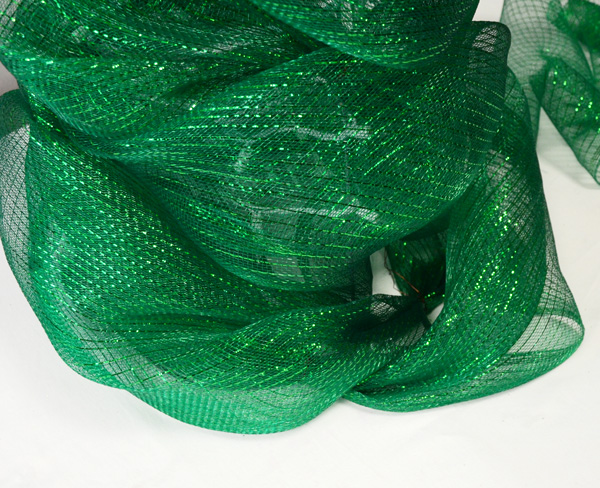
When you reach the bottom, make sure the mesh goes around and covers the cage base before you cut the mesh. This tree used one roll of deco mesh, with  a couple feet to spare. Hide the last wire tie and the end of the mesh behind a puff. Your Christmas tree should look like this!
                                             
                                                                                                   MAKING A BOW

STEP 5: Ornaments
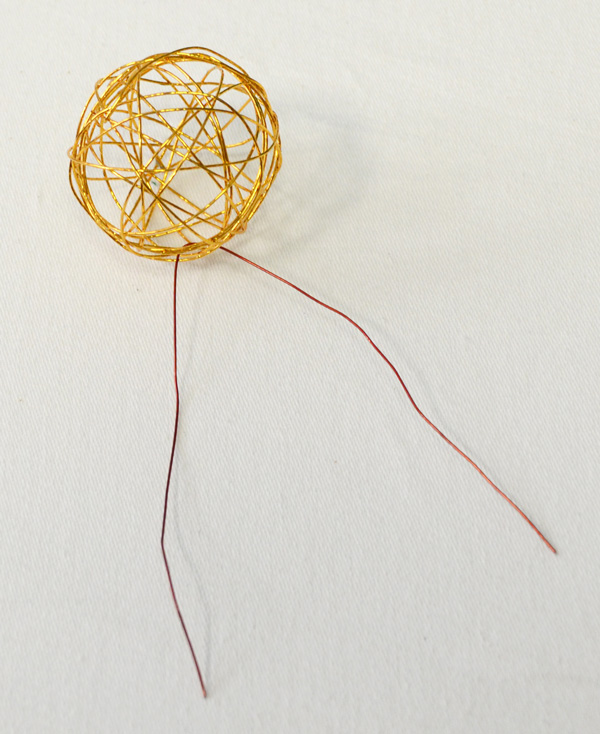
To spice up the plain green Christmas tree, we added gold and red decorative wire ball ornaments. Click here for more colors of wire balls. To attach them, take a piece of craft wire and loop it through a section of the wire ball. Twist the craft wire and then attach the ornament to the tomato cage or mesh. You can also use  hot glue to adhere ornaments that can not be wired on.
deco mesh christmas tree ideas how to

The tree was topped off with a bow made of 4" Metallic White Iridescent Ribbon. See our previous post, Making a Bow, for directions on how to make this pretty Christmas Bow. That tutorial uses 10" wide deco mesh, but works the same for 4" wide ribbon. 

Deco Mesh Christmas Tree - lights turned off


For the full list of video tutorials on  making deco mesh wreaths, garland and more, click here.

For more craft and deco mesh ideas, click here.


November 12, 2011

Gift Wrap Ideas with Deco Mesh: Video Tutorial


Need a fabulous way to create unique gift wrap for the holidays? Deco mesh is the answer! Below is a video tutorial showing how to use poly deco mesh for festive wine bottle packaging. In a few minutes, you can create a professional, designer inspired gift wrap. The same technique shown in the video can be used to wrap other types of gifts, vases and containers.

A festively wrapped wine bottle complete with Fleur de Lis wine stopper is the perfect hostess gift for Christmas, as well as birthdays, congratulations, housewarming or wedding. All you have to do is choose different colors of deco mesh to customize this gift wrap idea for your event.

Poly Deco Mesh is a type of colored plastic netting that holds its shape. Mesh comes in a wide range of colors, sizes and finishes. It can be used for a large range of creative projects, from creating wreaths and garland to trimming your tree.  For this Christmas bottle wrap, you will need:


SUPPLIES:
21 inch Red and Lime Plaid roll of Deco Poly Mesh
Lime Deco Flex Tubing Ribbon.
optional: Fleur de Lis Wine Stopper
Bottle of wine of your choice

This video shows you how to use the natural curl in deco mesh to package a wine bottle, and also to make a bow out of Deco Flex Tubing Ribbon. Use this bow to secure the wrap around the bottle.


Pictured below is a different version using the same technique, but for a small gift box.

The gift wrap shown above uses:
21" Deluxe Metallic Stripe Mardi Gras deco mesh
Purple Deco Flex Tubing Ribbon

For a complete selection of optional colors in decorative mesh and deco flex tubing ribbon, 

To view our complete list of video tutorials, other deco mesh creations and do-it-yourself Christmas decorating ideas, see the Mardi Gras Outlet Channel on YouTube.

November 7, 2011

Free Printable Labels for Thanksgiving and Fall


Who doesn't love a polka-dot turkey?

It's fall and Thanksgiving is coming up soon. This time of year if full of celebrations and festive events. To help out with all these parties, we've designed a collection of modern labels and stickers - available to you as a free download. The styles include a fall leaf, a bright pumpkin, a fall  pattern and a funky turkey. All of these are designed to leave room  in the center for you to personalize them for your party or event.


Want to personalize your labels? No need to write on each label, simply open the file in Adobe Acrobat Reader to type in what you want on each column of labels. You will see highlighted boxes on the label showing you where to click and type before you print. Don't have Acrobat Reader? You can download it for free here.

Print this paper out onto 8.5" x 11" sticker paper or thick card stock, and cut out each circular design with a 2" circle cutter, or if you're really good, some scissors.

Use these designs for bottle labels, candy packaging, cupcake toppers, food/buffet signs, dessert flags, scrapbook pages, disc beads or anything else you find a need for. They also could be good for plastic cup labels, so party guests will know which cup is theirs. Just give them a marker to personalize their cup or wine glass!


The 2" size of these stickers fits perfectly onto blank disc beads, which you can purchase  hereGold beads come with pre-attached white blank discs.  The orange and burgundy  fall colored beads can be purchased separately from the white blank discs. Don't worry, a dozen complete necklaces is only around $4. Create one-of-a-kind party favors to hand out or throw in your local thanksgiving day parade! Inexpensive and original! You can also leave the stickers blank and let the kids write on them. 


These printable Thanksgiving designs are also really easy to turn into food labels. Simply stick two stickers back to back over the top of a toothpick. Use these as cupcake toppers, candy bar signs, dessert picks or appetizer and buffet signs for Thanksgiving dinner.

Enjoy!


November 3, 2011

DIY Photo Booth Ideas


A great new trend for parties is DIY photo booths. These can be so much fun for your guests and will make your event fun and memorable. Wacky props, a fun backdrop and someone to photograph the fun are all you need.  Here are some ideas and tips for creating an entertaining photo booth. 
The Backdrop can be as simple or complex as you make it. The important thing to keep in mind is to choose something that works with the theme of your party.

Here is an easy polka dot backdrop for a children's birthday party.


The easiest way to create a background is to get a large cloth or sheet. If your party is outside, hang it from a clothesline, and just attach the top to a large wall if indoors.

For instant Mardi Gras atmosphere, check out these options:  Harlequin pattern backdrop,  a gigantic Mardi Gras Flag or striped Mardi Gras fabric.

The backdrop pictured in the photos below is sparkly metallic floral sheeting or petal paper. Floral sheeting is sparkling three-dimensional vinyl or metallic paper that comes on rolls. For optional styles and colors, click here. This would be great for a red-carpet type event.


The Ruffled Blog has directions on how to create this standing photo booth wall, complete with wallpaper and a frame cut-through. Click here for details.

  Props will bring out the zany side in your guests, and are a great way to add something unique to every photo. From feather boas to funny eye glasses, your guests will love playing dress up for the camera. Here are some fun options.


Held Props
Old photo frames and chalkboards are perfect props for photos. Unique chalkboards are also easy to make. Miss Fancy Pants Blog uses an old frame and chalkboard paint. Guests can write personal messages -perfect for brithday parties, weddings and showers.

Photography- there are high and low tech options.
Mac laptops have a Photobooth program. Or just use a simple digital camera and a small photo printer.  
Tips for fantastic photos:
  1. Fill the frame - this means that it is okay to crop in and not show an entire face or person. Filling the frame will make the photos more artistic and fun.
  2. Good lighting - natural lighting outdoors is best, but if your photo booth is indoors, have lights shining into the booth from the sides. 
  3. Have fun and encourage your guests to use the props and interact with you and the camera!  

Don't forget a great sign! A sign with instructions lets your guests know what to do and where to go for the fun.
For even more photo booth ideas and themes, check out our Pinterest photo booth idea board at:

LinkWithin

Related Posts with Thumbnails