Showing posts with label How to / Tutorials. Show all posts

July 4, 2013

Patriotic Deco Mesh Firecracker with Tinsel Stars: A Work Rail Tutorial

Patriotic Fire Cracker Deco Mesh Wreath | Red, White, and Blue- Tutorial by MardiGrasOutlet.com

Happy Fourth of July, America!    To celebrate this special day we've created a Red, White, and Blue Fire Cracker out of red Deco Mesh on the brand new work rail form. What a great way to  display our American spirit and Patriotism.  We hope you are having a great day!
Patriotic Fire Cracker Deco Mesh Wreath | Red, White, and Blue- Tutorial by MardiGrasOutlet.com


SUPPLIES:
To purchase these products from www.mardigrasoutlet.com, click on the individual product link below or click HERE for page listing of all products.

21" Poly Mesh Roll: Metallic Red
Scissors/and or Wire Cutters


For more dynamite deco mesh colors, click here for a link to our full range of patriotic craft supply and mesh.

COST/TIME:
This project takes approximately 30-45 minutes, start to finish. The total cost of supplies for this decoration is about $26. There will be product left over for each material, approximately 1/2 of the deco mesh roll, aluminum wire, and tinsel roping.

DIY Deco Mesh Firecracker Wreath

Step 1- Fluff the Wreath

You will first need to fluff out your wreath form, this will make it quicker and easier to place the mesh between the wire ties.

Step 2- Place the Mesh in between a Wire Tie

Leave about 6-8 inches of extra mesh, and secure it into a wire tie by twisting the two ends of tinsel together.

Step 3- Form a Mesh "Poof"

You will need about 12-15" of Mesh in between tinsel ties.  Be sure to gather the mesh between your hands without bunching, which can cause wrinkles in the mesh.


Step 4- Fill the Wreath Form

Beginning in one corner of the Rail Wreath Form, fill each wire tie with mesh by going across the form, inserting mesh and secure it, and then going back across to the opposite side.


Step 5- Trim

After you have filled the Wreath Form with Mesh, leave about 6-8 inches of mesh and trim from the role.  Tuck the mesh tail into another wire tie or behind the wreath form.

Deco Mesh, Rail Work Form, Patriotic, How To, Red White and Blue

Step 6- Fluff!

Now that the rail wreath form is full of mesh, you will need to fluff the mesh, fold the tinsel ties in towards the wire base, and tuck the tail of mesh into a tie or behind a poof of mesh.


How to Make a Tinsel Star | Tutorial by MardiGrasOutlet.com

Adding accents to the Rail Work Wreath is so easy.  You can weave them into the back, attach them with wire, or use the pre-attached tinsel ties.  The directions above show you how to make a star that will have five even sides every time. 

Upcycle Mardi Gras Beads into Patriotic Crafts- DIY Tutorial

Making a Patriotic Pick

We used a Red, White, and Blue Mardi Gras Bead with graduated bead sizes to create an inexpensive floral pic.  Simply cut the beads from the string, and insert them onto a heavy gauged craft wire, (available in many colors by clicking here).

Add Accents!

Patriotic Wreath Tutorial- DIY Deco Mesh by MardiGrasOutlet.com

Weave the patriotic floral pick between the bars of the rail wreath form, and secure to the top of the wreath form using a 3-5 inch piece of tinsel roping.  Repeat the process with other sparkly accessories, making sure to secure them all the tightly from the top-center of the wreath form.

Patriotic Fire Cracker Deco Mesh Wreath | Red, White, and Blue- Tutorial by MardiGrasOutlet.com
The Completed Deco Mesh Fire Cracker!

Patriotic Fire Cracker Deco Mesh Wreath | Red, White, and Blue- Tutorial by MardiGrasOutlet.com
We love the explosion of glitter and sparkle from the "fuse" at the top of the fire cracker!

Patriotic Fire Cracker Deco Mesh Wreath | Red, White, and Blue- Tutorial by MardiGrasOutlet.com
Deco Mesh is waterproof, so even if your holiday is rained out, your decoration won't be!

Patriotic Fire Cracker Deco Mesh Wreath | Red, White, and Blue- Tutorial by MardiGrasOutlet.com
Happy Fourth of July!  And Happy Crafting!


June 30, 2013

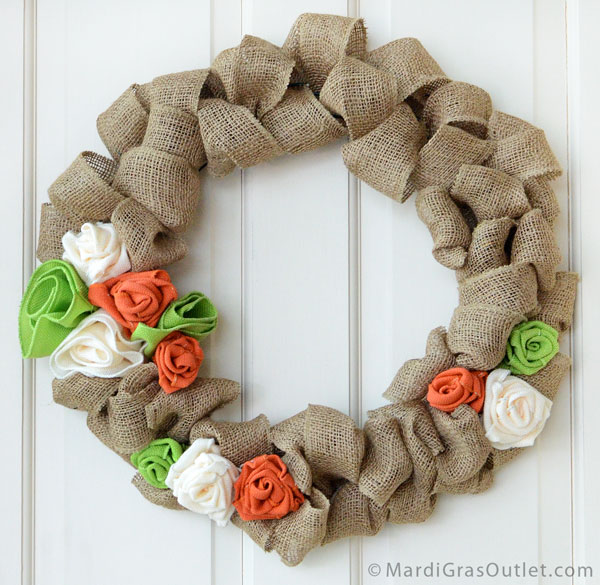
DIY Burlap Bubble Wreath with Ribbon Rosettes

DIY Burlap Wreath: Tutorial with Ribbon for Natural Fall Decor | MardiGrasOutlet.com

Great texture, easy to use and inexpensive...all of these traits make natural, woven burlap a popular craft choice right now! A bubble burlap wreath  is an easy do it your self project using this versatile fabric. The natural 4" wide jute burlap ribbon used in this wreath project easily transitions from summer decoration to fall with the addition of harvest colored flowers (roses and rosettes). The complete tutorial is below with directions for not only the wreath, but also the precious rose accents.

Supplies for a DIY Burlap Burlap Wreath from  MardiGrasOutlet.com

SUPPLIES:   To purchase these products from www.MardiGrasOutlet.com, click on the individual product link below or click HERE to see a complete supply list.

COST/TIME
The cost to create this basic burlap wreath with a single color of ribbon roses is just $20.  A full roll of 10 yard burlap ribbon is needed to fill the wreath form.  The wreath took about 30 minutes to make, and the ribbon roses took an additional 30-45 minutes.
How to attach burlap to the wreath from
Step 1- Attach Ribbon to Wreath Form
Fold the burlap ribbon in half.  Then attach to the outside of your wreath form.  You can either weave a piece of floral wire through your ribbon layers and attach the burlap by twisting the wire around the outer ring, or you can simply tie a knot in the ribbon around the wreath form.

Step Two: DIY Burlap Wreath | MardiGrasOutlet.com
Step 2- Weave the Ribbon
Begin to weave the ribbon through the wire wreath form.  To make the weaving easier, we cut our ribbon role down from 10 yards, to 4 lengths of 2.5 yards each.  Weave the end from the outside towards the inside.  Do not pull the ribbon tight, leave a small poof of burlap to create the "bubble".


Step 3: DIY Burlap Wreath | MardiGrasOutlet.com
Step 3
Weave back towards the center and again over to the right hand side, making sure that there is extra ribbon pulled upwards to create each bubble and that the ribbon stays folded in half.


Step 4: DIY Burlap Wreath from MardiGrasOutlet.com
Step 4- Weaving
Weave above the inner ring, through the center, and then below the outer ring of the wreath form.  Follow the arrows on the photo above.


Step 5: Continue weaving the ribbon on the burlap wreath | MardiGrasOutlet.com
Step 5- Continue Weaving
Each 2.5 yard length of burlap ribbon should go a little less than 1/4 of the way around the wreath form.  Keep the loops as close together as possible without bunching, their rough texture will keep the loops in place.  The loops do not need to be of a uniform size, and if you've made a mistake in weaving, once you fluff the wreath those areas will become nearly invisible.


Attach the burlap rosette-Burlap Wreath tutorial by MardiGrasOutlet.com
Step 6- Add in Flowers
When you have made it to the end of the burlap ribbon, attach it to the work wreath by either tying a knot or wiring it the form as outlined in step 1.  There should be a gap of about 4-6 inches between the beginning and end of the burlap sections where the wire wreath form is exposed.  Here you can attach accessories, floral sprays, or ribbon and bows.  We'll show you in the next few steps how to create roses out of burlap that will fill the space easily.

Creating Burlap Ribbon Roses | MardiGrasOutlet.com

Step 7- Making Burlap Roses
  1. Cut a length of wired ribbon that is between 20 and 28 inches, (a longer ribbon makes a larger rose).
  2. Pull the wire out from one side of the ribbon.
  3. On the other side of the ribbon pull the wire out very slightly, less than a half of an inch, and fold it over, (this keeps the ribbon from slipping off of the wire in the next step).
  4. At the opposite end, carefully pull the wire out so that the ribbon begins to ruffle.  Now your ribbon should be bunched towards to the end of the folded over wire.
  5. Grasping the wired side of the ribbon, hold the base of your flower while rolling it up.  
  6. Once you have made a roll of ribbon, you can glue to secure, or simply cut an 8 inch piece of floral wire, and insert it through the base of the rose directly above the ribbon's wire.  Make sure to draw the floral wire through all the layers of the ribbon.
  7. Twist the wire ends together securely at the base.  Voila!  Now repeat the process to make many roses!  This technique will make a larger, more voluminous rose.
DIY Ribbon Rosettes with Burlap Ribbon | MardiGrasOutlet.com

Back view of the burlap ribbon wreath | MardiGrasOutlet.com

This is the how the back of your wreath should look.

Fluffing the burlap loops on the ribbon wreath | MardiGrasOutlet.com

Forming Bubbles- 
When you've finished constructing the wreath and adding flowers, the burlap will need to be fluffed.  Pull the ribbon outwards so that it is no longer in half.  
Natural  Burlap Wreath with burlap rose accents  | MardiGrasOutlet.com
This burlap wreath can easily translate from season to season. Use this method to create decorations for patriotic, rustic summer and natural fall harvest styles.

DIY Burlap Ribbon Wreath: Tutorial  | MardiGrasOutlet.com

Burlap Ribbon Wreath- Perfect for Fall Decor! | MardiGrasOutlet.com

Check out our upcoming post on how to make this ruffle style bow with 10" wide burlap ribbon.


June 10, 2013

Chevron Pattern Stencil: Free Printable

Printable Chevron Pattern Stencil and Ombre Tutorial by MardiGrasOutlet.com

We love chevron stripes! This new printable stencil allows us to add this fun zigzag pattern to any surface we want. Just imagine the possibilities!  Paint fabric, ribbon, table runners, gift bags, walls,  letters or any thing you can imagine using this easy stencil. Keep reading to see how easy it is to use this Chevron patterned stencil. We updated our plain burlap bunting banner with a chevron pattern and customized plain wooden decorative letters with a ombre chevron pattern. 

Chevron Stencil Tutorial:
Free Printable Chevron Pattern PDF

CHEVRON PATTERN PRINTABLE 


STEP 1: Download and Print Chevron Stencil
Click the link above to download the free printable Chevron Pattern stencil. You will need a PDF reader to open this file.(Click HERE for a free PDF reader from Adobe) 

Print out the page, using your desktop home printer or bring the file to a copy or print center. You can print them using regular copy paper or card-stock paper, which may create a better stencil.

For our Chevron Stripe project, we are going to make a no-sew burlap pennant banner with an ombre painted pattern.  For directions on how to make the banner, please see our previous post, DIY Burlap Pennant Banner.

Step Two- Free Printable Chevron Stencil Tutorial by MardiGrasOutlet.com
Step 2
After you have printed out a copy of the chevron pattern, place it underneath one of the burlap flags and make an outline with a dark marker.

Step Three- Free Printable Chevron Stencil Tutorial by MardiGrasOutlet.com
Step 3
With a small craft blade, cut out your stencil.  Be sure to have cardboard or a self-healing mat beneath the paper to keep your crafting area free from scratches.  Using the outline as a guide, cut out the stripes so that they reach out a little further than your marker lines.  Cut out the black stripes to create thin lines, and cut out the white stripes to create thick lines.

Step Four- Free Printable Chevron Pattern Stencil Tutorial by MardiGrasOutlet.com
Step 4
Once you have cut out all the stripes, place the stencil on top of your flag. Before you begin painting, make sure you have something underneath your flag and stencil to prevent paint from leaking through onto other surfaces.

Painting the Chevron Pattern Stencil - Tutorial  by MardiGrasOutlet.com

Step 5
Apply color!  You can either paint all of your stripes the same color or use an ombre effect (see below for a how to create an ombre color palatte).  Be sure to push down on the stencil or tape it to your surface of the burlap so you do not get paint under the stencil.  
 
If you are using solid colors, you can make each flag a different color or use spray paint to make the painting process even faster. Allow the paint to dry before hanging.
Completed Burlap Chevron Patterned Bunting- Tutorial by MardiGrasOutlet.com
 
 
Chevron Pattern Burlap Bunting using a free printable stencil from MardiGrasOutlet.com
Perfect for indoor parties and backyard gatherings, the basic burlap pennant banner is versatile and easy to personalize!  
 
Chevron pattern ombre stencil on decorative letters by MardiGrasOutlet.com
Here we used the same technique to paint a chevron pattern on our wooden decorative letters.  We used varying degrees of color, a technique called ombre. Using the chevron stencil, start off at the top zigzag stripe with the darkest color and move down to the lightest tint.
 
How to make an ombre color palette- Chevron Stencil Tutorial by MardiGrasOutlet.com
Ombre Effect: 
To create varying tints of paint, we used only two colors, one main color and white.  On your paint mixing surface, create 3 areas of your main paint and one of white.  Add a few drops of white to two of the paint dollops, one with a few more drops to create a lighter color and one with less.  Add just a tint of color to your white paint dollop and then you have created 4 shades of color in varying degrees, from dark with no white added to a light hue.

For more styles of decorative letters and numbers to paint, click here.

Custom painted decorative letters with ombre chevron pattern using free stencil from MardiGrasOutlet.com
Are you as in love with the chevron stripe trend as we are?  What are you going to paint with this Chevron Stencil Pattern?


May 31, 2013

Flip Flop Ruffled Ribbon Wreath For Summer: New Deco Mesh Tutorial

Deco Mesh DIY: Make a Ruffled Flip Flop Wreath for Summer

Who can resist a cute pair of hot pink flip flops?  We can't!  We love all the hot neon colors showing up on everything from decor, to fashion and crafts!  Why not combine them all by creating a bright summery deco mesh wreath that incorporates our favorite hues and our favorite summer flip flops? So here is our Summer inspired Flip Flop Deco Mesh Wreath! 

The DIY tutorial below features a brand new ruffled ribbon technique for filling a work wreath. This new look is not only easy to do, but also uses the smaller (an less expensive) 10" wide mesh rolls. This technique makes it very easy to add in multiple colors of mesh, different patterns of ribbon or fun textures of rope or wire  (like the glitzy sticks we used).

Ruffled Ribbon Wreath Tutorial

Deco Mesh DIY: Make a Ruffled Flip Flop Wreath for Summer

SUPPLIES

Optional Supplies for Wreath Accents

COST/TIME


The cost of the supplies for a 1 color wreath is just under $30.  We used about 1and 2/3 rolls of 10" mesh with some left over for additional projects.  The entire wreath took about 45 minutes to create.  If you are interested in creating a ruffle wreath out of multiple mesh colors, a wide array of 10" mesh patterns and colors is available here.


Deco Mesh DIY: Make a Ruffled Flip Flop Wreath for Summer

Step 1
An important first step is to arrange and straighten the pairs of tinsel ties on your work wreath form as shown here.


Deco Mesh DIY: Make a Ruffled Flip Flop Wreath for Summer


Step 2
Measure off and cute 20 inches pieces of Deco Mesh from the 10" wide mesh roll.  You will need to cut 26 pieces of mesh to fill the form, which uses a little less than 2 rolls.


Deco Mesh DIY: Make a Ruffled Flip Flop Wreath for Summer

Step 3
If you are using more than 1 color of mesh, you still only need a total of 26 pieces of mesh for a 15" work wreath.  One piece of mesh will go into every pair of ties on the outside ring of the wreath, and 2 pieces will go into every pair of ties on the inside ring of the wreath.


How to make Ruffles out of Deco Mesh: MardiGrasOutlet.com
Step 4- Making Ruffles
When you are making Ruffles you are essentially creating a pinch pleat.  Unroll one of the 20" lengths of mesh, then pinch and pull it towards you using your fingers.  Keep the entire piece pinched firmly until you get to the end, and holding it at the center, place into a set of ties on the wreath form.


Deco Mesh DIY: Make a Ruffled Flip Flop Wreath for Summer
Step 5- Add Ruffles
Place your ruffles in the tinsel wreath form beginning with the outside ring.  Once you have place a ruffle in between a set of tinsel ties, twist the ties tightly together twice to secure.  In the outside ring you should add one ruffle for every set of ties.


Deco Mesh DIY: Make a Ruffled Flip Flop Wreath for Summer
Step 6
 Continue adding ruffles around the wreath form.


Deco Mesh DIY: Make a Ruffled Flip Flop Wreath for Summer
Step 7
Fill in the outside ring before moving to the center ring.


Deco Mesh DIY: Make a Ruffled Flip Flop Wreath for Summer

Step 8- Add Ruffles to the Center

The tinsel ties located in inner ring of the work wreath should have 2 ruffles each.  This will make your wreath look much more full.  In the photo above, we used a different color mesh so that the process of stacking the ruffles was easier to see.


Deco Mesh DIY: Make a Ruffled Flip Flop Wreath for Summer
Step 9- Add Another Layer Of Ruffles
Add a second ruffle directly on top of the the others in the inner ring of the work wreath only. Use the tinsel ties to wrap over the top of the ruffle and twist the two ends together to secure.
Deco Mesh DIY: Make a Ruffled Flip Flop Wreath for Summer
Our completed ruffled ribbon wreath.
Now it is time to add themed summer accents.


Deco Mesh DIY: How to Wire Flip Flops to add them to Wreaths and Crafts
It's easy to add flip-flops and other summer accents to work wreaths!  You simply wire them in using the tinsel ties.For each flip-flop we twisted a 9" piece of floral wire around the bottom of the toe strap.  We then used the floral wire to attach to a tinsel tie.

Here is how we made fun faux burlap ribbon tucks to add an additional burst of color on the wreath!

Step-by-Step Tutorial on how to make a Bow Tuck for Wreaths and Decor: MardiGrasOutlet.com

 
If you are adding bow tucks into a work wreath, then you do not have to follow step 3- securing the tuck with floral wire.  You will be able to add the ribbon tuck directly into the wreath by attaching them between a pair of tinsel ties and then twisting the ends of the ties together.


Deco Mesh DIY: Make a Ruffled Flip Flop Wreath for Summer
The Deco Mesh Ruffle Wreath with fun pink flip flops!

Deco Mesh DIY: Make a Ruffled Flip Flop Wreath for Summer, with Glitzy Sticks!

A second version of this ruffle wreath shows added sparkle and color with orange Glitzy Sticks!  Glitzy Sticks are bendable, metallic sparkly wires that come in a large array of colors to match any craft or floral project.  To match our Lime, Fuchsia, and Orange Deco Mesh we choose the Copper Glitzy Sticks which look orange.


Deco Mesh DIY: Make a Ruffled Flip Flop Wreath for Summer, with Butterflies!

Butterfly Beauties. We also really loved the way our summer wreath looked with brightly colored feather butterflies.   This botanical style would look beautiful on a garden gate.

Deco Mesh DIY: Make a Ruffled Flip Flop Wreath for Summer, with Butterflies!
Feather Butterfly Accents


Deco Mesh DIY: Make a Ruffled Flip Flop Wreath for Summer


The great thing about these work wreath forms is your design options are infinitely changeable. Getting tired of the flip flop wreath? Switch those out for butterflies, or glitzy sticks or flowers. What will you create for your summer wreath?


LinkWithin

Related Posts with Thumbnails