June 25, 2012

Dynamite Deco Mesh Firecrackers: Tutorial

Deco Mesh, Centerpiece, Tutorials, Patriotic, Red White and Blue, Wreaths, Deco Mesh Wreath, How To

Create dynamite decorations for your Fourth of July party with these precious faux firecrackers! Our Deco Mesh Firecrackers are a fun and easy to make. Use them as a festive Fourth of July door decoration or centerpiece for a summer soiree! They can be made out of metallic, solid, or striped Deco Mesh. Add a weight to them to hold down table clothes or fill with candy to become a fun party favor. Follow the DIY Tutorial below for simple step-by-step instructions.

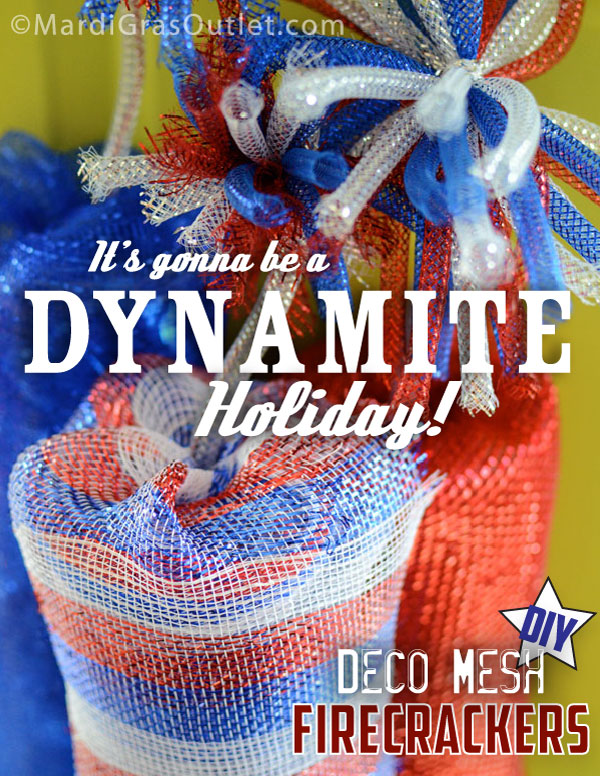
Deco Mesh firecrackers as door decorations. 
We love the pop of red, white and blue against the bright green door!
Deco Mesh, Centerpiece, Tutorials, Patriotic, Red White and Blue, Wreaths, Deco Mesh Wreath, How To

SUPPLIES:
To purchase these products from www.mardigrasoutlet.com, click on the individual product link below or click HERE for page listing of all products.

21" Poly Mesh Roll: Deluxe Wide Foil Red  
21" Poly Mesh Roll: Metallic Royal Blue
21" Poly Mesh Roll: RWB Stripe
Aluminum Craft Wire 2MM: Red (13 Yards)
Deco Flex Tubing Ribbon: White w/ Silver (30 Yards)
Deco Flex Tubing Ribbon: Metallic Blue (30 Yards)
Deco Flex Tubing Ribbon: Metallic Red (30 Yards)
Clear Cylinder Box (4.25"wide by 13" tall)
Scissors
Clear Tape

For more dynamite deco mesh colors, here is a link to our full range of colors of mesh.

COST/TIME:
This project takes approximately 1-2 hours, start to finish. The estimated total cost of supplies for this decoration is about $35-$40 depending on the mesh style. Using a single mesh color choice instead of three will lower the cost.  There will be product left over for each material, approximately 3/4 of a roll of each mesh color used, and much of the Deco Flex Tubing Ribbon.
Deco Mesh, Centerpiece, Tutorials, Patriotic, Red White and Blue, Wreaths, Deco Mesh Wreath, How To

Step 1

Cut X's in the middle of each of the two end caps of the clear cylinder.  This spot is where you will eventually tuck in the Deco Mesh.

Deco Mesh, Centerpiece, Tutorials, Patriotic, Red White and Blue, Wreaths, Deco Mesh Wreath, How To
 

Step 2

The clear cylinders come in 13" tall lengths and can be trimmed to any size with  scissors.  For our projects  both as a wreath and as a centerpiece, we used 3 cylinders; the first we kept at 13 inches, the second we trimmed to 10 inches, and the last we cut down to 7 inches.  After trimming to the desired length, put the caps onto the cylinders and tape to secure.

Deco Mesh, Centerpiece, Tutorials, Patriotic, Red White and Blue, Wreaths, Deco Mesh Wreath, How To

  Cut Wires

Cut three pieces of red or silver aluminum wire. Each aluminum wire should be about 10  inches longer than the cylinder heights. Our wires were approximately 23", 20" and 17" each.  You will need extra wire length both for the base of the cylinder and for the "spark" at the end.

Deco Mesh, Centerpiece, Tutorials, Patriotic, Red White and Blue, Wreaths, Deco Mesh Wreath, How To

Step 3

If you are using a sheer mesh, you will want to fill the clear container. When using a more opaque wrap, you can skip this step.  We filled our cylinders with a matching foil, available here in blue or in other colors at www.mardigrasoutlet.com. If you are using the firecrackers as a centerpiece we also recommend adding a weight at bottom, like these.  If  you plan on giving your firecrackers away as party favors, they can be filled with your favorite candy or party favors!

Deco Mesh, Centerpiece, Tutorials, Patriotic, Red White and Blue, Wreaths, Deco Mesh Wreath, How To

Step 4

Tape the Deco Mesh down to the center of the clear cylinder so that there is an equal amount of mesh on both sides, and roll it tightly. You want approximately 2 layers of Deco Mesh over the cylinder.  Cut the Deco Mesh and tuck the ends it into the base (bottom) end first.

Deco Mesh, Centerpiece, Tutorials, Patriotic, Red White and Blue, Wreaths, Deco Mesh Wreath, How To

Step 5

Insert the aluminum craft wire through the X in the bottom and make a 1.5"-3" coil at one end so that the wire will not pull completely through.  Push the wire through the container, working around your filler. Leave a straight portion of the wire coming out the top X for the fuse. Next tuck the Deco Mesh into the X cut into the top of the cylinder.

Deco Mesh, Centerpiece, Tutorials, Patriotic, Red White and Blue, Wreaths, Deco Mesh Wreath, How To

Step 6

Cut "fuses" from the  silver Deco Flex Tubing Ribbon that are at least 7 inches long.  Place it over the exposed aluminum wire at the top and tuck 1 inch or more into the X on the  cylinder top.

ADD SOME "SPARK"

Deco Mesh, Centerpiece, Tutorials, Patriotic, Red White and Blue, Wreaths, Deco Mesh Wreath, How To

Make Sparks-

Cut approximately twenty pieces of blue and red Deco Flex Tubing Ribbon - 5 or 6 inch in length per "spark". Tie them together at the center with a piece of flex tubing. They don't need to be even lengths. You can trim them after you've attached it to the firecracker.  Twist the end of the silver wire fuse around the center of your spark. leaving the excess fuse pointing upwards.

Deco Mesh, Centerpiece, Tutorials, Patriotic, Red White and Blue, Wreaths, Deco Mesh Wreath, How To

Repeat the process for each firecracker with your chosen color.

AND LASTLY, HANG!

Deco Mesh, Centerpiece, Tutorials, Patriotic, Red White and Blue, Wreaths, Deco Mesh Wreath, How To

If you created multiple firecrackers, you can twist them together at the top from the excess fuse lengths before hanging as a wreath.

FIREWORKS AS A PARTY CENTERPIECE...

Deco Mesh, Centerpiece, Tutorials, Patriotic, Red White and Blue, Wreaths, Deco Mesh Wreath, How To

We've used our large firecrackers here in a table setting.  
Deco Mesh, Centerpiece, Tutorials, Patriotic, Red White and Blue, Wreaths, Deco Mesh Wreath, How To

For a table runner we used Blue Crinkle Sheer, available in many colors! 


Deco Mesh, Centerpiece, Tutorials, Patriotic, Red White and Blue, Wreaths, Deco Mesh Wreath, How To


Hurricane cocktails made with New Orleans own signature Pat O' Brien's Hurricane drink mix round out the party. Topped with oranges, cherries, red and blue drink umbrellas and foil party picks the Hurricane glasses look refreshing and patriotic!

Deco Mesh, Centerpiece, Tutorials, Patriotic, Red White and Blue, Wreaths, Deco Mesh Wreath, How To

These indoor fireworks are the perfect Deco Mesh decoration for your Memorial Day, Fourth of July Celebration, or Birthday Party for your Independence Day Baby!

Have a DYNAMITE Fourth of July!

June 20, 2012

Summer Watermelon Wreath Tutorial

Deco Mesh, Watermelon, Wreath, Tutorial, DIY, Summer, Spring, Wreath, How to

Watermelon and summer go hand in hand. To celebrate the arrival of summer, we've created a great Deco Mesh Watermelon that is far from your traditional wreath. Its a perfect summer decoration for doors, porches, or for your next backyard BBQ. The Great Deco Mesh Watermelon tutorial gives step by step directions for this DIY project including how to make your own custom shape wreath form! Keep reading for all the details.
Deco Mesh, Watermelon, Wreath, Tutorial, DIY, Summer, Spring, Wreath, How to
Completed Mesh Watermelon

The size of the watermelon is easily controlled by the wire frame that you will make. Customize it to your space by making the frame larger or smaller. Our custom form is approximately 12" tall by 22' wide. The Deco Poly Mesh used to fill the form will extend beyond the wire form, making the final watermelon large- 18" tall by 30" wide.
Deco Mesh, Watermelon, Wreath, Tutorial, DIY, Summer, Spring, Wreath, How to


SUPPLIES
To purchase these products from www.mardigrasoutlet.com,  click on the individual product link below or click HERE for a page listing all products

21" Poly Mesh Roll: Hot Pink
21" Poly Mesh Roll: Metallic Apple / Moss
21" Poly Mesh Roll: Metallic Emerald Green
Black 25' Metallic Tinsel Roping
Aluminum Craft Wire 2MM, Pink 13 Yards
24 Gauge Paddle Floral Wire, Gold
Scissors
Wire Cutters

Time/Cost: The Deco Mesh Watermelon "wreath" takes an afternoon of crafting to complete. This wreath is more time consuming than other projects because you have to craft the form as well as the wreath. The cost of this project is approximately $30 with product left over. (click HERE  for pricing information).

Deco Mesh, Watermelon, Wreath, Tutorial, DIY, Summer, Spring, Wreath, How to

STEP 1: Form a half-circle with wire
Cut a piece of aluminum craft wire that is about 55" total. We used 2MM, Hot  Pink Aluminum Wire.
To make the watermelon shaped form, create a gentle half circle shape that is approximately 35" long. Bend the remaining 20" of wire across the top

Deco Mesh, Watermelon, Wreath, Tutorial, DIY, Summer, Spring, Wreath, How to

STEP 2: Cut 3 pieces of wire
Use your wire cutters to cut three wire pieces about 30" long, allowing extra length to twist them together. These pieces create the braces of your form that the deco mesh will attach to.

Deco Mesh, Watermelon, Wreath, Tutorial, DIY, Summer, Spring, Wreath, How to

STEP 3: Attach wires to form
Layer in the three pieces of wire- lengthwise across this form. Attach by twisting at both ends.

Deco Mesh, Watermelon, Wreath, Tutorial, DIY, Summer, Spring, Wreath, How to

STEP 4: Cut cross braces from floral wire
We used lighter  weight 24 gauge paddle wire to make vertical braces. These braces provide structure for the form. More cross braces will make more, tighter puff sizes and less braces will make fewer, looser puffs.  For our large watermelon, we ended up using 10 braces for our large watermelon. You will need less if you make it smaller.

Deco Mesh, Watermelon, Wreath, Tutorial, DIY, Summer, Spring, Wreath, How to

STEP 5: Add vertical braces
Starting at the top of the form, add the braces vertically between the wire. Where the wires meet-twist them tightly and make sure they are evenly spaced to add strength!  

Deco Mesh, Watermelon, Wreath, Tutorial, DIY, Summer, Spring, Wreath, How to

STEP 6: Add wire ties to the form
At each cross section you will need a 5" wire tie down for the deco mesh. Cut 5" lengths of wire (as many as your form will need).Twist this wire onto the form where the wires intersect. You want each pair of ties even in length. Be careful, at this stage there are many poky wires.

Deco Mesh, Watermelon, Wreath, Tutorial, DIY, Summer, Spring, Wreath, How to

STEP 7: Attach mesh
Start on one end with the emerald green mesh. Fold the emerald green mesh over into one end of the watermelon in order to hide the frayed end. Continue across bottom line of the form. At each wire tie section, gather the mesh into a puff and attach to the form.

Deco Mesh, Watermelon, Wreath, Tutorial, DIY, Summer, Spring, Wreath, How to

STEP 8: Form puffs
Continue down the entire bottom row of the half circle forming puffs and twisting into wire ties to attach at cross brace.
Deco Mesh, Watermelon, Wreath, Tutorial, DIY, Summer, Spring, Wreath, How to

Move up one row using the apple-moss deco mesh for the second row. You can use the same wire attachments as you used for the emerald green, or simply attach an additional wire to the corner. Tuck the frayed ends in as before. The mesh should always begin and end at the corners to ensure fullness!

Deco Mesh, Watermelon, Wreath, Tutorial, DIY, Summer, Spring, Wreath, How to

STEP 9: Fill in the rest of the Watermelon with pink Deco Mesh
After the two rows of green mesh, there are three rows of pink mesh. After each row continue back around onto the next row without cutting.  Trim excess mesh when finished and tuck the final pink puff into itself to hide frayed edges.
Deco Mesh, Watermelon, Wreath, Tutorial, DIY, Summer, Spring, Wreath, How to

The back of the completed watermelon-showing the custom made work form.

Deco Mesh, Watermelon, Wreath, Tutorial, DIY, Summer, Spring, Wreath, How to

STEP 10: Make watermelon seeds
Form tear-drop shapes with black metallic Tinsel Roping (approximately 8" pieces), leaving extra length on the end to attach into the Deco-Mesh.

Deco Mesh, Watermelon, Wreath, Tutorial, DIY, Summer, Spring, Wreath, How to

FINAL STEP: Attach seeds
Use the wire tails of the seeds to poke through the mesh, twist the tails together, and bend the seed over itself to hide the twists.  

Deco Mesh, Watermelon, Wreath, Tutorial, DIY, Summer, Spring, Wreath, How to

Hang your finished Deco Mesh Watermelon!

Time to slice into some sweet, refreshing watermelon and celebrate the arrival of summer  We hope you enjoy this fun Watermelon Decoration tutorial!

June 16, 2012

Patriotic Wreath Tutorial with Deco Mesh

Deco Mesh, Patriotic, Red White Blue, Memorial Day Wreath, Wreath, How to, American Flag, Tutorial

Let your colors fly for the Fourth of July with a patriotic themed wreath. A basic blue deco mesh puff wreath is transformed from plain to patriotic by adding American flags, paper fans or festive beads.


Deco Mesh, Patriotic, Red White Blue, Memorial Day Wreath, Wreath, How to, American Flag, Tutorial

Here are some inspiring ideas. Keep scrolling down for more ideas and tutorials on creating the fun wreaths featured here.

Deco Mesh, Patriotic, Red White Blue, Memorial Day Wreath, Wreath, How to, American Flag, Tutorial

What is Deco Mesh?  Poly Deco Mesh sometimes called Geo mesh is a type of soft plastic art netting that is perfect for making wreath, bows and more. It is durable and holds its full shape indoors and out. Mesh come in many colors, allowing you to customize your decorations for any season or celebration.  Using mesh and a simple work wreath form you can easily create the base for any type of  seasonal wreath.

Here is a basic tutorial for creating the base wreath with a work wreath form.
Deco Mesh, Patriotic, Red White Blue, Memorial Day Wreath, Wreath, How to, American Flag, Tutorial
Basic Supplies:
Optional Embellishments:
 Bows and Ribbons: 
To purchase these products from www.mardigrasoutlet.com, click on the individual product links above or click HERE  for a page listing of all products.

Deco Mesh, Patriotic, Red White Blue, Memorial Day Wreath, Wreath, How to, American Flag, Tutorial


Time/Cost: This wreath is simple and quick to make, one hour or less to put together. The total cost of the basic supplies for the blue mesh wreath is about $15. Depending on what accents and bow you choose, your total cost for the decorated wreath can range from $17 to $36. A great bargain!

Basic Wreath Directions:

Deco Mesh, Patriotic, Red White Blue, Memorial Day Wreath, Wreath, How to, American Flag, Tutorial


STEP 1
First, open up the tinsel ties so you can easily place the mesh in between each pair. Bunch the end of the mesh and secure into a set of ties on the inner ring. Twist the wire ties around the bunch to secure.

Deco Mesh, Patriotic, Red White Blue, Memorial Day Wreath, Wreath, How to, American Flag, Tutorial

STEP 2
Now you will form a puff. Move down the mesh about 9" in length. Working from each side as shown, fold as you gather the deco mesh into the center. This creates an even, fuller looking puff.


Deco Mesh, Patriotic, Red White Blue, Memorial Day Wreath, Wreath, How to, American Flag, Tutorial

STEP 3
To secure the puff, place the gathered section into the next set of tinsel ties on the inner ring. Twist the ties several times to secure the deco mesh. Pull and fluff the deco mesh puffs out as you go.

Deco Mesh, Patriotic, Red White Blue, Memorial Day Wreath, Wreath, How to, American Flag, Tutorial

STEP 4
Continue around the entire inner ring, gathering, attaching and fluffing the mesh puffs. There is no need to cut the mesh between the puffs.
Deco Mesh, Patriotic, Red White Blue, Memorial Day Wreath, Wreath, How to, American Flag, Tutorial

STEP 5
Once you have filled in the inner ring, move down to the outer ring without trimming the mesh. Fill in the entire outer ring with puffs, just like the inner ring.

Deco Mesh, Patriotic, Red White Blue, Memorial Day Wreath, Wreath, How to, American Flag, Tutorial

 STEP 6
Once the outer ring of the wreath is filled in, trim the excess deco mesh. This wreath form uses the most part of a 10 yard roll of the deco mesh.

Next add your embellishments!

STEP 7
Choose your preferred patriotic accents and bows. Add them to the basic wreath by securing them into the tinsel wire ties.  Here are some suggestions to inspire you.
Deco Mesh, Patriotic, Red White Blue, Memorial Day Wreath, Wreath, How to, American Flag, Tutorial

Deco Mesh, Patriotic, Red White Blue, Memorial Day Wreath, Wreath, How to, American Flag, Tutorial

Close up of the Patriotic Mini Paper Fans

Deco Mesh, Patriotic, Red White Blue, Memorial Day Wreath, Wreath, How to, American Flag, Tutorial


Deco Mesh, Patriotic, Red White Blue, Memorial Day Wreath, Wreath, How to, American Flag, Tutorial


Deco Mesh, Patriotic, Red White Blue, Memorial Day Wreath, Wreath, How to, American Flag, Tutorial

Red tinsel bow
Deco Mesh, Patriotic, Red White Blue, Memorial Day Wreath, Wreath, How to, American Flag, Tutorial

with layered bow using  Red Metallic Tinsel Roping and  2.5" Faux Red Burlap Ribbon 

Deco Mesh, Patriotic, Red White Blue, Memorial Day Wreath, Wreath, How to, American Flag, Tutorial, Burlap

Closeup of the American Flags

Deco Mesh, Patriotic, Red White Blue, Memorial Day Wreath, Wreath, How to, American Flag, Tutorial


Deco Mesh, Patriotic, Red White Blue, Memorial Day Wreath, Wreath, How to, American Flag, Tutorial


Deco Mesh, Patriotic, Red White Blue, Memorial Day Wreath, Wreath, How to, American Flag, Tutorial

 The tutorial for making this style bow  with 21" mesh can be found here:

We hope you have a fun filled Fourth of July!

LinkWithin

Related Posts with Thumbnails