Showing posts with label Christmas. Show all posts

July 22, 2013

Making a Ruffle Style Burlap Bow with 10" Ribbon

How to Make a Burlap Bow | Tutorial for Natural Decor by MardiGrasOutlet.com

The beautiful way fabric looks gathered inspired us to combining two of our favorite things: ruffles and bows.  This new ruffle bow technique that can be used with wider ribbon and mesh creates a simple, pretty ruffled bow that shows off the natural burlap texture and uses less ribbon than traditional looped bows. The tutorial below shows you how to create this bow using a rich red that is perfect for fall or Christmas. This bow can be made in any ribbon or fabric for any season as long as the fabric is at least 9" wide.

How to Make a Burlap Bow | Tutorial for Natural Decor by MardiGrasOutlet.com

SUPPLIES (click on the product name to purchase at www.mardigrasoutlet.com)


1.  9.5" Faux Burlap: Rust
2.  Wire or string options-
3.  Scissors

 COST/TIME
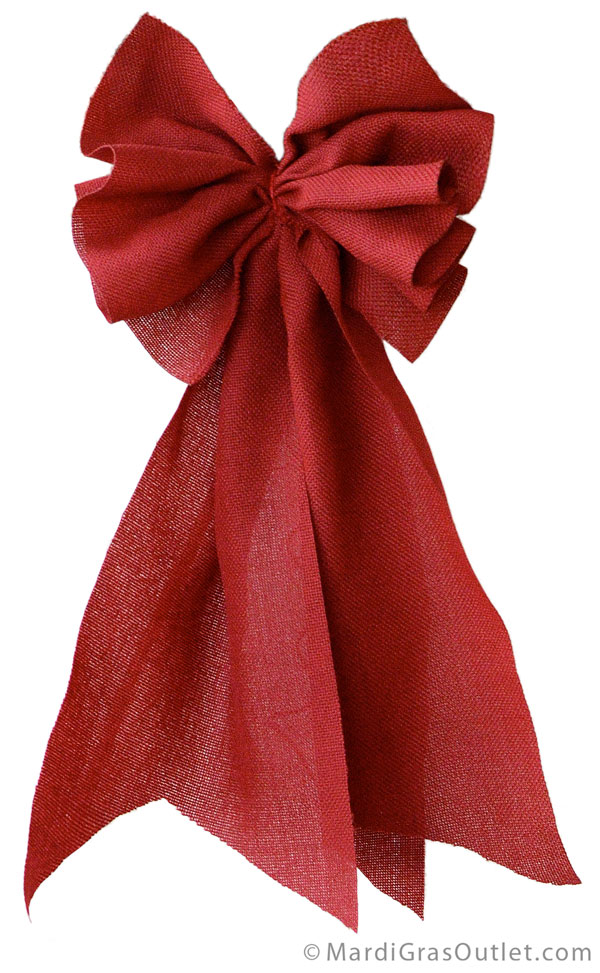
The total cost  per bow would be about $4 each. This cost will depend on your supply choices. You can make about 3-4 bows from one 10 yard roll of burlap ribbon, depending on how full you make the bow loops and the length of the bow tails. The bow shown below is about 12 inches across and nearly 2 feet long.

How to Make a Burlap Bow | Tutorial for Natural Decor by MardiGrasOutlet.com

Blended Burlap
Blended Burlap is a faux burlap material that is a great choice for outdoor decorations or for use with wet arts and crafts media. While natural burlap is made of jute and can not withstand the elements with out falling apart, this synthetic burlap is made with polyester and is safe to use outdoors.

You can follow these same steps, but use different colors of Deco Mesh or Burlap to make a custom bow for any holiday or occasion. Click here to see more color and pattern options in Burlap.

How to Make a Burlap Bow | Tutorial for Natural Decor by MardiGrasOutlet.com

STEP 1
Cut a length of Burlap about 20-24 inches long.  Lay it lengthwise on a flat surface.

How to Make a Burlap Bow | Tutorial for Natural Decor by MardiGrasOutlet.com

STEP 2
Begin to pinch and pull the burlap towards you, being sure to pinch the fabric tightly at the center.

How to Make a Burlap Bow | Tutorial for Natural Decor by MardiGrasOutlet.com

STEP 3
Continue to pull the burlap towards you until you get to the end, making sure not to bunch.  You want a nice, even, ruffled effect.

How to Make a Burlap Bow | Tutorial for Natural Decor by MardiGrasOutlet.com

STEP 4
Pinching the center tightly, secure the middle of the bow.  We used Tinsel Roping in Metallic Red because it is so easy to tie in other accents directly underneath or on top of the wire, and it adds a little extra shine to your project.  Be sure to leave yourself a few extra inches of tinsel roping on each end to making tying easier.

How to Make a Burlap Bow | Tutorial for Natural Decor by MardiGrasOutlet.com

STEP 5
Add the tails to the top of the bow by cutting a length of burlap twice the length you would like each tail.  Then simply tie the center of the fabric underneath the center of the bow with the same tinsel roping.

How to Make a Burlap Bow | Tutorial for Natural Decor by MardiGrasOutlet.com

STEP 6
Now you can trim the tails.  We folded our burlap in half and then cut upwards at a diagonal from the outside corners in order to make a split-tail style bow.  You can also simply cut the bow upwards at a diagonal from inside to outside to make a tail that is an angle cut.

How to Make a Burlap Bow | Tutorial for Natural Decor by MardiGrasOutlet.com
This diagram shows you a few possibilities on how to trim your bows tails.

How to Make a Burlap Bow | Tutorial for Natural Decor by MardiGrasOutlet.com

The finished Bow- Ready to hang!

How to Make a Burlap Bow | Tutorial for Natural Decor by MardiGrasOutlet.com
Here we've used the bow on a burlap bubble wreath.  We trimmed the tails a little shorter and added some floral accents.  The tutorial on how to make this wreath can be found by clicking here.   
 
How to Make a Burlap Bow | Tutorial for Natural Decor by MardiGrasOutlet.com
We would love to see how you use this burlap bow style in your decor!  Email us at ideas@mardigrasoutlet.com with your creative pictures.  Happy Crafting!

December 9, 2012

DIY Holiday Burlap Tree created with a Tomato Cage

Tutorial for a burlap holiday tree decoration created with a tomato cage

Simple supplies combine to create a precious holiday decoration- a lime green Burlap Christmas Tree! A standard wire tomato cage, craft wire and 9" wide burlap ribbon are all you need to make this pretty ruffled Christmas tree. Spurred by the popularity of our previous post on using a tomato cage and deco mesh ribbon to make a Christmas tree decoration (click here to see it), we created another version with a great new natural burlap texture in a lime green color.  Festive, fun and fresh!  Keep reading to see how simple it is to make your own burlap Christmas Tree for the holidays.

Supplies used to make a ruffled burlap Christmas tree decoration


SUPPLIES

To purchase these products from www.mardigrasoutlet.com, click on the individual product link below or click HERE for a complete supply list.
Scissors and/or Wire Cutters
Wire tomato cage 

Optional Accents:
Candy Striped Christmas Balls Spray
 

Cost/Time

Our 4' tree took approximately half a roll of 9" burlap ribbon. The total cost of the basic supplies is approximately $14 with materials left over. This does not include accents such as the ribbon and floral sprays or the cost of the tomato cage.  This burlap Christmas Tree takes about 20 minutes to make.


Cut craft wire into short pieces

Step 1

Cut short lengths of the aluminum craft wire, approximately 6 inches long.

Weave craft wire in and out of the top of the burlap ribbon

Step 2

Weave the aluminum wire in and out of the ribbon about 1inch apart just below the top edge of the burlap. This is similar to how you gather or pleat fabric with thread.

Gather ribbon into the wire tie and attach to the form

Step 3

Push to fabric together into the center of the piece of wire. Tightly twist the wire ends together, this will cause the burlap to bunch, creating a pleated effect. We start with the tomato cage wrapped in white lights. To see our previous tutorial for how to wrap the lights on the cage, click HERE. With the light wrapped tomato cage set upside down, begin to layer on the burlap ribbon. Start about 9" up on the cage so the burlap ribbon brushes the ground. Use the wire tie to attach the ribbon onto the form around first ring.  

Continue this process around the tomato cage

Step 4

Move down the roll of ribbon about 6-8 inches and repeat Step 1. Weave in and out another piece of craft wire that will become a tie for the ribbon. Continue around the first level of the cage, attaching the gathered ribbon. 

At the end of the first layer, trim burlap ribbon.

Step 5

Once you have reached the beginning of your first tier, allow for a few inches of overlap and trim the burlap. Add this cut edge back into your first tie for finished look

Continue process on the next layer- about 8" up the wire form.

Step 6

Begin the second tier about 8" up on the tomato cage, just enough length to hide the top wires of the previous layer. Repeat steps 1-5 for this layer.
 
Note: With the size tomato cage we used this layer fell at next ring. This may or may not be the case for you, depending on the size of the tomato cage you use. Tomato cages vary widely with height and width.


Keep ruffling burlap ribbon and filling in the tomato cage form.

Step 7

Continue moving upwards on the tomato cage filling in layers. 

Top of the tomato cage shows after the last layer of burlap.
Once you've reached the top of the tomato cage you'll need to add a final layer of burlap to cover the remaining wire legs of the tomato cage.
Wrap the remaining top with gathered burlap to finish it off.

Step 8

Cut a piece of the burlap ribbon about 12 inches wide.  Bunching from each side, gather the burlap in your hands. Hold it at the center, and wrap it around the top of the tree.  It should look gathered to match the other layers of burlap. Tie this piece onto the top of the form as shown with the aluminum craft wire or matching rope.

Our finished ruffled burlap Christmas Tree
The finished tree! 

Add a cute red and white striped bow for a whimsical color pop!
Precious burlap tree with a basic red and white striped ribbon bow added to the top.

Sparkly candy striped balls and a striped bow on our ruffled burlap Christmas tree.

 Red and white peppermint glitter balls from a Christmas floral spray make the burlap tree even more fun and festive.

Our ruffled burlap Christmas tree lit up with white twinkle lights.

With or without lights, this Burlap Christmas Tree is adorable!  


Happy Holidays!

Holiday Deco Mesh Facebook Photo Contest

Poly Deco Mesh, Craft, Holiday, Photo Contest, Christmas, Decorations
What would you do with $300 worth of free craft supplies?
Enter our facebook holiday deco mesh photo contest for a chance to find out.

We're giving away FREE product! Are you decorating for the holidays with Deco Mesh? If so, share your wonderful wreaths, sensational swags,  gorgeous garland, and creative Christmas tree Deco Mesh creations on our Facebook page! Post a photo of your Holiday Deco Mesh decor on the Mardi Gras Outlet Facebook page.  The top three photos with the most "likes" win a Mardi Gras Outlet store credit for $300, $200, and $100, respectively. 

Please post only one photo per person. Entries must be in by December 14th. Voting tabulated at noon on Saturday, December 15th.  Click HERE for more details and to "like" your favorite deco mesh holiday photos on our facebook page.

Good Luck and Happy Holiday crafting!


November 29, 2012

Quick Christmas Tree Decorating with Tinsel Ties and Deco Mesh


Just in time for holiday Christmas tree decorating, we wanted to introduce a new product, Tinsel Ties, that will make your holiday decorating easier. More than just a cute name, Tinsel Ties will save you both time and money on Christmas crafting and decorating. We can all use more of both those things during the hectic holidays!


Tinsel Ball Ties are a pair of metallic ball ornaments attached on each end to a wire tinsel tie. Sold in sets of 12 ties, they come in an assortment of sizes and colors. See all of the styles available here.


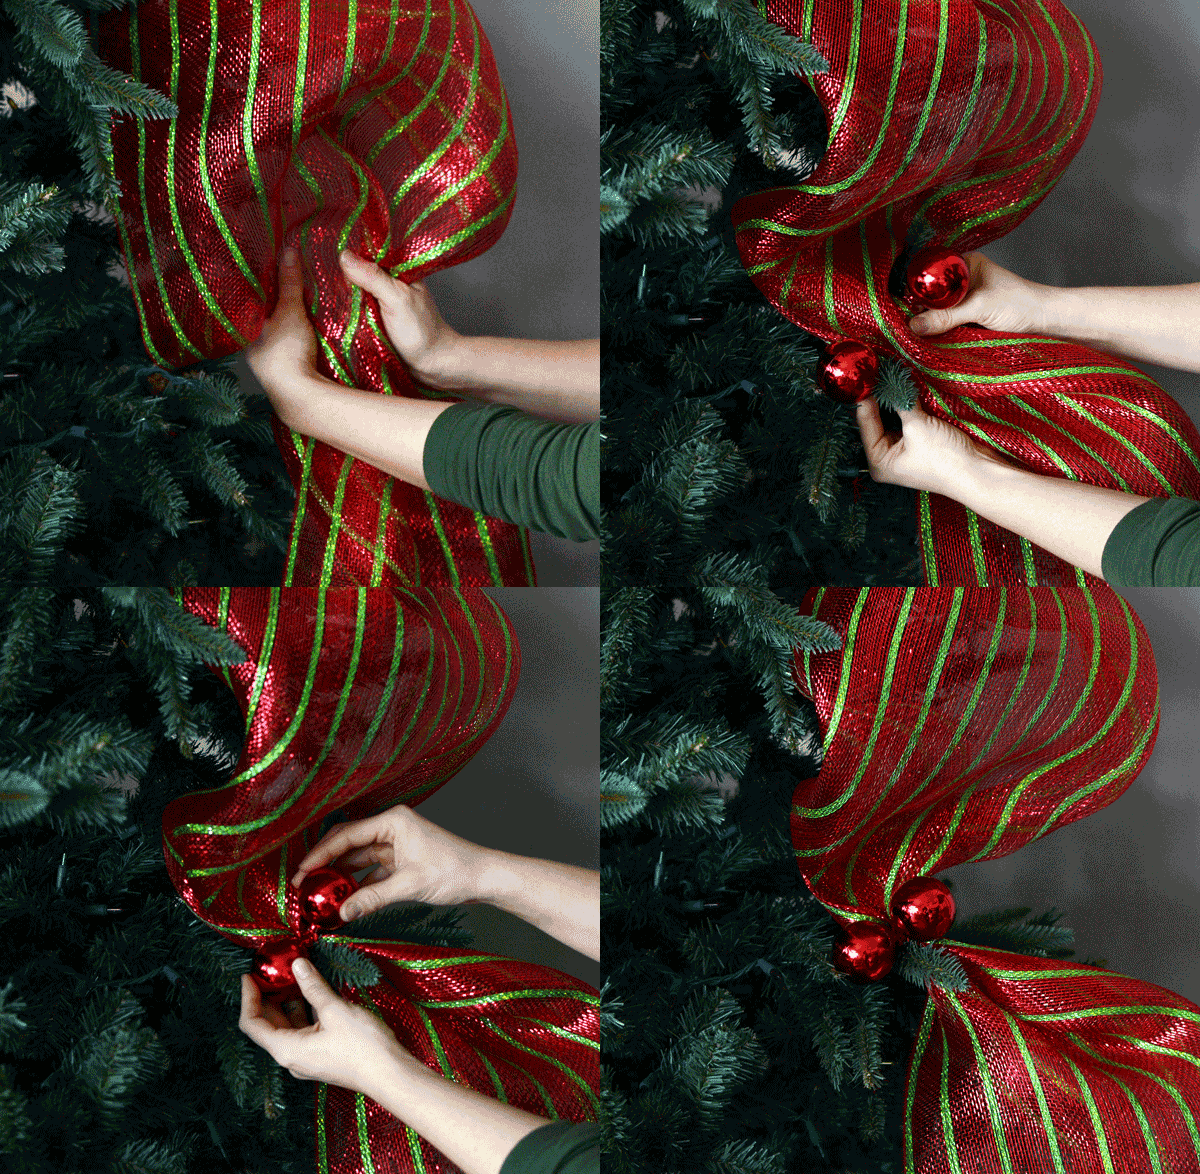
Quickly add deco mesh or ribbon accents to your Christmas tree with tinsel ball ties. The wire ties easily wrap around branches to hold additional accents like Poly Deco Mesh, ribbon or burlap in place. The sparkly ball ornaments add another festive layer. The tutorial below shows you how to use these tinsel ball ties to easily decorate your Christmas tree with deco mesh and ribbon.

Here are some more decorating ideas with Tinsel Ball Ties.


The flexible wire tinsel ties make it easy to add ball ornaments to indoor or outdoor trees, garland and wreaths. Here we quickly added Tinsel Ball Ties onto a fresh 24" Frasier fir wreath. Along with a simple red and white ribbon bow, the tinsel ties transformed a plain wreath into a precious holiday door decoration in minutes.


Ideal for outdoor decorating because they are both water resistant and shatterproof, we used tinsel ball ties to decorate an iron entry gate for a festive Christmas welcome. No worries of droopy, wet ribbon or shattered ornaments.


Add coordinating bows and ornaments at one time with the tinsel ball ties.


Use the wire ball tie to make the bow and wire it onto planter.

Tutorial: Quick Christmas Tree Decorating with Tinsel Ball Ties & Deco Mesh


To purchase these products from www.craftoutlet.com, click on the individual product link below.


These supplies decorated our 8 foot tree with about a half roll of deco mesh left over. Depending on the size of your tree, you may need more or less deco mesh and Tinsel Ball Ties.

Tinsel Ball Tie Tutorial

Attaching Tinsel Ball Ties and Deco Mesh to a Christmas tree is Simple!


Three easy steps to attaching the Deco Mesh to your Christmas Tree:

  1. Gather the Mesh with both hands from each side. Try not to bunch it.
  2. Place a Tinsel Ball Tie behind the Mesh and under one of the branches.
  3. Twist the balls around each securing the mesh to the branch.

How to Decorate a Christmas Tree Using the Tinsel Ball Ties to Add Deco Mesh and Ribbon


Step 1: Start at the Top

Attach striped Deco Mesh with a Tinsel Tie near the top of the tree and let the roll of mesh unfurl to the ground.


Step 2: Move down the Tree.


As you move down the tree vertically, use the tinsel ball ties to attach the mesh to the branches. Leave at least a foot of space between each tie, to achieve the look you desire. Do not pull the mesh tight, but allow it to fall loosely between ties, this will give the tree volume and texture.


Step 3: Reaching the Bottom

When you've reached the bottom of the tree, (we used about 7 ties on an 8 foot tree), twist the deco mesh into a Tinsel Tie to secure.


Step 4: Trim

At the bottom, trim the deco mesh with scissors once you have attached it securely into a Tinsel Ball Tie.


Repeat

Continue steps 1-4 as many times as it takes to fill in your tree. We made three vertical panels of Deco Mesh on the front of the tree (with mesh left over). Depending on the height of your tree, with 2 rolls of Mesh you could create 4 or 5 hanging sections, or spiral the deco mesh around the whole tree from top to bottom.


Allow the mesh to fall naturally downwards, create zig-zag patterns down the tree, or make slight curves with the deco mesh. Rearranging the placement is easy with Tinsel Ties, and they won't poke skin or grab sweaters like floral wire.


Add Accents


At any point, you can untwist the Tinsel Ball Tie to add in bows, floral sprays, ornaments, or ribbon. This precious vintage looking pom-pom ribbon bow is easily added onto the tree by placing two loops to form a bow into the tinsel wire tie.


Add a bow as a tree topper! For directions on making a bow, see the tutorial on this blog post.


Our tree decorated with deco mesh garland and tinsel tie balls.

We hope your tree turns out just like you imagine! Merry Christmas!


November 19, 2012

Holiday Wire Ball Wreath Tutorial


It's time to get your Christmas decorations rolling with these fun decorative wire balls. (Sorry, we couldn't resist the pun.)  Decorative wire balls are our latest crafting obsession. We've found lots of  creative ways to use them. They come in an assortment of colors and sizes and are inexpensive! (Click HERE to see them all.)


Pictured here are wire balls as accents on a bow,  simple ornaments on a tree or a table centerpiece in a clear glass vase.  (See more ideas at the end of this post and on our Pinterest page.)
 
 Our favorite idea is this unique Christmas wire ball wreath that is both modern and fun. Keep reading for an easy photo tutorial for creating one of your own.


Supply List

To purchase these products from www.mardigrasoutlet.com, click on the individual product link below or click HERE for a complete supply list.

Cost/Time

It took about 20 minutes to create this wreath. The amount of wire balls you will need will depend on the size of the wreath you create. For our large 20" wide wreath, the material cost is approximately $47.  We only used partial rolls of the ribbon and aluminum craft wire so you will have left over product for another project.
 

Step 1

Cut three lengths of aluminum craft wire, about 40" long.

Please note: The size of the finished wreath will determine the length of the wire for the basic form. The larger the wreath, the heavier gauge your wire needs to be to prevent the wreath from drooping. For a smaller version of this wreath, we only needed one wire for the form. As the size increased, we used three wires for stability.

Step 2

Twist the wires together and form a basic circle wreath form. Turn one end back into a C-shape to form a stop.


Step 3

On the open end of the form, slide on the wire balls. Insert the wire into the ball on the side rather than the middle so the balls will stack on the form.
 
 After a little experimenting, we found that a pattern of 2 large wire balls then 1 small ball worked best.  Continue repeating this pattern and sliding the balls around to the wire end with the C-stop.


Step 4

Fill the circular wire form with wire balls, rotating the arrangement of wire balls to fill in the blank space.


Step 5

When the form is full,  double over the wire to form another C-clasp.  Hook the two wire ends together and twist tightly to ensure the wire balls won't slip on the wreath.


Step 6

Make a bow and tie onto the wreath to hide the clasp.  For bow making directions, please see our previous post, How to Make a Bow with Deco Mesh.


 The finished wire ball wreath! 
 
Here are some more photos of ideas using these fun wire balls. For more ideas check out Mardi Gras Outlet's Decorative Wire Ball  page on Pinterest.


Happy Crafting!


LinkWithin

Related Posts with Thumbnails