November 29, 2012

Quick Christmas Tree Decorating with Tinsel Ties and Deco Mesh


Just in time for holiday Christmas tree decorating, we wanted to introduce a new product, Tinsel Ties, that will make your holiday decorating easier. More than just a cute name, Tinsel Ties will save you both time and money on Christmas crafting and decorating. We can all use more of both those things during the hectic holidays!


Tinsel Ball Ties are a pair of metallic ball ornaments attached on each end to a wire tinsel tie. Sold in sets of 12 ties, they come in an assortment of sizes and colors. See all of the styles available here.


Quickly add deco mesh or ribbon accents to your Christmas tree with tinsel ball ties. The wire ties easily wrap around branches to hold additional accents like Poly Deco Mesh, ribbon or burlap in place. The sparkly ball ornaments add another festive layer. The tutorial below shows you how to use these tinsel ball ties to easily decorate your Christmas tree with deco mesh and ribbon.

Here are some more decorating ideas with Tinsel Ball Ties.


The flexible wire tinsel ties make it easy to add ball ornaments to indoor or outdoor trees, garland and wreaths. Here we quickly added Tinsel Ball Ties onto a fresh 24" Frasier fir wreath. Along with a simple red and white ribbon bow, the tinsel ties transformed a plain wreath into a precious holiday door decoration in minutes.


Ideal for outdoor decorating because they are both water resistant and shatterproof, we used tinsel ball ties to decorate an iron entry gate for a festive Christmas welcome. No worries of droopy, wet ribbon or shattered ornaments.


Add coordinating bows and ornaments at one time with the tinsel ball ties.


Use the wire ball tie to make the bow and wire it onto planter.

Tutorial: Quick Christmas Tree Decorating with Tinsel Ball Ties & Deco Mesh


To purchase these products from www.craftoutlet.com, click on the individual product link below.


These supplies decorated our 8 foot tree with about a half roll of deco mesh left over. Depending on the size of your tree, you may need more or less deco mesh and Tinsel Ball Ties.

Tinsel Ball Tie Tutorial

Attaching Tinsel Ball Ties and Deco Mesh to a Christmas tree is Simple!


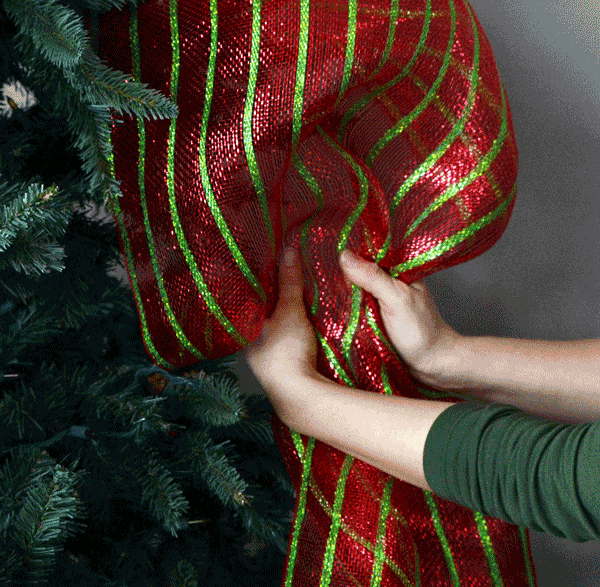
Three easy steps to attaching the Deco Mesh to your Christmas Tree:

  1. Gather the Mesh with both hands from each side. Try not to bunch it.
  2. Place a Tinsel Ball Tie behind the Mesh and under one of the branches.
  3. Twist the balls around each securing the mesh to the branch.

How to Decorate a Christmas Tree Using the Tinsel Ball Ties to Add Deco Mesh and Ribbon


Step 1: Start at the Top

Attach striped Deco Mesh with a Tinsel Tie near the top of the tree and let the roll of mesh unfurl to the ground.


Step 2: Move down the Tree.


As you move down the tree vertically, use the tinsel ball ties to attach the mesh to the branches. Leave at least a foot of space between each tie, to achieve the look you desire. Do not pull the mesh tight, but allow it to fall loosely between ties, this will give the tree volume and texture.


Step 3: Reaching the Bottom

When you've reached the bottom of the tree, (we used about 7 ties on an 8 foot tree), twist the deco mesh into a Tinsel Tie to secure.


Step 4: Trim

At the bottom, trim the deco mesh with scissors once you have attached it securely into a Tinsel Ball Tie.


Repeat

Continue steps 1-4 as many times as it takes to fill in your tree. We made three vertical panels of Deco Mesh on the front of the tree (with mesh left over). Depending on the height of your tree, with 2 rolls of Mesh you could create 4 or 5 hanging sections, or spiral the deco mesh around the whole tree from top to bottom.


Allow the mesh to fall naturally downwards, create zig-zag patterns down the tree, or make slight curves with the deco mesh. Rearranging the placement is easy with Tinsel Ties, and they won't poke skin or grab sweaters like floral wire.


Add Accents


At any point, you can untwist the Tinsel Ball Tie to add in bows, floral sprays, ornaments, or ribbon. This precious vintage looking pom-pom ribbon bow is easily added onto the tree by placing two loops to form a bow into the tinsel wire tie.


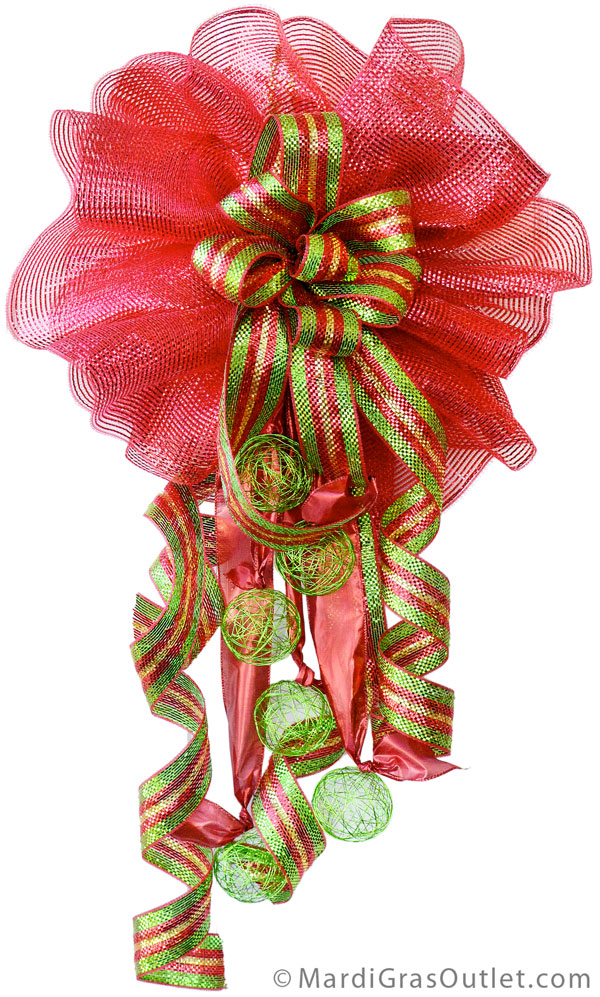
Add a bow as a tree topper! For directions on making a bow, see the tutorial on this blog post.


Our tree decorated with deco mesh garland and tinsel tie balls.

We hope your tree turns out just like you imagine! Merry Christmas!


November 19, 2012

Holiday Wire Ball Wreath Tutorial


It's time to get your Christmas decorations rolling with these fun decorative wire balls. (Sorry, we couldn't resist the pun.)  Decorative wire balls are our latest crafting obsession. We've found lots of  creative ways to use them. They come in an assortment of colors and sizes and are inexpensive! (Click HERE to see them all.)


Pictured here are wire balls as accents on a bow,  simple ornaments on a tree or a table centerpiece in a clear glass vase.  (See more ideas at the end of this post and on our Pinterest page.)
 
 Our favorite idea is this unique Christmas wire ball wreath that is both modern and fun. Keep reading for an easy photo tutorial for creating one of your own.


Supply List

To purchase these products from www.mardigrasoutlet.com, click on the individual product link below or click HERE for a complete supply list.

Cost/Time

It took about 20 minutes to create this wreath. The amount of wire balls you will need will depend on the size of the wreath you create. For our large 20" wide wreath, the material cost is approximately $47.  We only used partial rolls of the ribbon and aluminum craft wire so you will have left over product for another project.
 

Step 1

Cut three lengths of aluminum craft wire, about 40" long.

Please note: The size of the finished wreath will determine the length of the wire for the basic form. The larger the wreath, the heavier gauge your wire needs to be to prevent the wreath from drooping. For a smaller version of this wreath, we only needed one wire for the form. As the size increased, we used three wires for stability.

Step 2

Twist the wires together and form a basic circle wreath form. Turn one end back into a C-shape to form a stop.


Step 3

On the open end of the form, slide on the wire balls. Insert the wire into the ball on the side rather than the middle so the balls will stack on the form.
 
 After a little experimenting, we found that a pattern of 2 large wire balls then 1 small ball worked best.  Continue repeating this pattern and sliding the balls around to the wire end with the C-stop.


Step 4

Fill the circular wire form with wire balls, rotating the arrangement of wire balls to fill in the blank space.


Step 5

When the form is full,  double over the wire to form another C-clasp.  Hook the two wire ends together and twist tightly to ensure the wire balls won't slip on the wreath.


Step 6

Make a bow and tie onto the wreath to hide the clasp.  For bow making directions, please see our previous post, How to Make a Bow with Deco Mesh.


 The finished wire ball wreath! 
 
Here are some more photos of ideas using these fun wire balls. For more ideas check out Mardi Gras Outlet's Decorative Wire Ball  page on Pinterest.


Happy Crafting!


November 14, 2012

DIY Christmas Bow Video: Double Bow with Deco Mesh

Making a Deco Mesh Christmas Bow with two patterns


From gifts to garland, festive Holiday decorating means big, beautiful bows! Combine two different patterns, styles and colors of deco mesh and ribbon to create large Christmas bows perfectly suited for all your decorating needs. These over-sized DIY double bows are great for decorating large gifts, Christmas trees, wreaths and porches for the holidays. Making these large bows from 21-inch wide deco mesh is surprisingly easy! Just follow our tutorial video (below) to learn how to make your own.  


Supplies for a large Christmas deco mesh bow 

Supply List

To purchase these products from www.mardigrasoutlet.com, click on the individual product link below or click HERE for a complete supply list.

Cost/Time

It took our designer less than 10 minutes to create the basic bow.  The material cost is approximately $26 for enough supplies to make about 4 -5 large bows

Large Christmas doublle bow made out of deco mesh

Deco mesh Christmas bow decorates a tree

A Second Version- Christmas Bow with wire ball accents.

Deco mesh Christmas bow with wire ball accents

Adding ribbon tails and metallic wire balls to the basic bow only takes a few more minutes, but adds
lots of sparkle and interest. Here are is how you create this look from the basic double Christmas bow.

Alternative Accessories

Add Wire Balls and a Ribbon Tail:

Adding tails and wire ball accents to a bow
Cut your desired ribbon- approximately 3-4 foot long pieces.  Lay out length wise. Tie wire balls onto ends of the ribbon.

Detail of twisting wire to add tails to a bow


In the center of each piece of ribbon use aluminum craft wire or the tinsel roping to gather up the tails. Twist the wire so about half of the ribbon lies on either side. Stagger the wire ball height to create interest.  Use this wire to attach the tails onto the back of the bow.

Tails and wire ball accents to add to a bow
 

Final Product

We used three pieces of red ribbon with a green wire ball on each end (6 wire balls total) and two additional tails of the striped deco mesh ribbon as accent.


Finished Christmas mesh bow with wire ball and ribbon accents
 
 
Love the wire ball accents in this post? So do we! These inexpensive and creative aluminum wire balls are our new craft obsession. Check back later for more posts on these fun new products. We've come up with lots of fun ways you can use the wire balls in crafting, tablescapes, and as decor for Holidays and Parties!


November 1, 2012

Candy Cane Wreath Upgrade!

Sweet Candy Cane Wreath Tutorial

The winter season is on its way, and with it comes memories of Holidays gone by.  Why not brighten up last years wreath as well, by filling it with new ribbons and glittery accents? We updated one of our most popular wreath posts, the candy cane wreath, to create a fun new look for this cherished candy cane striped style.

Keep reading to learn how to add in ribbon tucks for the new look. Click HERE, for the original tutorial for this candy cane wreath shown here.

HOW TO MAKE A RIBBON TUCK

Step One: Ribbon Tuck


STEP 1

Making ribbon tucks for wreaths, tree decorations, and floral arrangements is easy.  Begin by making a loop with the ribbon. We used a 2.5" red satin lame ribbon.


Step Two: Ribbon Tuck Loops

STEP 2

Make a second loop on top of the first that is slightly smaller than the first, so the layers of ribbon are visible.


Step Three: Second Loop

STEP 3

Grasp the ribbon folds firmly at the base.


Step Four: Trim

STEP 4

Trim from the roll, leaving extra length for the tail, (the larger the wreath you are adding tucks to, the larger you may want to make the ribbon loops and tails).


Step Five: Add ribbon tail

STEP 5

Add a second tail behind the first by trimming a length of ribbon that is at least an inch longer than the first tail.


Step Six: Wire together

STEP 6

If you are adding ribbon to a work wreath, then simply place it into a wire tie.  If you don't have a work wreath base, then twist the ribbon tuck into a length of wire as tightly as possible so that the tails don't slip.

Step Seven: Trim edges

STEP 7

Trim the tails so that both layers of ribbon are visible.

Add ribbon tuck to your wreath

Voila! A ribbon tuck-  Make a few and add them into last years holiday decor for a fresh update!

An updated version of the popular candy cane deco mesh wreath- A tutorial

Our favorite candy cane wreath updated with new ribbon tucks.
Click HERE for the original post tutorial on how to make the basic candy cane wreath.
Candy Cane Wreath with ribbon accents- A tutorial
For an additional wreath look,  add in glitter red and lime ball floral sprays that you can find here.  Two floral sprays are used in this version of the candy cane wreath.

Supply List:

To purchase these products from www.mardigrasoutlet.com, click on the individual product link below or click HERE for a complete supply list.


Cost/Time

The 24" wreath takes approximately 6 yards of Deco Mesh. The total cost of the supplies with all accents is approximately $30 with materials left over. This candy cane striped Christmas wreath takes about 20 minutes to make.


LinkWithin

Related Posts with Thumbnails