June 16, 2012

Patriotic Wreath Tutorial with Deco Mesh

Deco Mesh, Patriotic, Red White Blue, Memorial Day Wreath, Wreath, How to, American Flag, Tutorial

Let your colors fly for the Fourth of July with a patriotic themed wreath. A basic blue deco mesh puff wreath is transformed from plain to patriotic by adding American flags, paper fans or festive beads.


Deco Mesh, Patriotic, Red White Blue, Memorial Day Wreath, Wreath, How to, American Flag, Tutorial

Here are some inspiring ideas. Keep scrolling down for more ideas and tutorials on creating the fun wreaths featured here.

Deco Mesh, Patriotic, Red White Blue, Memorial Day Wreath, Wreath, How to, American Flag, Tutorial

What is Deco Mesh?  Poly Deco Mesh sometimes called Geo mesh is a type of soft plastic art netting that is perfect for making wreath, bows and more. It is durable and holds its full shape indoors and out. Mesh come in many colors, allowing you to customize your decorations for any season or celebration.  Using mesh and a simple work wreath form you can easily create the base for any type of  seasonal wreath.

Here is a basic tutorial for creating the base wreath with a work wreath form.
Deco Mesh, Patriotic, Red White Blue, Memorial Day Wreath, Wreath, How to, American Flag, Tutorial
Basic Supplies:
Optional Embellishments:
 Bows and Ribbons: 
To purchase these products from www.mardigrasoutlet.com, click on the individual product links above or click HERE  for a page listing of all products.

Deco Mesh, Patriotic, Red White Blue, Memorial Day Wreath, Wreath, How to, American Flag, Tutorial


Time/Cost: This wreath is simple and quick to make, one hour or less to put together. The total cost of the basic supplies for the blue mesh wreath is about $15. Depending on what accents and bow you choose, your total cost for the decorated wreath can range from $17 to $36. A great bargain!

Basic Wreath Directions:

Deco Mesh, Patriotic, Red White Blue, Memorial Day Wreath, Wreath, How to, American Flag, Tutorial


STEP 1
First, open up the tinsel ties so you can easily place the mesh in between each pair. Bunch the end of the mesh and secure into a set of ties on the inner ring. Twist the wire ties around the bunch to secure.

Deco Mesh, Patriotic, Red White Blue, Memorial Day Wreath, Wreath, How to, American Flag, Tutorial

STEP 2
Now you will form a puff. Move down the mesh about 9" in length. Working from each side as shown, fold as you gather the deco mesh into the center. This creates an even, fuller looking puff.


Deco Mesh, Patriotic, Red White Blue, Memorial Day Wreath, Wreath, How to, American Flag, Tutorial

STEP 3
To secure the puff, place the gathered section into the next set of tinsel ties on the inner ring. Twist the ties several times to secure the deco mesh. Pull and fluff the deco mesh puffs out as you go.

Deco Mesh, Patriotic, Red White Blue, Memorial Day Wreath, Wreath, How to, American Flag, Tutorial

STEP 4
Continue around the entire inner ring, gathering, attaching and fluffing the mesh puffs. There is no need to cut the mesh between the puffs.
Deco Mesh, Patriotic, Red White Blue, Memorial Day Wreath, Wreath, How to, American Flag, Tutorial

STEP 5
Once you have filled in the inner ring, move down to the outer ring without trimming the mesh. Fill in the entire outer ring with puffs, just like the inner ring.

Deco Mesh, Patriotic, Red White Blue, Memorial Day Wreath, Wreath, How to, American Flag, Tutorial

 STEP 6
Once the outer ring of the wreath is filled in, trim the excess deco mesh. This wreath form uses the most part of a 10 yard roll of the deco mesh.

Next add your embellishments!

STEP 7
Choose your preferred patriotic accents and bows. Add them to the basic wreath by securing them into the tinsel wire ties.  Here are some suggestions to inspire you.
Deco Mesh, Patriotic, Red White Blue, Memorial Day Wreath, Wreath, How to, American Flag, Tutorial

Deco Mesh, Patriotic, Red White Blue, Memorial Day Wreath, Wreath, How to, American Flag, Tutorial

Close up of the Patriotic Mini Paper Fans

Deco Mesh, Patriotic, Red White Blue, Memorial Day Wreath, Wreath, How to, American Flag, Tutorial


Deco Mesh, Patriotic, Red White Blue, Memorial Day Wreath, Wreath, How to, American Flag, Tutorial


Deco Mesh, Patriotic, Red White Blue, Memorial Day Wreath, Wreath, How to, American Flag, Tutorial

Red tinsel bow
Deco Mesh, Patriotic, Red White Blue, Memorial Day Wreath, Wreath, How to, American Flag, Tutorial

with layered bow using  Red Metallic Tinsel Roping and  2.5" Faux Red Burlap Ribbon 

Deco Mesh, Patriotic, Red White Blue, Memorial Day Wreath, Wreath, How to, American Flag, Tutorial, Burlap

Closeup of the American Flags

Deco Mesh, Patriotic, Red White Blue, Memorial Day Wreath, Wreath, How to, American Flag, Tutorial


Deco Mesh, Patriotic, Red White Blue, Memorial Day Wreath, Wreath, How to, American Flag, Tutorial


Deco Mesh, Patriotic, Red White Blue, Memorial Day Wreath, Wreath, How to, American Flag, Tutorial

 The tutorial for making this style bow  with 21" mesh can be found here:

We hope you have a fun filled Fourth of July!

June 12, 2012

DIY: Personalized Wedding Parasol Tutorial

diy, painted, wedding, parasol, tutorial, paper parasol, umbrella


Personalized Hand Painted Wedding Parasols are a current elegant wedding trend that you can easily make yourself. In New Orleans, it is a tradition for umbrella toting brides to have a second line dance at their reception. Guests and wedding attendants join in the dance waving umbrellas and white handkerchiefs. Recently pretty painted umbrellas have been turning up outside of Louisiana. Laissez les bons temps rouller!

While the hand lettering looks like it would be best left up to a professional artist, the printable template (available below) makes it simple for anyone. Our DIY tutorial will show you how. Bring the Louisiana tradition of a Second Line to your wedding festivities with a pretty painted parasol!


SUPPLIES
(parasol available at www.mardigrasoutlet.com)
Acrylic Craft Paint (we used metallic gold)
Paintbrush (flat angled bristles work best)
Dull Pencil
Scissors
Scotch Tape

We have made a free printable template that reads "Just Married" in a script font to help you out with this project. You will need a PDF Reader in order to download this file. Need one? Click here to download it. This template is sized to fit this 22" parasol perfectly (32" wide when open).

Click below to download the painting template.

There are 6 pages that you need to print out. Regular copy paper and a desktop home printer work fine.  We made the template easy to follow by including a guide on each page that indicates how to line-up the letters.

diy, painted, wedding, parasol, tutorial, paper parasol, umbrella

STEP 1: Cut-out the Template
Once you have printed out all 6 pages, loosely cut around the letters on each page. This just makes it easier to tape the template to the parasol later. The only precise scissor action will be to follow the straight dotted lines.

diy, painted, wedding, parasol, tutorial, paper parasol, umbrella

STEP 2: Tape the Letters Together
Use the dotted lines that divide the words to put each each word together. Simple line up those edges and tape each word together.

diy, painted, wedding, parasol, tutorial, paper parasol, umbrella

STEP 3: Tape to the Back
Flip the parasol up-side down. Place the words face down on the parasol. Tape them to the inside.

diy, painted, wedding, parasol, tutorial, paper parasol, umbrella

Turn the parasol around and make sure the letters look good where you have placed them. You should also be able to see the letters through the paper parasol.

diy, painted, wedding, parasol, tutorial, paper parasol, umbrella

STEP 4: Trace the Letters
Trace the outline of each letter using a dull pencil so that you don't poke through the paper. It also helps to hold behind the paper with your hand as you trace.

diy, painted, wedding, parasol, tutorial, paper parasol, umbrella

STEP 5: Paint the Letters
First, remove the template that is taped to the back. Use a flat, angled soft-bristle brush to fill in the penciled outlines on the front. This is acrylic craft paint in metallic gold, but you can use other colors to coordinate with your wedding.

diy, painted, wedding, parasol, tutorial, paper parasol, umbrella

And that's it! Time to show it off!

diy, painted, wedding, parasol, tutorial, paper parasol, umbrella


diy, painted, wedding, parasol, tutorial, paper parasol, umbrella


June 4, 2012

Patriotic Bow Tutorial with Striped Deco Mesh

Deco Mesh, Sinamay, How to, Tutorials, Patriotic, Red White Blue, Memorial Day, Patriotic Crafts

Dress your door, porch railing or parade worth bike in  red, white and blue with this large patriotic bow.  This easy DIY bow tutorial shows you a fun, new way to create a large bow using 21" wide red, white and blue striped mesh. Making this large, red, white and blue decoration is very easy, even for non-crafters. No special skills or supplies needed- just your hands and a wide deco mesh or fabric. Fourth of July parades and parties are the perfect place to show off these big bows and your patriotism- so get crafting!

Deco Mesh, Sinamay, How to, Tutorials, Patriotic, Red White Blue, Memorial Day, Patriotic Crafts
SUPPLIES (available here at www.mardigrasoutlet.com)
Scissors

Deco Poly Mesh is a type of soft plastic netting that holds a full shape, allowing you to easily make wreaths, bows, garlands and more (see our tutorials page). Deco Mesh also comes in many colors, patterns and styles, including the red, white and blue striped mesh used here for this patriotic bow. One roll of deco mesh will make about 2 large bows, 3 if you make the tails shorter and the top less puffy by using less mesh than shown in this tutorial.

You can follow these same steps, but use different colors of Deco Mesh to make a custom bow for any holiday or occasion. Click here to see more deco mesh colors. 

We also made a different type of bow with 10-inch wide mesh, instead of 21-inch wide mesh shown here. Click here to see that tutorial.

Deco Mesh, Sinamay, How to, Tutorials, Patriotic, Red White Blue, Memorial Day, Patriotic Crafts

STEP 1: Make the Bow Tail
Cut a length of deco mesh that is about 6 feet long. Hold it at the center, and straighten out the tails. Set the bow tails aside for securing the bow top after these next steps.

Deco Mesh, Sinamay, How to, Tutorials, Patriotic, Red White Blue, Memorial Day, Patriotic Crafts

STEP 2: Make the Bow Top
Using a new length of deco mesh, make the bow top. Take the end edge of the deco mesh roll and hold  it at the center. Start gathering the mesh, folding as you bunch the mesh into your hand as you go down the center of the mesh.
Deco Mesh, Sinamay, How to, Tutorials, Patriotic, Red White Blue, Memorial Day, Patriotic Crafts

STEP 3: Continue down the Mesh
Keep gathering, always staying at the middle of the width of mesh, parallel to the two long sides of the roll. You should start to see a bow starting to form. This bow used about 6 or 7 feet of deco mesh for the top part.

Deco Mesh, Sinamay, How to, Tutorials, Patriotic, Red White Blue, Memorial Day, Patriotic Crafts

STEP 4: Trim
Once the bow looks full enough for you, trim the bow from rest of the roll.

Deco Mesh, Sinamay, How to, Tutorials, Patriotic, Red White Blue, Memorial Day, Patriotic Crafts

The top part of the bow should look something like this.


Deco Mesh, Sinamay, How to, Tutorials, Patriotic, Red White Blue, Memorial Day, Patriotic Crafts

STEP 5: Tie the Tails to Bow
Use the bow tails you cut in Step 1 to secure the bow, where you have been holding. Wrap the center of the tails around the center of the bow, so the front of the bow looks like this.

Deco Mesh, Sinamay, How to, Tutorials, Patriotic, Red White Blue, Memorial Day, Patriotic Crafts

Tie a simple knot at the back of the bow. Pull the knot tightly to secure. Straighten out the two tails by pulling, as needed. Deco mesh tends to want to curl on its own.

You are finished! 

You can add a wire or string to the back for easy hanging. Use this big bow (about 20in x 45in!) as a door decoration, or to decorate a patio, porch or stair railings, or any other place that needs a festive accent. Deco mesh is durable and waterproof, so this bow will last through the elements without any re-fluffing. This makes is a great decoration for boat parades, lake houses or piers.

Deco Mesh, Sinamay, How to, Tutorials, Patriotic, Red White Blue, Memorial Day, Patriotic Crafts


Deco Mesh, Sinamay, How to, Tutorials, Patriotic, Red White Blue, Memorial Day, Patriotic Crafts


May 25, 2012

Pink Deco Mesh Wreath: Video Tutorial & Giveway Results

Video Tutorial: How to make a Deco Mesh Wreath | Baby Shower and Party Ideas by MardiGrasOutlet.com

The results of our first blog giveaway are in! Congratulations to Missy Smith who wins this fun pink and blue mesh wreath. Thank you to all of our readers who helped us reach one million views! We are looking forward to the future with lots of exciting things happening on the blog and at Mardi Gras Outlet.com.


If you did not win, here is the video tutorial for creating this wreath on your own. All the supplies for this project are available at MardiGrasOutlet.com. Click HERE for a complete list.

Video Tutorial: How to make a Deco Mesh Wreath | Baby Shower and Party Ideas by MardiGrasOutlet.com

Video Tutorial: How to make a Deco Mesh Wreath | Baby Shower and Party Ideas by MardiGrasOutlet.com

SUPPLIES  (To purchase these products from www.mardigrasoutlet.com , either click on the  on individual product link or click HERE for a list of all products.)

The estimated total cost of supplies for this wreath is $35 with product left over.

Deco Mesh, work wreath forms, ribbon and glamour rope come in many colors, finishes and patterns, so be creative and change up the colors and supplies for this wreath to customize it for your occasion or holiday.
Video Tutorial: How to make a Deco Mesh Wreath | Baby Shower and Party Ideas by MardiGrasOutlet.com

Deco Poly Mesh is a versatile material that is perfect for making DIY wreaths or garlands. It is waterproof and holds its shape, and comes in many colors.  This pink and blue wreath works well for a baby shower or birthday.

For more deco mesh ideas and tutorials, see our past blog posts.

May 22, 2012

1 Million Views Wreath Giveaway!

Million Views Deco Mesh Wreath Giveaway | MardiGrasOutlet.com

We hit 1 million! Mardi Gras Outlet's Party Idea Blog has reached 1 million all time views! Thanks a million for staying tuned to our tutorials and crafting ideas. We are celebrating by giving away the deco mesh wreath shown above. Want it for free? Simply comment on this blog post, and we will pick a random lucky winner.

We will announce the winner later this week along with the video tutorial for creating this fun pink and blue mesh wreath. Good luck! 


UPDATE!

Congratulations to Missy Smith who won this pink and blue deco mesh wreath!

CLICK HERE for our step-by-step video tutorial on how to make your own wreath.

May 14, 2012

Stars n' Stripes Snack Cups: Free Printable

DIY Patriotic Snack Cups | Free 4th of July Printable from MardiGrasOultet.com


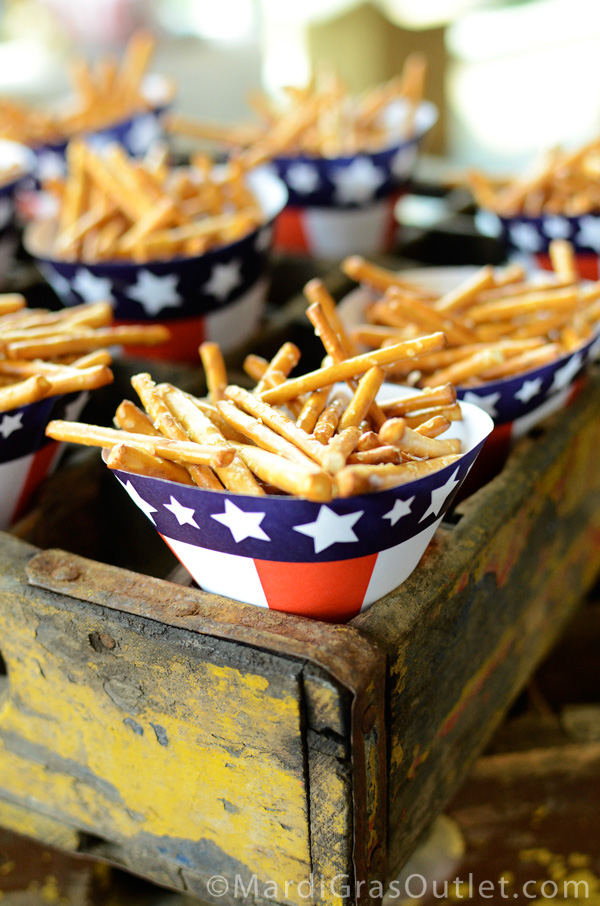
School is almost out for the summer! Celebrate the arrival of the lazy days of summer with a Memorial Day barbecue or backyard picnic. These patriotic Stars n' Stripes snack cups in red, white and blue are a cute, budget friendly party idea that will wow your guests. Easy DIY paper cups are convenient and portable containers for pretzels and other fun snack foods. Use the free download (available here) for these printable snack cups!

Click on the link above to download the printable free PDF template. You will need a PDF reader( available here for free). 

Print out as many as you need on your home printer onto 8.5"x11" copy paper or card-stock. You can  also save the file and have them copied on a color copy machine at your local copy center.

DIY Patriotic Snack Cups | Free 4th of July Printable from MardiGrasOultet.com

DIRECTIONS
Cut out the half-circle template, and then roll it into a cone shape. Make sure that the paper edges overlap by a few inches, and line-up at a red stripe. Staple or tape the cup together.


DIY Patriotic Snack Cups | Free 4th of July Printable from MardiGrasOultet.com

Once you have made the cups, stack them up next to bowls of snacks on the table. And let your guests fill them up during your party.

Or have them filled with fun party snacks. We found these great vintage rustic wooden coke crates that held the snack cups perfectly. A pretty presentation and easy to grab snack on the go!

DIY Patriotic Snack Cups | Free 4th of July Printable from MardiGrasOultet.com

Snacks with family and friends- Let the good times roll this summer! Enjoy!

May 8, 2012

DIY Patriotic Fireworks Centerpiece

fireworks centerpiece
Memorial Day and the Fourth of July are just around the corner, so set the stage to celebrate with a crafty DIY fireworks centerpiece! This red, white and blue table decoration is an easy and safe way to add fireworks to an outdoor party or barbecue. To see how to make it, keep scrolling for our tutorial which uses deco flex tubing ribbon.

supplies patriotic fireworks centerpieces ideas
SUPPLIES
To purchase these products from www.mardigrasoutlet.com, click on the individual product link below or click HERE for a page listing of all products.

   Scissors

Time/Cost
This centerpiece takes less than 1 hour to make. These products cost aproximately $30 with product left over to make additional centerpieces or decorations.

fireworks centerpiece base
STEP 1: Make the Base 
The clear plastic centerpiece base plate and column come separately, so you will have to insert the column into the base. Before filling the column, tape the underside of the base to keep the beads from falling out through the center hole.

With the red, white and blue Mardi Gras beads, layer in each color of beads to fill the centerpiece column. You may have to cut some strands to make the bead layer evenly. 

STEP 2: Make the Fireworks Puffs 
Gather the ends of the red, white and blue deco flex ribbon and hold in one hand.


Make a loop with all three colors at once and hold in the same hand. The loop should be about the same length as the loose ends of the ribbon. Form another loop with all three colors. Keep making loops, going back and forth about 8 to 10 times, holding them in one hand.

*This fireworks puff is about 4-inches wide, but we made a variety of sizes for the centerpiece, from only 2-inches wide to about 10-inches.

Now cut a short length of tubing and tie tightly around the center of the loops, where you have been holding. 


Cut the end of each loop you made on both sides.

It should look like this once you have cut all of the loops. Fluff out the puff to make it look rounder.

STEP 3: Attach Wire 
Cut a 12"-18" length of aluminum craft wire and twist one end around the fireworks puff.

Cut a piece of white deco flex tubing ribbon and insert the wire through the middle of the tube, to hide the wire. The ribbon should be about the same length as the wire.

fireworks decorations diy ideas sprays how to make
STEP 4: Make more puffs 
This centerpiece has 7 fireworks. Each puff has different color combinations and are different sizes to give variation to the centerpiece. 


fireworks memorial day fourth 4th july patriotic centerpiece party decorations ideas deco flex tubing ribbon

STEP 5: Insert into the centerpiece base 
Now you can stick the wire ends into the column. As you add each firework, turn the centerpiece to make sure it looks good from all angles.

For the two taller and larger fireworks, insert the wire into the sturdier plastic balloon sticks instead of the deco flex tubing.

fourth 4th july usa fireworks centerpiece "red white blue" patriotic tutorial diy how to make making
You could also use these fireworks individually. Fill a mason jar with sand, and insert one fireworks spray. Make several of these to decorate longer tables or dessert bars.


The same fireworks spray was used to make this red, white and blue wreath. Click here to see the tutorial on how to make the burlap ribbon wreath. 

We hope you have a safe and memorable
Memorial Day celebration!

LinkWithin

Related Posts with Thumbnails