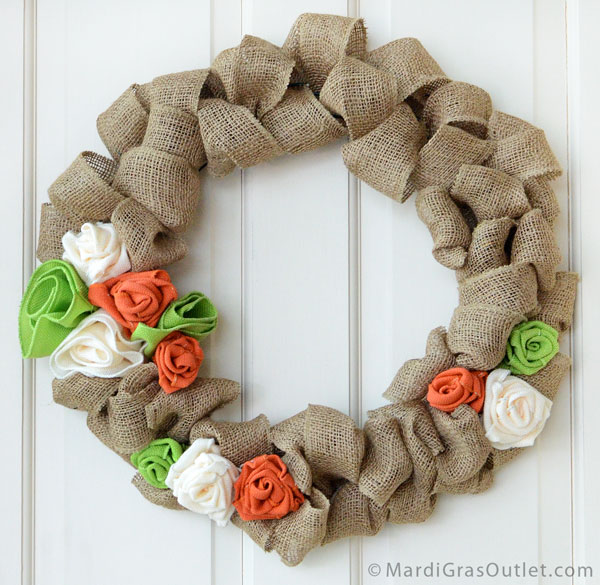
Great texture, easy to use and inexpensive...all of these traits make natural, woven burlap a popular craft choice right now! A bubble burlap wreath is an easy do it your self project using this versatile fabric. The natural 4" wide jute burlap ribbon used in this wreath project easily transitions from summer decoration to fall with the addition of harvest colored flowers (roses and rosettes). The complete tutorial is below with directions for not only the wreath, but also the precious rose accents.
SUPPLIES: To purchase these products from www.MardiGrasOutlet.com, click on the individual product link below or click HERE to see a complete supply list.
- 24 Gauge Paddle Floral Wire: Gold, (optional)
- Scissors
- Hot Glue Gun
The cost to create this basic burlap wreath with a single color of ribbon roses is just $20. A full roll of 10 yard burlap ribbon is needed to fill the wreath form. The wreath took about 30 minutes to make, and the ribbon roses took an additional 30-45 minutes.
Step 1- Attach Ribbon to Wreath Form
Fold the burlap ribbon in half. Then attach to the outside of your wreath form. You can either weave a piece of floral wire through your ribbon layers and attach the burlap by twisting the wire around the outer ring, or you can simply tie a knot in the ribbon around the wreath form.
Step 2- Weave the Ribbon
Begin to weave the ribbon through the wire wreath form. To make the weaving easier, we cut our ribbon role down from 10 yards, to 4 lengths of 2.5 yards each. Weave the end from the outside towards the inside. Do not pull the ribbon tight, leave a small poof of burlap to create the "bubble".
Step 3
Weave back towards the center and again over to the right hand side, making sure that there is extra ribbon pulled upwards to create each bubble and that the ribbon stays folded in half.
Step 4- Weaving
Weave above the inner ring, through the center, and then below the outer ring of the wreath form. Follow the arrows on the photo above.
Step 5- Continue Weaving
Each 2.5 yard length of burlap ribbon should go a little less than 1/4 of the way around the wreath form. Keep the loops as close together as possible without bunching, their rough texture will keep the loops in place. The loops do not need to be of a uniform size, and if you've made a mistake in weaving, once you fluff the wreath those areas will become nearly invisible.
Step 6- Add in Flowers
When you have made it to the end of the burlap ribbon, attach it to the work wreath by either tying a knot or wiring it the form as outlined in step 1. There should be a gap of about 4-6 inches between the beginning and end of the burlap sections where the wire wreath form is exposed. Here you can attach accessories, floral sprays, or ribbon and bows. We'll show you in the next few steps how to create roses out of burlap that will fill the space easily.
Step 7- Making Burlap Roses
- Cut a length of wired ribbon that is between 20 and 28 inches, (a longer ribbon makes a larger rose).
- Pull the wire out from one side of the ribbon.
- On the other side of the ribbon pull the wire out very slightly, less than a half of an inch, and fold it over, (this keeps the ribbon from slipping off of the wire in the next step).
- At the opposite end, carefully pull the wire out so that the ribbon begins to ruffle. Now your ribbon should be bunched towards to the end of the folded over wire.
- Grasping the wired side of the ribbon, hold the base of your flower while rolling it up.
- Once you have made a roll of ribbon, you can glue to secure, or simply cut an 8 inch piece of floral wire, and insert it through the base of the rose directly above the ribbon's wire. Make sure to draw the floral wire through all the layers of the ribbon.
- Twist the wire ends together securely at the base. Voila! Now repeat the process to make many roses! This technique will make a larger, more voluminous rose.
This is the how the back of your wreath should look.
Forming Bubbles-
When you've finished constructing the wreath and adding flowers, the burlap will need to be fluffed. Pull the ribbon outwards so that it is no longer in half.
This burlap wreath can easily translate from season to season. Use this method to create decorations for patriotic, rustic summer and natural fall harvest styles.
Check out our upcoming post on how to make this ruffle style bow with 10" wide burlap ribbon.


That's amazing, what a great idea for creating a custom wreath.
ReplyDeleteThanks Amanda! We think it would be great for any color of burlap, so its versatile for other seasons and holidays.
Delete