October 16, 2012

DIY Video Tutorial: Christmas Wreath with Tinsel Ball Wreath Form


Mesh, mesh and more mesh! Have you noticed it's everywhere lately. That's because this versatile decorative mesh makes getting creative and decorating for the holidays so much fun.  The holiday color scheme featured in our latest tutorial is traditional, with a pop of modern lime green made on the new tinsel ties wreath form. These easy to use wreath forms feature thin metallic tinsel wire ties topped with festive ball accents.

This video tutorial for a Christmas themed wreath is the latest in our series of informative how to videos using deco mesh and work wreath forms (see all our videos, here). Our poly deco mesh video tutorial guides you through the easy steps to create this festive wreath that you  mix-and-match to fit your home's holiday decor. 

Wreath, Christmas, Deco Mesh, Holiday Craft, DIY, Video Tutorial, Wreath Supplies

Supplies:

To purchase these products from www.mardigrasoutlet.com, click on the individual product link below or click here.

Scissors

Cost/Time

The 24" wreath form takes approximately 8 yards of Deco Mesh.  After adding the accent ribbon, tubing, and tinsel roping, there will be some products left on the rolls.  The total cost of the supplies with all the accents is under $50.  This modern Christmas Wreath takes under 45 minutes to make.


Christmas Deco Mesh Wreath


October 8, 2012

Making a Large Bow with Deco Mesh

Deco Mesh, Bow, Bow Making, Poly Deco Mesh, Tutorial, DIY, Holiday Bow, Wreath

These over sized DIY bows are great for decorating doors, walls and porches for Christmas and holidays. Making large bows from 21-inch wide deco mesh is surprisingly easy! Just follow our tutorial on how to make your own. 
Deco Mesh, Bow, Bow Making, Poly Deco Mesh, Tutorial, DIY, Holiday Bow, Wreath

SUPPLIES (click on the product name to purchase at www.mardigrasoutlet.com)
Scissors

The total cost for this bow will be around $4. You can make about 2 to 3 bow from one roll of deco mesh, depending on how full you make the bow top and how long the bow tails. The bow shown here is about 20"x40"!

Deco Poly Mesh is a type of soft plastic netting that holds a full shape, allowing you to easily make wreaths, bows, garlands and more (see our tutorials page for more ideas). Deco Mesh also comes in many colors, patterns and styles. One roll of deco mesh will make about 2- 3 large bows.

You can follow these same steps, but use different colors of Deco Mesh to make a custom bow for any holiday or occasion. Click here to see more deco mesh colors. 

Here is the tutorial:

Deco Mesh, Bow, Bow Making, Poly Deco Mesh, Tutorial, DIY, Holiday Bow, Wreath

STEP 1: Make a tail
Make a tail for the bow by cutting a length of deco mesh that is about 5 or 6 feet long. Hold the mesh piece at the middle and straighten out the tails. Deco mesh naturally wants to curl. Set this tail piece aside.


Deco Mesh, Bow, Bow Making, Poly Deco Mesh, Tutorial, DIY, Holiday Bow, Wreath

STEP 2: Make the Bow Top
To make the bow top, grab the end of the roll of deco mesh at the center. Start gathering the mesh into one hand down the center. Fold as you gather for a fuller bow, and keep going until you are satisfied with the bow size. This bow used about 6 or 7 feet of deco mesh.
Deco Mesh, Bow, Bow Making, Poly Deco Mesh, Tutorial, DIY, Holiday Bow, Wreath


Deco Mesh, Bow, Bow Making, Poly Deco Mesh, Tutorial, DIY, Holiday Bow, Wreath


STEP 3: Trim
Once you have made the bow top, cut the mesh at the bottom.


Deco Mesh, Bow, Bow Making, Poly Deco Mesh, Tutorial, DIY, Holiday Bow, Wreath

STEP 4: Attach the tails
Take the other piece of deco mesh that you cut in the first step (the tail), and use it to tie around the bow top. The bow tails should wrap around where you have been holding. Tie a simple knot at the back to secure. Straighten out the bow tails.  

Deco Mesh, Bow, Bow Making, Poly Deco Mesh, Tutorial, DIY, Holiday Bow, Wreath

Making this same bow in a striped patterned looks great as well! Check out our first version of this bow in red, white and blue for the 4th of July, HERE.

Deco Mesh, Bow, Bow Making, Poly Deco Mesh, Tutorial, DIY, Holiday Bow, WreathDeco Mesh, Bow, Bow Making, Poly Deco Mesh, Tutorial, DIY, Holiday Bow, Wreath

Deco Mesh, Bow, Bow Making, Poly Deco Mesh, Tutorial, DIY, Holiday Bow, Wreath
 If you are looking to make a Christmas bow, we suggest some of our Christmas patterns like these. Click HERE for the whole selection.

Deco Mesh, Bow, Bow Making, Poly Deco Mesh, Tutorial, DIY, Holiday Bow, Wreath


September 30, 2012

Video Tutorial: Glitter Ball Halloween Wreath

Wreath, Deco Mesh, Poly Deco Mesh, Halloween, DIY, Video Tutorial, Fall Craft, Fall Deco Mesh
It's that time of year again...spooky decorations, pumpkin carving, and Halloween craft projects! This year, we were inspired by new Halloween color combinations that adds lime and purple into the traditional mix of orange and black. We created this whimsical Halloween orange mesh wreath with sparkly glitter balls and pops of lime green and purple accents. The video tutorial (featured below) gives you step by step instructions for making this fun mesh Halloween wreath.  We hope it inspires you to add pops of unexpected colors into your Halloween decorations this year!


Wreath, Deco Mesh, Halloween, DIY, Video Tutorial, Fall Craft, Fall Deco Mesh, Supplies

Supplies:

To purchase these products from www.mardigrasoutlet.com, click on the individual product link below or click here.
Scissors and/or Wire Cutters

Cost/Time:

The 30" wreath form takes 10 yards (a whole roll) of Deco Mesh to fill.  After using the accent ribbon, tubing, and tinsel roping, there will be some products left on the rolls.  The total cost of the supplies with all the accents is approximately $55.  The Glitter Halloween Wreath takes under 45 minutes to make and is a great family craft project!

Our finished Halloween Mesh Wreath
Wreath, Deco Mesh, Poly Deco Mesh, Halloween, DIY, Video Tutorial, Fall Craft, Fall Deco Mesh
For our full list of video tutorials on how to make deco mesh wreaths, bows, garland, wall trees and much more, visit our tutorials page or Mardi Gras Outlet's channel on YouTube .
Go to our website to order materials and see more design inspiration at MardiGrasOutlet.com


September 24, 2012

DIY: Halloween Spider Puff Decoration


These"not too spooky" Halloween Puff Spiders are full of personality. Created with chocolate brown poly deco mesh and metallic tinsel garland, these spiders are weather resistant and durable  so they can be hung anywhere outdoors! Add them to some fake spider webbing for cute Halloween decorations that will not scare the little ones away! Keep reading to find out how we created them.


SUPPLY LIST

To purchase these products from www.mardigrasoutlet.com, click on the individual product link below or click here.

21" Poly Deco Mesh: Metallic Chocolate
Metallic Tinsel Roping: Chocolate
Craft Wire
1.5" Wire Ball (in a coordinating color)
Scissors

COST/TIME:
This spider puff decoration took approximately 20 minutes to make.. You will need  4 yards of mesh per spider leaving you about 6 yards on the mesh roll left over! The materials cost about $10.00 with enough material for 2 spiders.


Pre-cut approximately 30 pieces of craft wire (5"-6" pieces).

Using the 21" wide mesh, cut small lengths/curls of mesh, then cut in half length-wise as show. Or you can use 10" wide mesh with out cutting them in half.

You will need approximately 30 pieces of mesh curls for the spider.


Continue adding onto the wire ball until you have uniformly covered the whole surface.


Make the spider legs out of the metallic tinsel garland in chocolate. Cut four 2' long sections. Bend in the middle to form legs.

Attach the tinsel legs into the wire ties- two on each side.


Bend the tinsel in the middle and at the ends to form your spider legs.

Create silly or spooky eyes with card stock paper or plastic googly eyes. Glue or wire the eyes into the puff to create your spooky spider full of personality.

Silly Spider Success!

September 7, 2012

DIY Video Tutorial: Fall Harvest Wreaths


Fall Deco Mesh, Fall Wreath, DIY, Video Tutorial, Harvest, Autumn Craft, Poly Deco Mesh


Here's our latest "do-it-yourself" video tutorial for Fall Harvest themed wreaths. Creating an elaborate fall wreath is easy when you have the tools!  Our video tutorial  takes you through all the steps from beginning to end with materials such as a work wreath form, deco mesh, and 3 layers of ribbon and


Fall Deco Mesh, Fall Wreath, DIY, Video Tutorial, Harvest, Autumn Craft, Poly Deco Mesh

SUPPLY LIST
To purchase these products from www.mardigrasoutlet.com, click on the individual product link below or click here.
24" Work Tinsel Wreath Form: Green
21" Poly Mesh Roll: 2-Tone Apple and Moss, 10 yards
2.5" Faux Burlap Ribbon, Orange: 25 yards
Moss Rope Garland: 25 ft
2.5" Jute Window Pane Mesh, Natural: 10 yards
Scissors

COST/TIME:
This wreath took approximately 30-45 minutes to make. Depending on the size of your deco mesh loops, you will use approximately 7 yards of mesh. As for the ribbon-the size and quantities of  bows you make will determine how much you need. In our version we have a few left over feet from both ribbon types as well as the Moss Rope Garland.  The basic wreath form and deco mesh creation will cost under $13, and the total cost of the project including ribbons is $40 with materials to spare!

Fall Deco Mesh, Fall Wreath, DIY, Video Tutorial, Harvest, Autumn Craft, Poly Deco Mesh

The Basic Wreath Finished


Fall Deco Mesh, Fall Wreath, DIY, Video Tutorial, Harvest, Autumn Craft, Poly Deco Mesh

Add your own Fall Harvest accessories!

From the basic wreath form you can create a variety of different fall looks. Fall inspired greenery like faux fall leaves, small orange pumpkins, dried harvest wheat and even persimmon branches are all used on our wreath from to create different versions. Here is some inspiring finished fall wreaths.


Fall Deco Mesh, Fall Wreath, DIY, Video Tutorial, Harvest, Autumn Craft, Poly Deco Mesh

Harvest Pumpkin Wreath

This wreath uses our the moss apple deco mesh as a base. The added in burlap ribbon and jute window pane ribbon add nice texture, but the wreath needs accessories that say Fall. The additional pumpkins and natural wheat help to tie all the elements together.

Fall Deco Mesh, Fall Wreath, DIY, Video Tutorial, Harvest, Autumn Craft, Poly Deco Mesh

Detail of Fall Pumpkin Wreath

Fall Deco Mesh, Fall Wreath, DIY, Video Tutorial, Harvest, Autumn Craft, Poly Deco Mesh


Fall Wreath with Persimmons

Don't limit yourself to faux greenery! Fall is the perfect time to harvest real produce and greenery to accent your wreath. For this fall wreath version, we used persimmons and branches to add another layer of fall flavor and texture. This season persimmon and bittersweet branches can be found at your local grocery store, florist or maybe your neighbors yard.

Let us know how your wreath turned out!

Send us photos of your finished project (preferably on a neutral background or door), and we'll feature your work on our blog or Pinterest. Email us at ideas@mardigrasoutlet.com. Want step-by-step instructions on bow-making or other wreath tutorials?  Check out our tutorials page or visit us on YouTube.

August 16, 2012

Fall Wreath Tutorial with New Tinsel Work Wreath Form


Our children are back in school and football chatter abounds. This means fall is around the corner. It's time to decorate your door for the changing season.This autumn inspired metallic copper wreath will bring you into fall and beyond.


A brand new work wreath product - the tinsel work wreath- is used to create this wreath. This basic wreath work form is the same size and style as regular work wreath forms but uses smaller tinsel ties. These tinsel ties blend in with your wreath filler. This form comes in many different sizes, colors and styles. Check out all the different styles by clicking here.


What are Work Wreath Forms and why use them? A work wreath is a basic round metal wreath with pre-attached wire "tips". The tips are used to attach craft, floral, and fabric. Have you ever made a wreath using only grapevine or a floral foam base? When using a work wreath there is no gluing or wiring, no hot glue guns and hunting for areas to attach your decorations. The wire tips are 5-6" long and with just a twist your crafts are attached, and multiple layers of supplies can be added into the same wire tips.

Here is the tutorial for making these cute fall wreath styles!

Supply List

To purchase these products from www.mardigrasoutlet.com, click on the individual product link below or click here.

21" Poly Mesh Roll: Deluxe Metallic Copper
24" Tinsel Work Wreath Form: Metallic Copper
Scissors

COST/TIME:

This project takes approximately 20 minutes. The estimated total cost of supplies for the basic wreath is about $18 as shown. Using the 24" wreath form, you will have poly deco mesh product left over.

Each Poly Mesh Roll comes with 10 yards of fabric.  For our project we used the 24" wreath form which uses approximately 5-8 yards of mesh.  If you would like a larger wreath, try the 30" wreath form, which will use a whole 10 yard roll of Deco Mesh. Other Work Wreath Form color options can be found here and alternative colors of deco poly mesh here.

Step 1- Gathering the Mesh

Make every poof or loop of Deco Mesh by first gathering the mesh from each side, do not wrinkle or bunch.  By gathering it you ensure that it will be easier to adjust and make fuller, airier puffs.


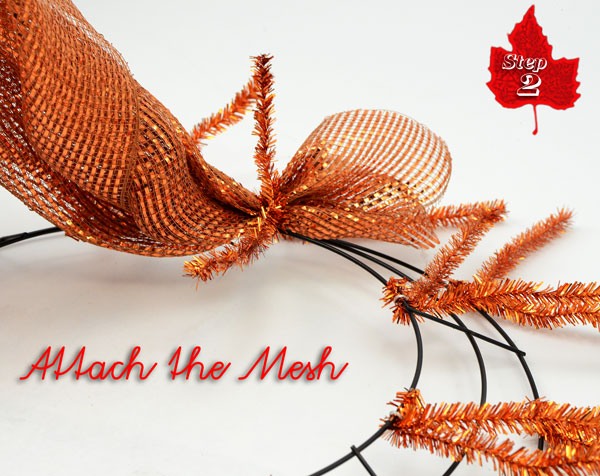
Step 2- Attach the Mesh to the Work Wreath

Place the Deco Mesh down in the CENTER or innermost ring of the wreath and twist the tinsel ties tightly to secure the mesh onto the form.  The extra tinsel ties become your method of attaching additional design accents and ribbon.


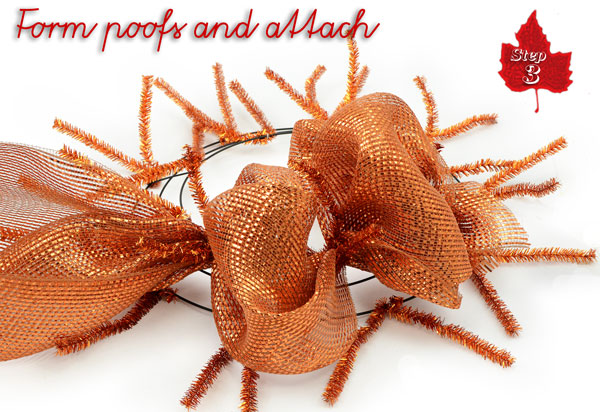
Step 3- Form loops

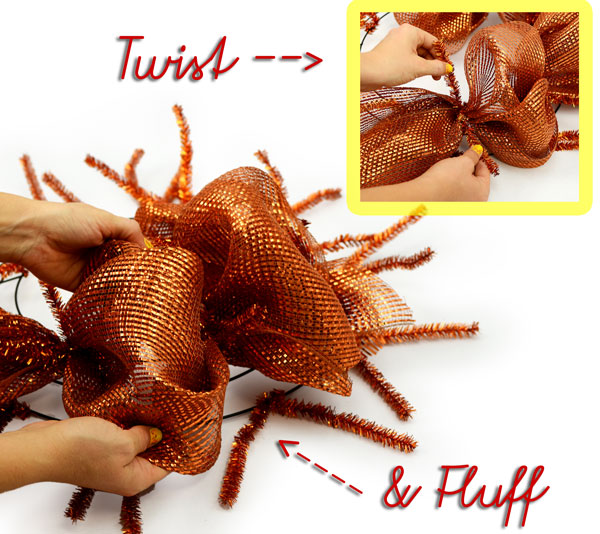
Larger loops will create a more voluminous wreath. And smaller loops a more compact wreath. Whatever size you choose, aim for consistent loop size around the entire form.  Attach the mesh to the form at every pair of tinsel wire by twisting and work your way around the center ring.


It is important when making loops or puffs to GATHER the Deco Mesh, do not bunch or wad it together.  Bunching the mesh will cause it to look wrinkly and dense instead of airy and light.


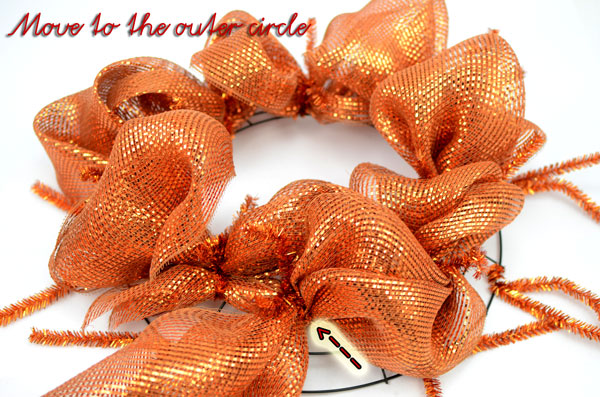
Step 4- Transition to the Outer Ring of the Work Wreath

When you have made loops around the entire inner circle of the wreath, re-attach the mesh to the same tinsel you began at.  This ensures that you do not have any gaps in coverage.  Without making any cuts to the fabric, bring the deco mesh to the OUTER circle of the wreath, making a loop in between the inner and outer circles.


Continue forming loops around the outermost circle of the work wreath.

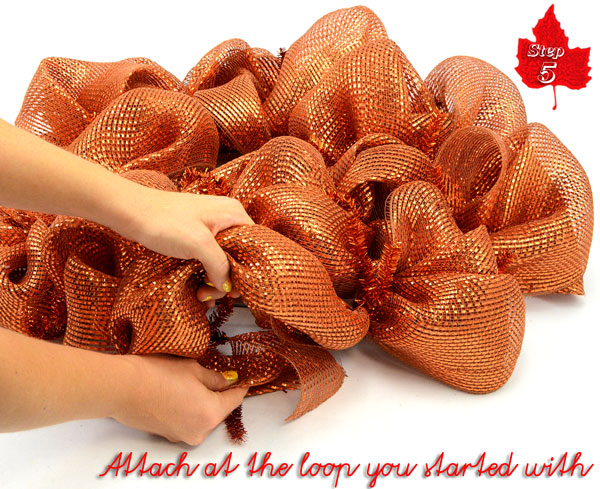
Step 5- Attach and Finish

Once you have worked your way around the outer circle, cut the Deco Mesh only after you have gathered enough to make your final loop.  Attach it back into the tinsel garland twist you started the outer circle with, this prevents gaps in coverage.  You can fold the Deco Mesh underneath itself or simply trim away any excess.

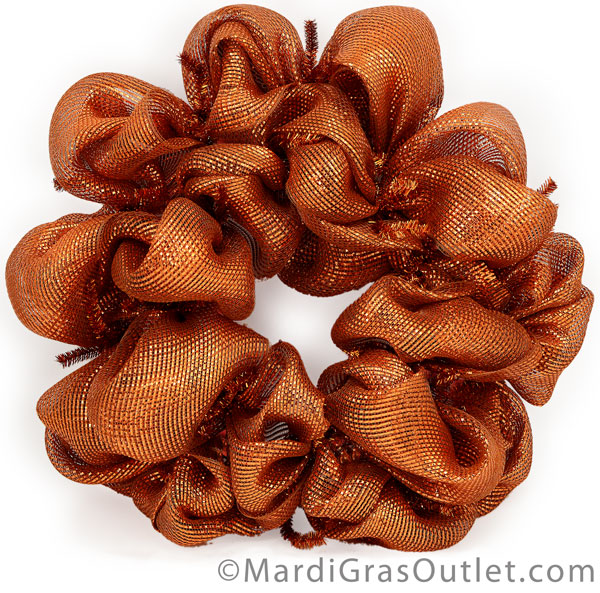
The Finished Product- the basic wreath


This basic wreath took under 20 minutes to complete.  The 24" Metallic Copper Tinsel Work Wreath Form's cost is $5.95 and the 21" Deluxe Copper Metallic Deco Mesh is $11.95, making the total cost for this project at $17.90.  At that price you can still afford to fill the wreath with additional decoration!


Add Trim and Accessories!

From this basic wreath form you can create many different looks to go through all the fall holidays. Using the same tinsel ties, add in accents or ribbon to create the look you desire. Here are some examples to inspire you. This wreath goes from fall to Halloween to Thanksgiving with a few simple changes.
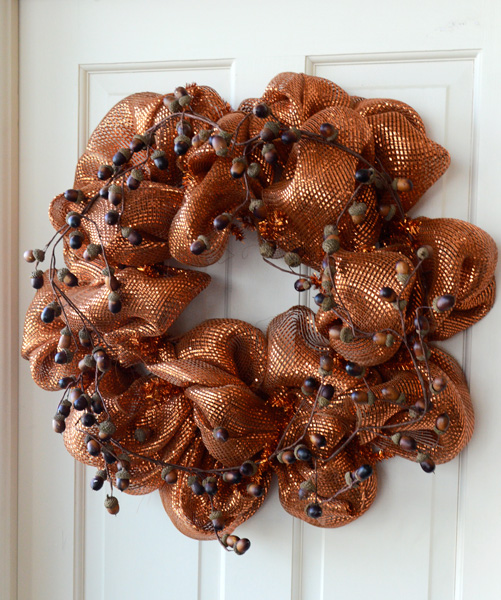
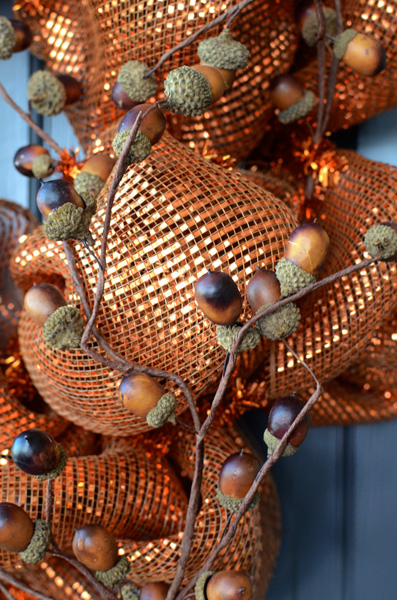
Fall Acorn Wreath
An acorn garland woven around the form creates the perfect simple fall wreath.

Love the cute tiny faux acorns on the garland!
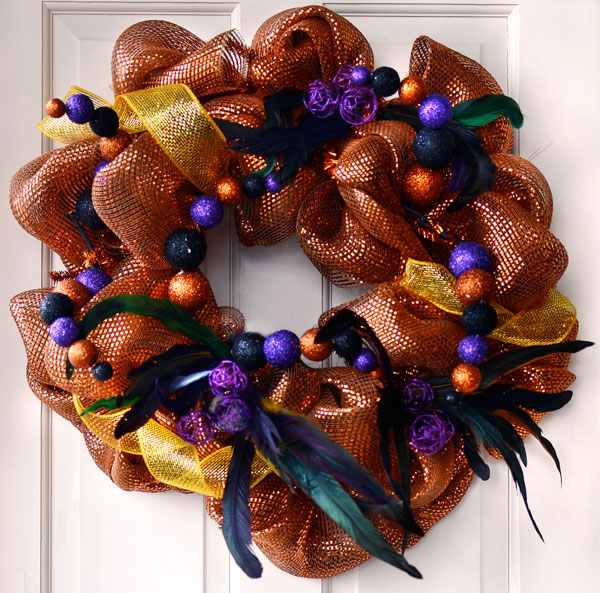
Halloween Feathers Wreath
The addition of glittered orange and black accents transforms your fall wreath into a sparkling Halloween door decoration.
Glittered orange, black and purple Halloween ball sprays, fun iridescent feathers, purple wire balls and gold mesh ribbon.
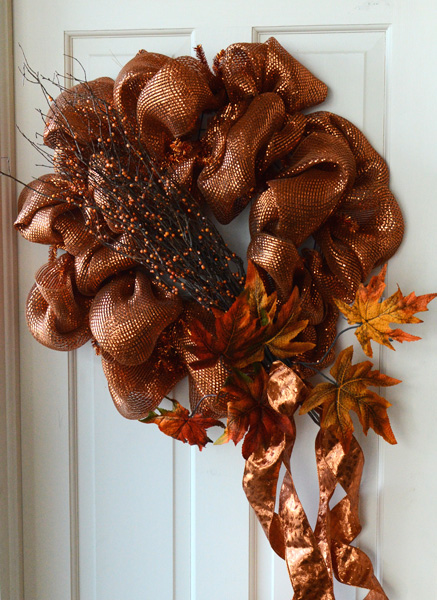
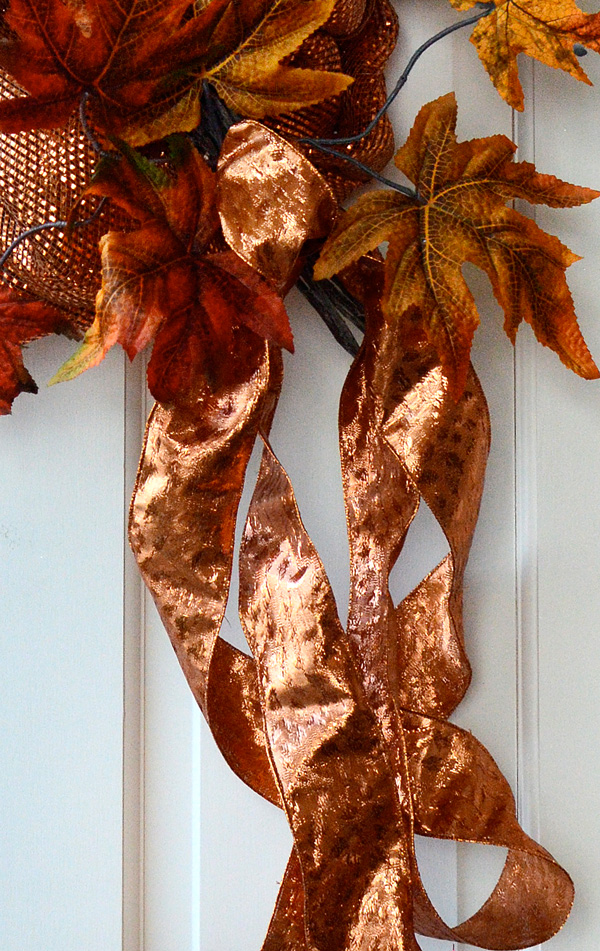
Bittersweet and Fall Leaves Wreath
After Halloween -transition into Thanksgiving by replacing the orange and black accents with fall leaves, pretty copper animal print ribbon and bittersweet branches.


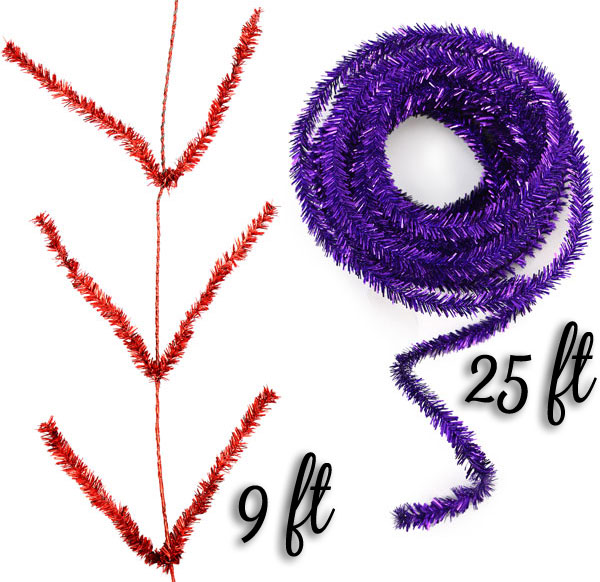
Love this look and want to add more to your door decoration? Try Tinsel Work Garland or Tinsel Roping, which come in a wide variety of coordinating colors. Tinsel Work Garland is 9 feet long and comes with 44 pre-attached wire tips so you can create custom garlands that match your wreath. Tinsel Roping is 25 feet long and is enough to accent a 30" work wreath with some to spare. Both are wired to allow for flexibility and ease of adding design accents.

Hope you have a Happy Fall!

LinkWithin

Related Posts with Thumbnails