April 30, 2013

Rope Wrapped Decorative Letter Tutorial

Decorative Wood Letters, Tutorial, Jute Rope, Wrapped Letters, DIY Craft, Burlap, Decor Letters


Wrapping decorative letters with jute rope gives them a natural texture that you just can't achieve with yarn or paint.  These rope wrapped decorative letters can be used to personalize wreaths, walls or bookcases. The jute rope product we use in this tutorial is coated so it is less likely to fray and can withstand use on an outdoor wreath. This is the second post in our series of creative ways to accent plain decorative letters. To see more creative ideas, click here

Decorative Wood Letters, Tutorial, Jute Rope, Wrapped Letters, DIY Craft, Burlap, Decor Letters

Wrapping decorative letters is easy and you can use almost any kind of string, ribbon, or rope.  You can make them solid colors, striped, or hombre. The options are endless. We chose to make our striped to add two punches of color. What will you create?

Supplies

Cost/Time

This decorative letter craft project cost only $7!  It took about 30 minutes to complete.
Decorative Wood Letters, Tutorial, Jute Rope, Wrapped Letters, DIY Craft, Burlap, Decor Letters
Step 1- Glue on String
Glue a layer of string around the outside of the letter, this will help hide areas that you may miss when wrapping.

Decorative Wood Letters, Tutorial, Jute Rope, Wrapped Letters, DIY Craft, Burlap, Decor Letters
Step 2- Glue and Wrap
Glue your string onto the backside of the letter.  This will keep the front neater and more uniform.  Wrap around the letter, keeping the rope tight, adding some glue every few inches to keep the string or rope secure.

Decorative Wood Letters, Tutorial, Jute Rope, Wrapped Letters, DIY Craft, Burlap, Decor Letters

Step 3- Changing Colors
Trim the first color rope from the roll, and glue down the next color.  Wrap the same way you did the first color, gluing every few inches on the backside of the letter.

Decorative Wood Letters, Tutorial, Jute Rope, Wrapped Letters, DIY Craft, Burlap, Decor Letters
Step 4- Keep Wrapping
Just keep wrapping!  Keep the rope as taught as possible without moving it from the glue.

Decorative Wood Letters, Tutorial, Jute Rope, Wrapped Letters, DIY Craft, Burlap, Decor Letters
The finished Letter "S"!  We really like the texture of the Jute rope and the bright, whimsical stripes!

Decorative Wood Letters, Tutorial, Jute Rope, Wrapped Letters, DIY Craft, Burlap, Decor Letters

The rustic quality of jute lends itself to many different decor styles.

Decorative Wood Letters, Tutorial, Jute Rope, Wrapped Letters, DIY Craft, Burlap, Decor Letters

Happy Crafting!


April 18, 2013

DIY Chair Sash Rosettes: A Tutorial


chair bows, DIY, Tutorial, Deco Mesh, Crinkle Sheer, Wedding Chair, Chair Sash, Rosette

Tired of those plain Jane folding chairs?  Sheer fabric sashes tied into rosettes change the look from plain to pretty. This tutorial will show you how to tie your own beautiful chair bow rosettes with ribbon or fabric. Save some money (by not renting expensive chair sashes)  and add a pop of color to coordinate with you party theme!  Chair bows and sashes are perfect for any type of party, but are perfect for weddings, engagement parties, anniversary dinners or even for baby and bridal showers. 

SUPPLIES

This tutorial uses a 24" wide fabric sold on a roll of 10 yards. This fabric is a crinkled sheer poly organza fabric that adds volume to the rosette. A full selection of crinkle sheer colors is available here. This look can be created with a large variety of fabrics or extra wide ribbons.

COST/TIME

A Rosette without tails uses 5-6 feet of crinkle sheer, and a Rosette with tails uses about 8 feet.  Our Crinkle Sheer comes with 30 feet on a roll, which means you can make 4-6 Rosettes with just one roll. This equates to about $3 per chair bow, a bargain in comparison to renting bows and sashes! Your first Rosette will take about 10 minutes to make, but they will go much quicker the more practice you get.

Deco Mesh, Crinkle Sheer, Chair Sash, DIY, Tutorial, Rosettes, Wedding, How to

Start with an undecorated chair.
Begin by centering your chair in front of you.  These rosettes can go on the back of any chair style, which means they don't just have to be for special occasions only. 

Deco Mesh, Crinkle Sheer, Chair Sash, DIY, Tutorial, Rosettes, Wedding, How to

STEP 1- Center the Fabric
Make sure the center of your fabric meets the center area of the FRONT of your chair back.  Pull the length of fabric around to the back and ensure the fabric is tight and stays tight through the duration of tying.  

Deco Mesh, Crinkle Sheer, Chair Sash, DIY, Tutorial, Rosettes, Wedding, How to

STEP 2- Tie a knot
Tie the fabric in a knot at the back of the chair.  The smaller the knot you make, the easier it will be to finish off the Rosette in the end.

Deco Mesh, Crinkle Sheer, Chair Sash, DIY, Tutorial, Rosettes, Wedding, How to

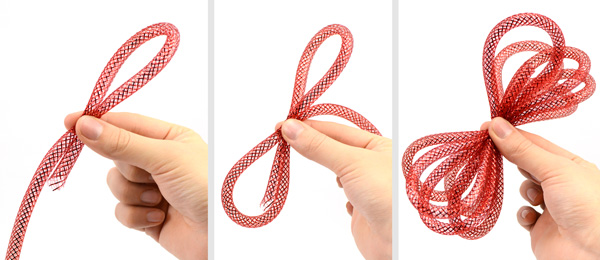
STEP 3- Twist the fabric
Twist the fabric in opposite directions.  The fabric in your right hand should twist in a clockwise direction, and the fabric in your left hand should twist in a counterclockwise direction.  The more tightly and evenly you make your twist now, the more smooth and elegant your Rosette will turn out.  If you prefer a more ruffled looking Rosette, than make twists which are slightly looser and less even.  

 Do not twist the Crinkle Sheer too tightly, you want it to coil at the base of the knot in the next step, not in your hands as you make the twists.

Deco Mesh, Crinkle Sheer, Chair Sash, DIY, Tutorial, Rosettes, Wedding, How to

STEP 4- Twist together
Twist the two lengths of fabric together in the same direction as you will be coiling the Rosette.  We twisted ours to the right and the Rosette will now move in a clockwise pattern.  Make sure the two sections of crinkle sheer are twisted tightly together.

Deco Mesh, Crinkle Sheer, Chair Sash, DIY, Tutorial, Rosettes, Wedding, How to

STEP 5- Make coils
Coil the fabric around itself.  If you coil around the base too tightly, it will look more like a braided bun of hair, so make sure to coil loosely.  

Deco Mesh, Crinkle Sheer, Chair Sash, DIY, Tutorial, Rosettes, Wedding, How to

STEP 6- Knot to secure
Bring the tail of the fabric twists back the original knot of Crinkle Sheer.  Trim any excess fabric to keep it clean and neat.  If your Rosette is loosely coiled or if you are using them for an outdoor event, it may be necessary to secure the Rosette with a safety pin.


chair bows, DIY, Tutorial, Deco Mesh, Crinkle Sheer, Wedding Chair, Chair Sash, Rosette


The Finished Rosette!
If you have made a Rosette without tails, trim the tail so that there is no extra crinkle sheer showing.  If you have made a Rosette with tails, then you can straighten the tails and trim the two sections to an equal length.

Deco Mesh, Crinkle Sheer, Chair Sash, DIY, Tutorial, Rosettes, Wedding, How to
Chair sashes are a nice addition of color to any event or party.  You can even use them for everyday decor on porches or for backyard patio furniture!

For more product info, please visit our website at www.MardiGrasOutlet.com.
Friend us on Facebook at https://www.facebook.com/MardiGrasOutlet.
View more of our great craft and decorating ideas on Pinterest: http://pinterest.com/mardigrasoutlet/.

April 3, 2013

Decorating Wooden Letters with Sheet Moss: A Creative Idea


Decorative Letters, Moss Sheet, Tutorials, Moss Crafts, Natural Decor Crafts
Personalize a wreath with your monogram. Create words to express a special message. Show support for your favorite sports team. Decorative wooden letters can be used for many different projects.  The basic wooden form gives you a blank slate to create lots of different looks. Over the next few posts we will highlight lots of creative ideas for customizing decorative wooden letters and numbers.

In the tutorial featured here, we show you have to easily cover a wooden letter "M"  with fresh green sheet moss for a natural spring look.

SUPPLIES


COST/TIME


The cost of the supplies for a moss letter is under $17. There will be lots of sheet moss product left over for additional projects or more letters (3/4 of the roll of sheet moss).  Covering the decorative letter with sheet moss takes less than 15 minutes.

Decorative Letters, Moss Sheet, Tutorials, Moss Crafts, Natural Decor Crafts
Step 1- Unroll the Moss
Unroll the moss on a flat surface, wrong side facing up.  It sheds, so using it on a surface covered with newspaper will make cleanup easier. 
Decorative Letters, Moss Sheet, Tutorials, Moss Crafts, Natural Decor Crafts


Step 2- Make an Outline
Flip the letter so that it is face down on the back of the moss, (the back should be facing you, the font of the letter above is similar to "New Standard", there is a diagram available here to tell which side is the front).  Use a permanent marker to make an outline of the letter.

Decorative Letters, Moss Sheet, Tutorials, Moss Crafts, Natural Decor Crafts

Step 3- Cut out the Outline
Cutting the moss is easily done with scissors because the back of the moss is flat.


Decorative Letters, Moss Sheet, Tutorials, Moss Crafts, Natural Decor Crafts
Step 4- Gluing
Using a glue gun or spray adhesive, apply glue to the front of the letter, and carefully lay the moss onto the surface.  Press down only when you have the exact placement correct.

Decorative Letters, Moss Sheet, Tutorials, Moss Crafts, Natural Decor Crafts

The finished Moss Letter in under 15 minutes of craft time!

Decorative Letters, Moss Sheet, Tutorials, Moss Crafts, Natural Decor Crafts, Burlap


We love the look of the decorative moss letter "M" on a textured burlap spring wreath. You can find the wreath tutorial in this post.

What would you decorate with this mossy letter?


March 19, 2013

Burlap Oval Twig Works Wreath Tutorial: 3 Wreaths in One!

Burlap, Wreath, Deco Mesh, Tutorial, DIY, Twig Works, Natural Decor


Who says wreaths have to be round? Decorate your door with an unexpected oval wreath.This fun oval wreath is the perfect shape for a door.  From the basic oval burlap wreath, we created multiple looks, creating three wreaths from one. This gives you lots of options to bring you through spring and into summer with one basic wreath. 

Our wreath form. We used a 25" oval twig works wreath form. The twig works wreaths are basic wreath forms with twine like ties already attached so you can create natural looking door decorations. The ties and form are covered in mossy texture so they blend well with natural textures. These forms can be filled with poly deco mesh, burlap, ribbon, fabric or greenery (either real or silk). Click here for the complete selection of Twig Works wreath forms.

New poly burlap mesh.The new poly burlap "mesh" was the perfect companion for the twig works form. The natural texture of the vine form works well with textured fabrics like burlap and sisal. Poly burlap looks like natural jute burlap, but it is water resistant and safe to use outdoors. Traditional burlap will disintegrate over time in the sun and water so it is not well suited for outdoor wreaths. Poly Burlap is a good alternative.

SUPPLIES:   To purchase these products from www.MardiGrasOutlet.com, click on the individual product link below or click HERE to see a complete supply list.
The cost of the basic poly burlap wreath is approximately $34. This does not include the optional accents shown below. Almost a full roll of mesh is used to fill the oval twig works wreath form.  The basic burlap wreath took under 30 minutes to make. With added accents, it should take less than one hour.

Burlap, Wreath, Deco Mesh, Tutorial, DIY, Twig Works, Natural Decor

 Step 1- Gather the the Poly Burlap Mesh
Grasp the poly burlap on both sides and  gather toward the center. Make sure to gather and not bunch the mesh for fuller poofs.


Burlap, Wreath, Deco Mesh, Tutorial, DIY, Twig Works, Natural Decor
Step 2- Attach the Burlap
Attach the poly burlap to the inside ring of the twig works wreath form by placing it into a wire tie and twisting.  The above animation shows how to twist the wire ties.

Burlap, Wreath, Deco Mesh, Tutorial, DIY, Twig Works, Natural Decor

Move down the burlap mesh about 9".  More length will create more voluminous poofs, less length will create shorter, smaller poofs. Gather from each side again and insert this section into the next wire tie.


Burlap, Wreath, Deco Mesh, Tutorial, DIY, Twig Works, Natural Decor
Step 3
Continue around the inner ring of the form- creating poofs and twist them into wire ties. Fill the entire   inner ring of the twig works wreath form.

Burlap, Wreath, Deco Mesh, Tutorial, DIY, Twig Works, Natural Decor
Step 4- Transition to the outside ring
When you have attached the burlap into every wire tie and are back at the first set, move to the outside ring of the wreath form without trimming the burlap.

Burlap, Wreath, Deco Mesh, Tutorial, DIY, Twig Works, Natural Decor
Step 5- Outer Ring
Repeat the same process of gathering and making poofs. Continue along the entire outside ring of the wreath form.

Burlap, Wreath, Deco Mesh, Tutorial, DIY, Twig Works, Natural Decor
Step 6- Trim
When you get to the last set of wire ties, trim the burlap, leaving a few extra inches of length from the wire tie.  
Burlap, Wreath, Deco Mesh, Tutorial, DIY, Twig Works, Natural Decor
The Finished Wreath!  Now its time to add accents!

Burlap, Wreath, Deco Mesh, Tutorial, DIY, Twig Works, Natural Decor, Peacock Feather

Peacock Wreath 

Elegant accents layered on the rustic burlap create a pretty, peacock wreath. Add a bow made out of this sheer  Two-Tone Organza Ribbon in a turquoise-blue shade. Matching 30" Peacock Eye Feathers are layered in on the opposite side. 


Burlap, Wreath, Deco Mesh, Tutorial, DIY, Twig Works, Natural Decor, Fern, Spring Decor


Spring Wreath with Fern

Realistic looking lacy Maidenhair Fern adds a touch of spring time green to the natural burlap. A mossy
Angel Vine Birds Nest nestles in among the fern fronds. A bright lime green and white houndstooth printed ribbon competes the spring scene.

Burlap, Wreath, Deco Mesh, Tutorial, DIY, Twig Works, Natural Decor, Decorative Letter, Moss

We love a monogram! Add your initial to your cute spring wreath creation with the new wood decorative letters and numbers that are available here. They can be personalized in tons of unique ways to coordinate with your decor or theme! Check back for our next blog post to learn how to make this fun spring moss decorative letters made with sheet moss on a roll (available here).

Burlap, Wreath, Deco Mesh, Tutorial, DIY, Twig Works, Natural Decor, Butterflies, Spring Decorating

 Fluttering Butterflies Wreath

Bright butterflies alight on our natural burlap wreath for welcome pop of color. These Feather Butterflies come in an assortment of summer colors that match the sheer Organza Ribbon in a coral color that is woven through out the wreath.

Which burlap wreath is your favorite? 

Send a photo of your burlap wreath creations to ideas@MardiGrasOutlet.com. We would love to share it with our Pinterest or Facebook followers. 


March 13, 2013

Paper Fan Crawfish Boil Centerpiece: Tutorial


This easy and inexpensive DIY centerpiece is a great way to add some Cajun flair to your next crawfish boil, crab or lobster bake seafood party! We show you how to make several different centerpiece bases in this easy tutorial filled with decorating tips and ideas. See our previous tutorial (HERE) on making paper fans to create a variety of decorative rosettes for each base.


Materials:

All of these materials are available at MardiGrasOutlet.com.  Each centerpiece only costs about $10 each to make, and you can make 5 or 6 centerpieces with the materials listed above. To learn how to create the crawfish and red foil paper fans used in this tutorial, please see our DIY Crawfish Fans post.  You will need materials 1-5 for making the fans.

Step 1: Mounting the Paper Fans

Glue a plastic stick or wooden dowel against the back of each paper fan between the folds by dipping the stick into some skillet glue and placing the stick as close to the center as possible so that it will fully support the weight of the fan.  You could also use a hot glue gun to attach the sticks.


After you have attached sticks to all of your fans, lay them out on a table and arrange them at various heights to determine how you would like the final arrangement to look. You can trim off any excess length from the sticks or just push some fans farther into your centerpiece to maintain variety.

Step 2: Creating a Base

Below we demonstrate two different bases you can choose from for your centerpiece. To create a red crinkle base, cut off a small square of a dry floral foam brick. Cut 1 sheet of Red Mylar Tissue in half, and lay them at an angle to one another with the foam brick on top (see diagram below.) Insert a small bag of sand or other weight beneath the foam brick to protect the arrangement from tipping over easily.
Lift up the mylar tissue sheeting and bunch it over the top of the floral foam. Cut a short piece of metallic red deco flex tubing and tie it around the tissue to secure. This is the centerpiece base.

Make a bow with deco flex tubing (see diagram above). First, form a loop and hold it in one hand. Form a second loop, and keep going back and forth until there are 10 loops total. While still holding the loops in one hand, use the ribbon that holds the tissue sheeting together to secure the bow to the centerpiece base. Pull out and fluff the loops.

Alternative Step 2:

To add variety to your decorating scheme, you can also use a tall, clear glass vase along with some Spanish moss and metallic red deco flex tubing to create a base for your centerpiece. The vase shown is 7" x 4".

Just pack the vase with the Spanish moss and tie a deco flex bow as described above.  You could also insert some plastic crawfish into the vase for added color.

Attach the bow to the vase using another piece of the deco flex tubing, knotting it at the back.  If your centerpiece will be viewed from multiple angles, feel free to create a bow for each side!


Step 3: Arranging the Fans

Once you have created the base of your choice, begin placing your fans on sticks down into the base. Vary the height of your fans by pushing them father into the base or by trimming the sticks to different heights.


Continue to arrange to your heart's content! Depending on how you choose to display your centerpiece, you may want to have all of the fans facing one direction, or you may want to consider the arrangement from multiple angles.


Step 4: Crawfish Table Covering

You can create a decorative resting mat for your centerpiece using crawfish print newspaper, Spanish moss and 5-inch plastic crawfish.  You may even want to cover your entire table with this decorative crawfish paper to add style while protecting the surface from those succulent mud bugs!


LinkWithin

Related Posts with Thumbnails