August 16, 2012

Fall Wreath Tutorial with New Tinsel Work Wreath Form


Our children are back in school and football chatter abounds. This means fall is around the corner. It's time to decorate your door for the changing season.This autumn inspired metallic copper wreath will bring you into fall and beyond.


A brand new work wreath product - the tinsel work wreath- is used to create this wreath. This basic wreath work form is the same size and style as regular work wreath forms but uses smaller tinsel ties. These tinsel ties blend in with your wreath filler. This form comes in many different sizes, colors and styles. Check out all the different styles by clicking here.


What are Work Wreath Forms and why use them? A work wreath is a basic round metal wreath with pre-attached wire "tips". The tips are used to attach craft, floral, and fabric. Have you ever made a wreath using only grapevine or a floral foam base? When using a work wreath there is no gluing or wiring, no hot glue guns and hunting for areas to attach your decorations. The wire tips are 5-6" long and with just a twist your crafts are attached, and multiple layers of supplies can be added into the same wire tips.

Here is the tutorial for making these cute fall wreath styles!

Supply List

To purchase these products from www.mardigrasoutlet.com, click on the individual product link below or click here.

21" Poly Mesh Roll: Deluxe Metallic Copper
24" Tinsel Work Wreath Form: Metallic Copper
Scissors

COST/TIME:

This project takes approximately 20 minutes. The estimated total cost of supplies for the basic wreath is about $18 as shown. Using the 24" wreath form, you will have poly deco mesh product left over.

Each Poly Mesh Roll comes with 10 yards of fabric.  For our project we used the 24" wreath form which uses approximately 5-8 yards of mesh.  If you would like a larger wreath, try the 30" wreath form, which will use a whole 10 yard roll of Deco Mesh. Other Work Wreath Form color options can be found here and alternative colors of deco poly mesh here.

Step 1- Gathering the Mesh

Make every poof or loop of Deco Mesh by first gathering the mesh from each side, do not wrinkle or bunch.  By gathering it you ensure that it will be easier to adjust and make fuller, airier puffs.

Step 2- Attach the Mesh to the Work Wreath

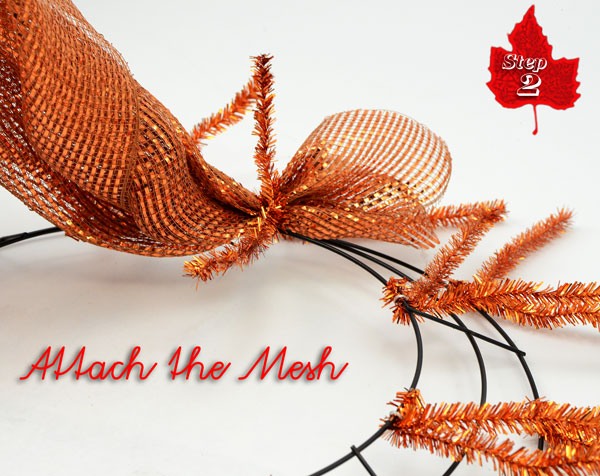
Place the Deco Mesh down in the CENTER or innermost ring of the wreath and twist the tinsel ties tightly to secure the mesh onto the form.  The extra tinsel ties become your method of attaching additional design accents and ribbon.
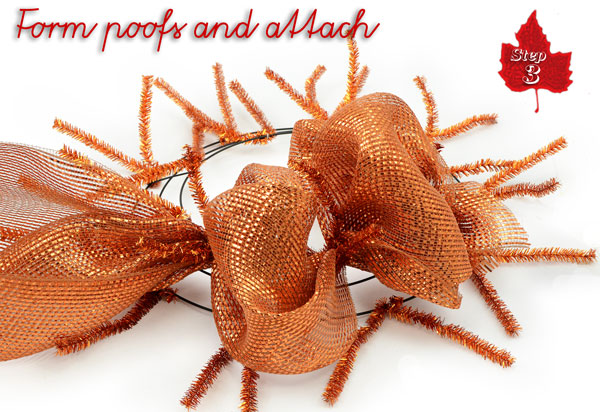

Step 3- Form loops

Larger loops will create a more voluminous wreath. And smaller loops a more compact wreath. Whatever size you choose, aim for consistent loop size around the entire form.  Attach the mesh to the form at every pair of tinsel wire by twisting and work your way around the center ring.
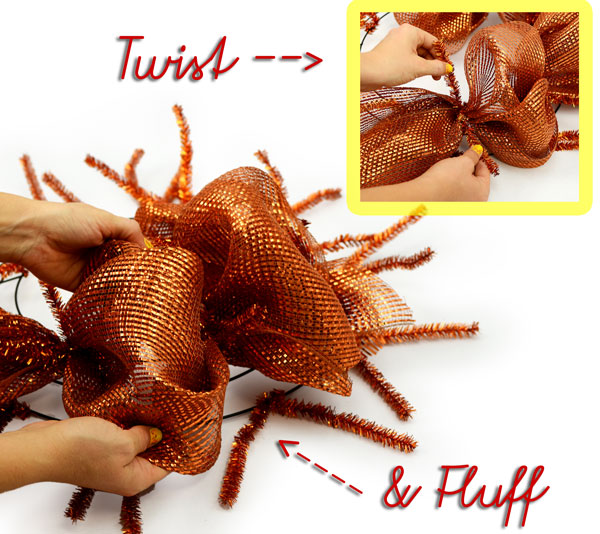


It is important when making loops or puffs to GATHER the Deco Mesh, do not bunch or wad it together.  Bunching the mesh will cause it to look wrinkly and dense instead of airy and light.


Step 4- Transition to the Outer Ring of the Work Wreath

When you have made loops around the entire inner circle of the wreath, re-attach the mesh to the same tinsel you began at.  This ensures that you do not have any gaps in coverage.  Without making any cuts to the fabric, bring the deco mesh to the OUTER circle of the wreath, making a loop in between the inner and outer circles.
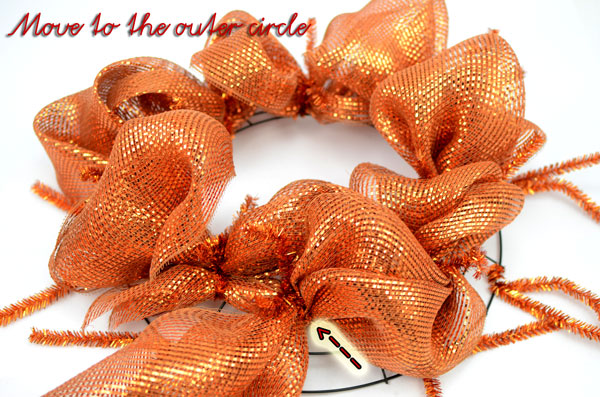

Continue forming loops around the outermost circle of the work wreath.
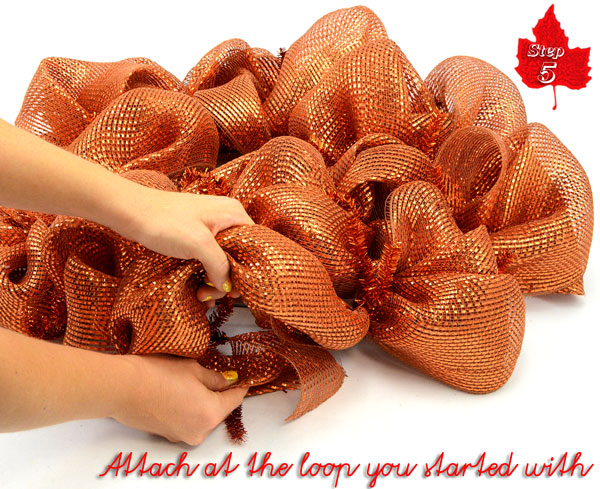
Step 5- Attach and Finish

Once you have worked your way around the outer circle, cut the Deco Mesh only after you have gathered enough to make your final loop.  Attach it back into the tinsel garland twist you started the outer circle with, this prevents gaps in coverage.  You can fold the Deco Mesh underneath itself or simply trim away any excess.

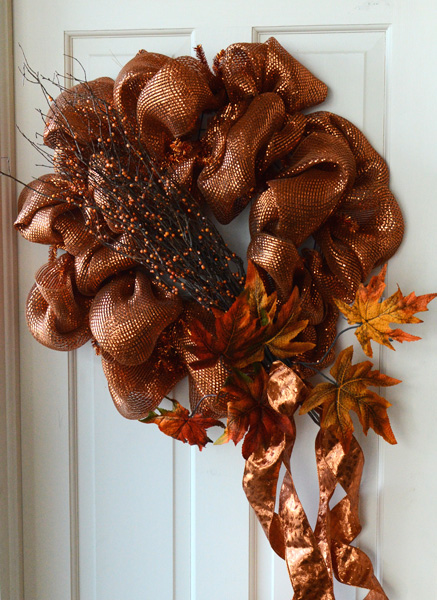
The Finished Product- the basic wreath
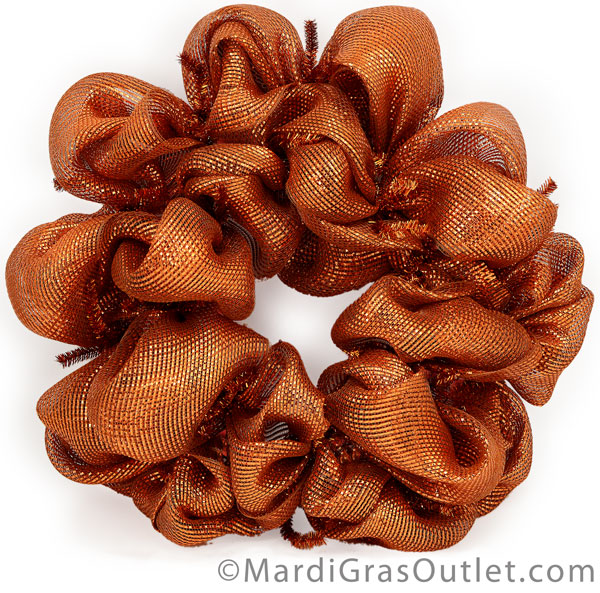

This basic wreath took under 20 minutes to complete.  The 24" Metallic Copper Tinsel Work Wreath Form's cost is $5.95 and the 21" Deluxe Copper Metallic Deco Mesh is $11.95, making the total cost for this project at $17.90.  At that price you can still afford to fill the wreath with additional decoration!


Add Trim and Accessories!

From this basic wreath form you can create many different looks to go through all the fall holidays. Using the same tinsel ties, add in accents or ribbon to create the look you desire. Here are some examples to inspire you. This wreath goes from fall to Halloween to Thanksgiving with a few simple changes.
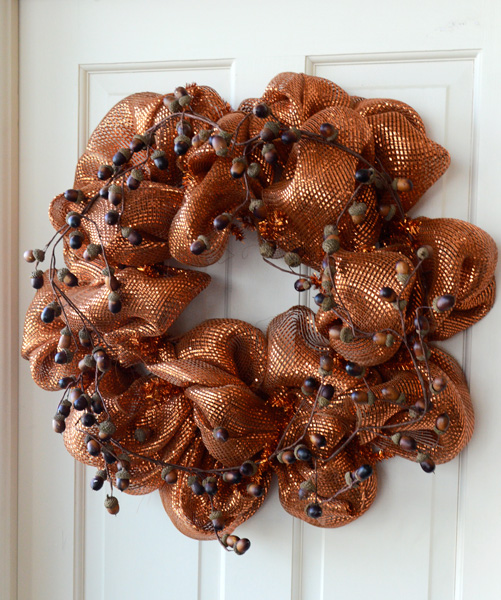
Fall Acorn Wreath
An acorn garland woven around the form creates the perfect simple fall wreath.
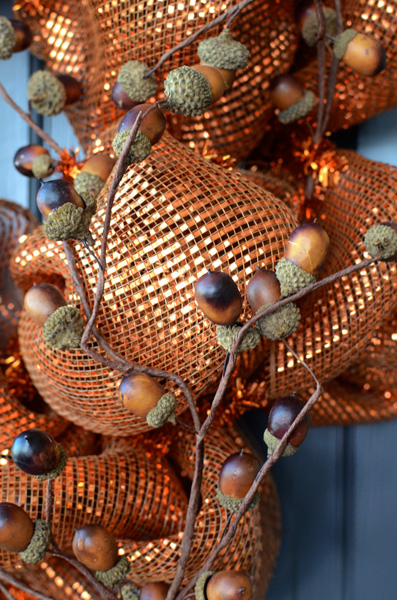
Love the cute tiny faux acorns on the garland!
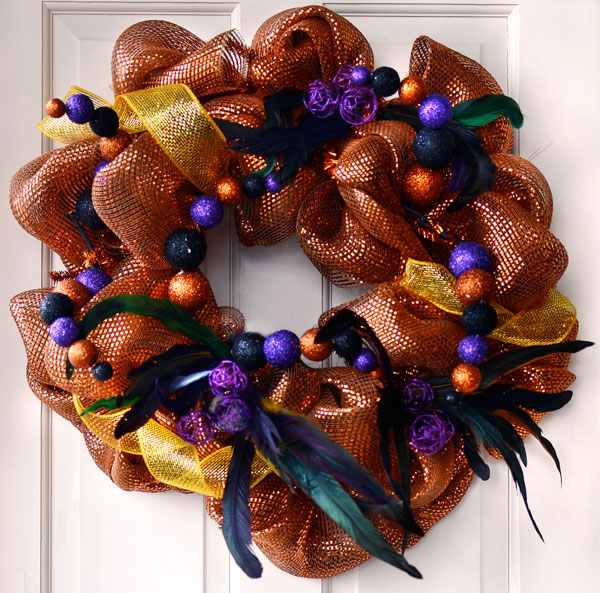
Halloween Feathers Wreath
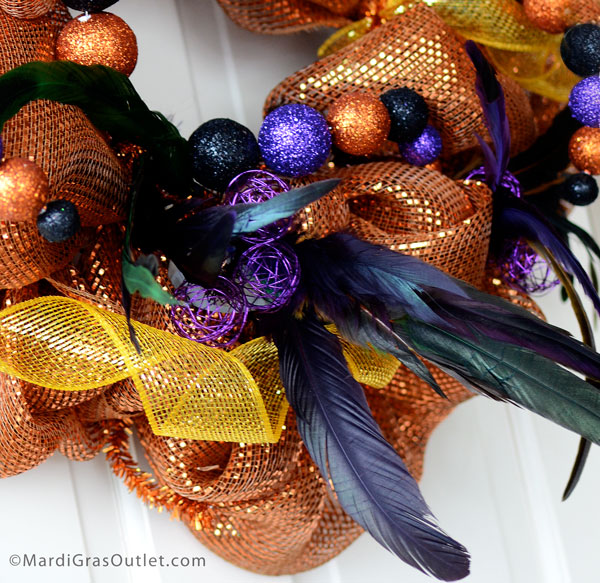
The addition of glittered orange and black accents transforms your fall wreath into a sparkling Halloween door decoration.
Glittered orange, black and purple Halloween ball sprays, fun iridescent feathers, purple wire balls and gold mesh ribbon.

Bittersweet and Fall Leaves Wreath
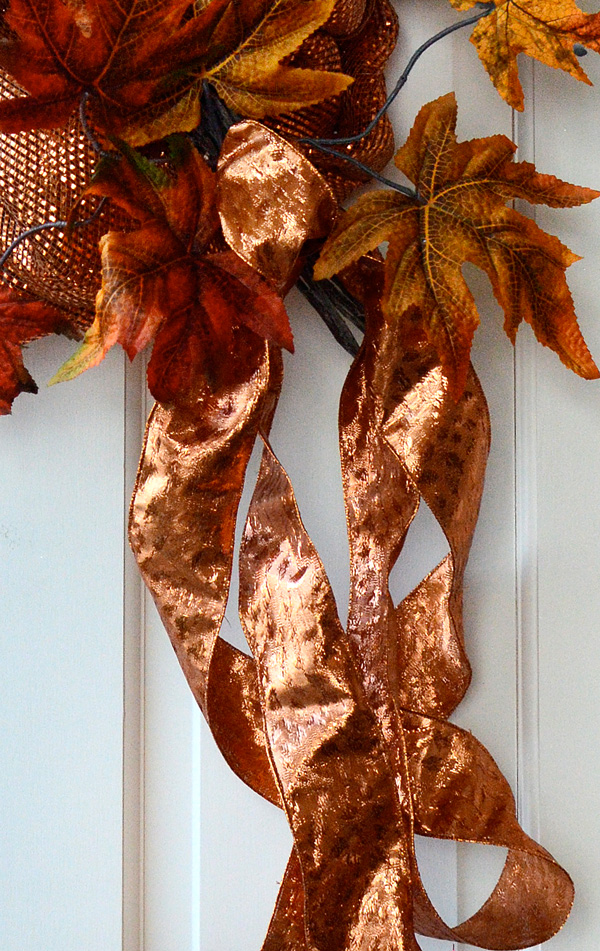
After Halloween -transition into Thanksgiving by replacing the orange and black accents with fall leaves, pretty copper animal print ribbon and bittersweet branches.


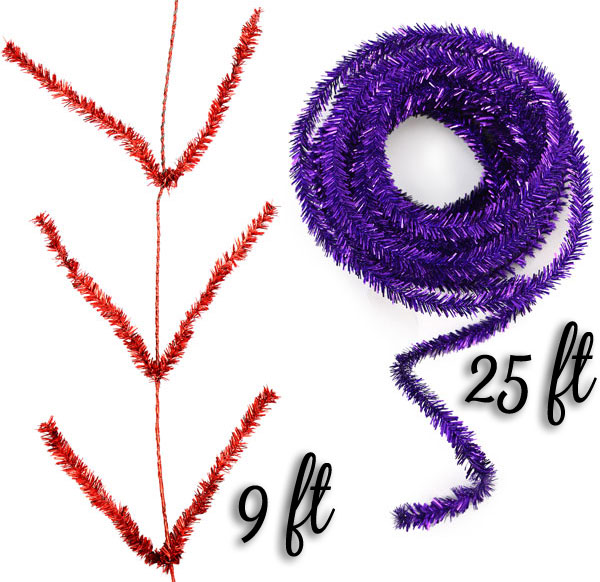
Love this look and want to add more to your door decoration? Try Tinsel Work Garland or Tinsel Roping, which come in a wide variety of coordinating colors. Tinsel Work Garland is 9 feet long and comes with 44 pre-attached wire tips so you can create custom garlands that match your wreath. Tinsel Roping is 25 feet long and is enough to accent a 30" work wreath with some to spare. Both are wired to allow for flexibility and ease of adding design accents.
Hope you have a Happy Fall!

August 2, 2012

It's Crab Boil Time

Crab Boil, Summer Party Ideas, How-To, Tutorial, Cajun/Creole, blue crab, Louisiana

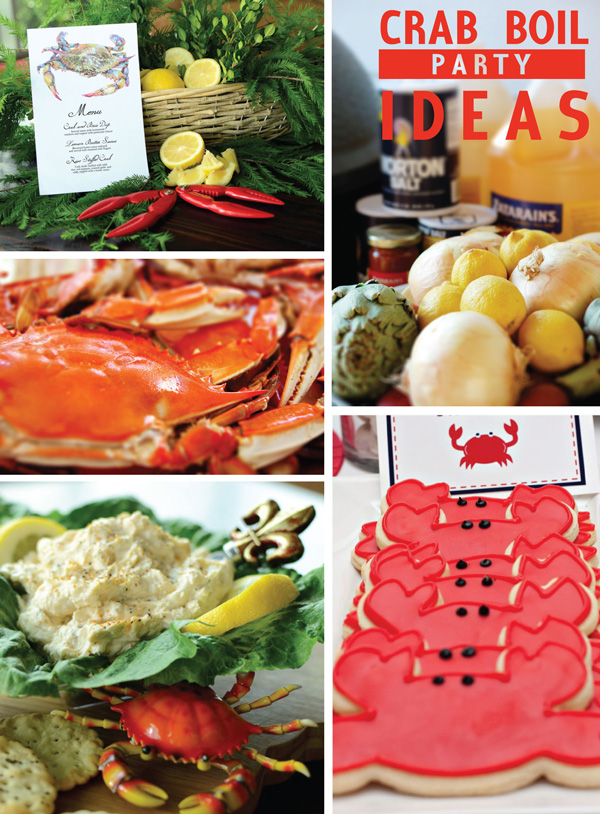
Fresh, delicious Louisiana blue crabs are in season right now! A crab boil is great way to celebrate the end of the summer. Here are our tips on how to have the perfect Louisiana crab boil.

Crab Boil, Summer Party Ideas, How-To, Tutorial, Cajun/Creole, blue crab, Louisiana


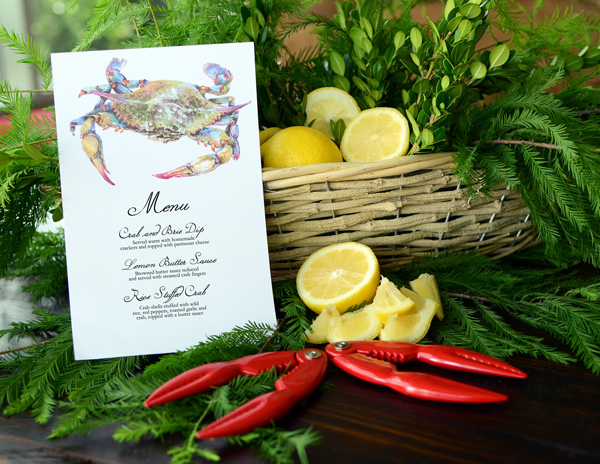
Set the tone of your crab boil with a crab themed invitation! This blank watercolor invite can also be used for the menu. Customize it by printing at home with your featured dishes.

Crab Boil, Summer Party Ideas, How-To, Tutorial, Cajun/Creole, blue crab, Louisiana

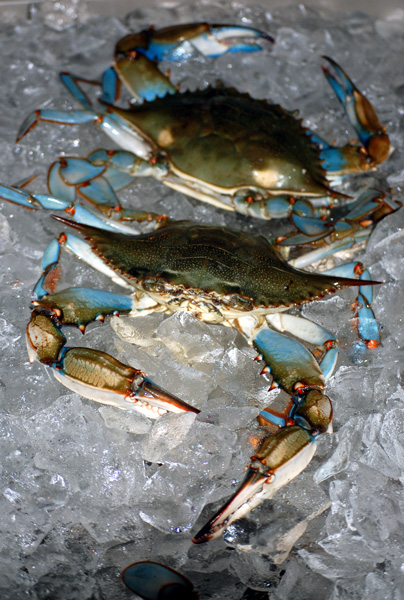
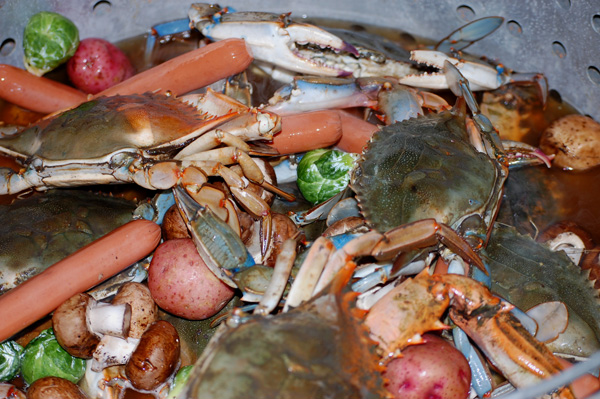
Here in the Gulf Coast we have blue crabs available, so using local and fresh crabs is the best way to go. Aren't the colors of fresh blue crabs beautiful?


Crab Boil, Summer Party Ideas, How-To, Tutorial, Cajun/Creole, blue crab, Louisiana


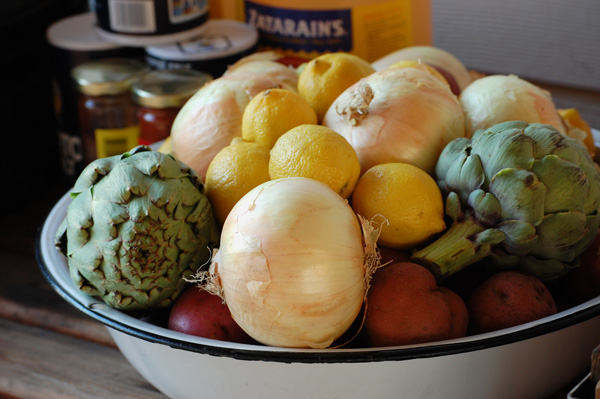
Season the crab boiling water with lots of spices, garlic, onions and lemons.  Zatarains makes complete seafood spice blends for crab, shrimp and crawfish boils, found here.
Crab Boil, Summer Party Ideas, How-To, Tutorial, Cajun/Creole, blue crab, Louisiana


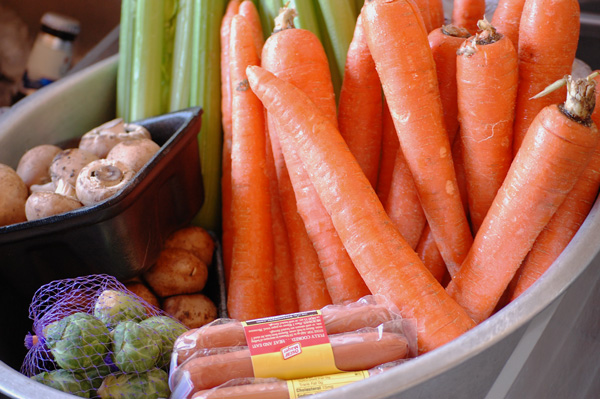
In Louisiana, we don't limit the boil to just crabs.  Those delicious Cajun boiling spices add great flavor to what ever is in the boiling pot. Add in sausage and hot dogs (for the kids). Create spicy sides with boiled artichokes, red potatoes, carrots, mushrooms, corn- even brussel sprouts.


Crab Boil, Summer Party Ideas, How-To, Tutorial, Cajun/Creole, blue crab, Louisiana


 You will need a  BIG pot. This crab boiling pot is full of flavor. The blue crabs will turn bright red once they are cooked.

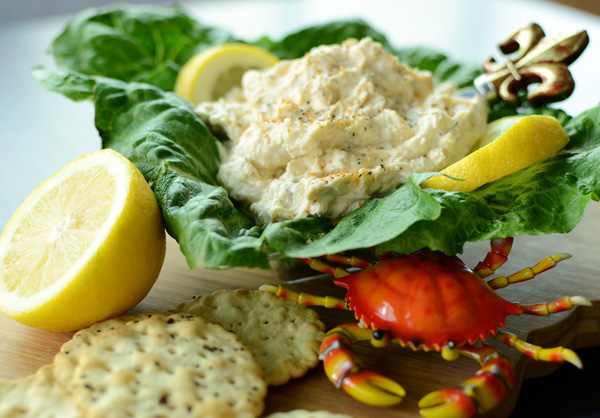
While the crabs are cooking, serve a family favorite-Crab and Brie Dip.

Crab Boil, Summer Party Ideas, How-To, Tutorial, Cajun/Creole, blue crab, Louisiana

Crab and Brie Dip served on a cute Louisiana state shaped cutting board.

Crab Boil, Summer Party Ideas, How-To, Tutorial, Cajun/Creole, blue crab, Louisiana

Creamy Crab and Brie Dip Recipe
  • 1/2 stick butter
  • 1 lb. white crab meat (picked through for pieces of shell)
  • ½ small onion- finely chopped or minced
  • 2 cloves garlic, minced
  • 1/4 cup white wine
  • Dash Worcestershire sauce
  • 1 pint heavy whipping cream
  • 4 oz. Brie cheese, rind removed
  • 4 oz. cream cheese
  • Tony Chachere's Creole Seasoning to taste
1. Sauté onion and garlic in butter over medium heat. Cooking until the vegetables are soft.
2. Deglaze the pan by adding white wine.  Add in Worcestershire sauce, bring to a rolling boil, stir often and reduce the liquid by about half.
 3. Add in cream and reduce to a simmer. Add both cheeses in small pieces, stirring until melted. Remove from the heat. Season to taste with Tony Chachere's Creole Seasoning
4. Gently add the crab meat, trying to keep the lump crab meat intact.
Serve warm or cold with assorted crackers or toasted baguette slices. Garnish with fresh lemon wedges.


Crab shaped cookies are adorable desserts, or can serve as guest party favors. They are easy to make with a crab cookie cutter, available here for $1.50.

This photo by Vicki Lynn Photography and Crab Shack Birthday Party designed by the Tom Kat Studio. Check out more photos of this precious crab birthday party ideas, here .
Crab Boil, Summer Party Ideas, How-To, Tutorial, Cajun/Creole, blue crab, Louisiana
Looking for fun activities for kids? Print out this crab coloring page, available here.
You will need a PDF reader to download this printable coloring page, which is free here.

Crab Boil, Summer Party Ideas, How-To, Tutorial, Cajun/Creole, blue crab, Louisiana


For fun crab boil supplies, like this Tika Designs Crab and Lemon platter, and the whole line of Tabasco Seafood themed tableware, visit our crab boil party supplies section, HERE.

They are great colorful accents to add to any crab boil party and wacky crab themed things like crab hats, soap and this  crab mylar balloon.


Crab Boil, Summer Party Ideas, How-To, Tutorial, Cajun/Creole, blue crab, Louisiana
To see a larger collection of crab boil party ideas, check out our Pinterest page, which has a collection of all things crab from all over the internet. Just click through each image to see the original source.

Crab Boil, Summer Party Ideas, How-To, Tutorial, Cajun/Creole, blue crab, Louisiana


July 26, 2012

Pirate Treasure Chest Centerpiece

Centerpiece, Pirate Party, Children's Party, DIY, Mardi Gras Beads, Birthday Party, Party Decorations, Pennant Banner

AURGGHH...Matey. If you're hosting a band of pirates for a summer birthday party, keep in mind that Beads and doubloons are good for more than just Mardi Gras festivities.  These sparkly jewels are great for pirate treasure (or booty...as children laughingly call it.) A pirate treasure chest is the centerpiece of any jolly roger themed party.  Let your pirate crew dress in their favorite pirate garb- think eye patches, bandannas, swords and parrots. Add in an adventurous treasure hunt to  make it an event everyone will remember. This pirate treasure chest serves as the bounty and the party favors. Everyone gets to take home gold, pearls and jewels.

Check our our Pirate Party ideas board on Pinterest for more fun ideas like these:

Centerpiece, Pirate Party, Children's Party, DIY, Mardi Gras Beads, Birthday Party, Party Decorations, Pennant Banner 

Here's how to create our treasure chest centerpiece -
Supplies: (click on the links to purchase at MardiGrasOutlet.com)

Centerpiece, Pirate Party, Children's Party, DIY, Mardi Gras Beads, Birthday Party, Party Decorations, Pennant Banner

STEP 1: Construct Box and fill with Foam
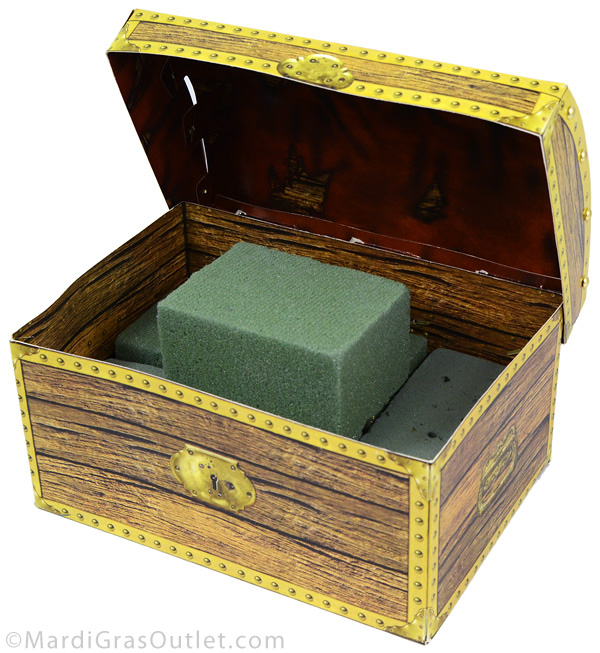
This paperboard treasure chest requires some minimal assembly, since it comes flat. Assemble the chest, and then fill the bottom with floral foam (this used 3 pieces). Add another half piece of dry floral foam in the center for more height and dimension.

Another option is to stuff the treasure chest with crumpled paper first.

You can also fill the chest completely with pearl strands and coins, just get enough to fill it up (about 15 packs of beads). That way you can use the centerpiece as a party favor holder as well.

Centerpiece, Pirate Party, Children's Party, DIY, Mardi Gras Beads, Birthday Party, Party Decorations, Pennant Banner

STEP 2: Fill with Pearls
We used pearl Mardi Gras beads, which are inexpensive. Skull and bones necklaces were also added. Place enough to cover the floral foam. Let some drape over the edges, to make the treasure chest look fuller.

Centerpiece, Pirate Party, Children's Party, DIY, Mardi Gras Beads, Birthday Party, Party Decorations, Pennant Banner

STEP 3: Add Coins
Doubloons were scattered in the treasure chest and around the table. 

Centerpiece, Pirate Party, Children's Party, DIY, Mardi Gras Beads, Birthday Party, Party Decorations, Pennant Banner

STEP 4: Add Parrot
This fake red parrot adds a focal point and color accent to the pirate centerpiece. Glue or tie the parrot at the left front edge of the chest.

Centerpiece, Pirate Party, Children's Party, DIY, Mardi Gras Beads, Birthday Party, Party Decorations, Pennant Banner

STEP 4: Optional: Add Specialty Beads
Using a couple specialty beads such as the Bobble Parrot Bead Necklace and the Pirate and Skull Flags Necklace, we added variety to the centerpiece. You might also consider the Bandanna Pirate Necklace, Cartoon Pirate Necklace, Fierce Pirate Necklace, Four Pirates Necklace or any other ones that strike your fancy! All these and more are available at MardiGrasOutlet.com in our Pirates, Parrots and Skulls section.
Centerpiece, Pirate Party, Children's Party, DIY, Mardi Gras Beads, Birthday Party, Party Decorations, Pennant Banner

OPTIONAL DECORATIONS
We placed red/white striped poly deco mesh as a table runner underneath the centerpiece. It comes in 21" wide by 10 yard rolls, and is a type of soft plastic netting that is used for crafts and decorations. You can purchase the red and white striped poly deco mesh here: 21" poly mesh roll in red and white stripes

Centerpiece, Pirate Party, Children's Party, DIY, Mardi Gras Beads, Birthday Party, Party Decorations, Pennant Banner

PIRATE BUNTING 
You can also construct a pirate themed garland with triangle flags for more decorations. It's very easy to make! Keep scrolling down for simple instructions.

Centerpiece, Pirate Party, Children's Party, DIY, Mardi Gras Beads, Birthday Party, Party Decorations, Garland, Banner, Pennant

Supplies: (click on the links to purchase at MardiGrasOutlet.com)
The actual amount you need of each of the above supplies will depend on how long you make your display and bunting. The 26" rolls will allow you plenty of material to spare for future projects! You could also use a thicker patterned craft paper or fabric to create this bunting.

STEP 1: Cut Triangles
If you would like, you can create a template for this part of the process out of cardboard. Use a ruler to draw a triangle that is 8" x 8" x 9" or any other size you desire onto a piece of cardboard and then cut the shape out to form a template. We made the top of our flag slightly wider than the two sides, but you could easily vary the dimensions. 

Using your template, trace the triangle onto the black foil paper and silver foil paper. Cut the shapes out using scissors. You will probably want at least 6-8 triangles, but you can make as many as you want!

Centerpiece, Pirate Party, Children's Party, DIY, Mardi Gras Beads, Birthday Party, Party Decorations, Garland, Banner, Pennant

STEP 2: Punching the Holes
After you have traced and cut out all of your triangles, use an exacto knife or a hole punch to create 2-4 evenly-spaced holes across the top of each triangle. Make sure the holes are wide enough that your black ribbon or thread can pass through them.  

Be careful not to make the wholes too close to the edge of the triangle, otherwise the flags might rip when you are stringing them. Maintain about a quarter inch distance from the edges when punching out the holes.
Centerpiece, Pirate Party, Children's Party, DIY, Mardi Gras Beads, Birthday Party, Party Decorations, Garland, Banner, Pennant

STEP 3: Threading the Flags
Unravel a bit of your thread or thin ribbon from the spool. Don't worry about cutting it off of the spool until you are done threading your flags on. This way, you won't end up with too little length, and it allows you to increase the size of your bunting as you work.

Starting from the back of the flag, bring the thread up through the first hole to the front of the flag. Continue weaving the thread in and out of the series of holes until you exit the end of the flag from the back.  Push the flag along the thread until it is the desired distance to create the length of bunting you would like. Alternate black flags with silver flags to create a pattern, or add in other colors of foil paper as desired!

Centerpiece, Pirate Party, Children's Party, DIY, Mardi Gras Beads, Birthday Party, Party Decorations, Garland, Pennant, Banner

Continue threading your flags onto the ribbon, pushing each flag down to line up with the next as you go. Add as many flags as you like! When you are done, allow 1-2 feet of extra ribbon at each end of the bunting so that you can tie it up easily, and the cut the ribbon loose from the spool.

Centerpiece, Pirate Party, Children's Party, DIY, Mardi Gras Beads, Birthday Party, Party Decorations


July 19, 2012

DIY Party Puffs & Topiary with Deco Mesh

Deco Mesh, How to, Tutorials, DIY, Topiary Ideas, Birthday Party Ideas, Summer Tablescape, Centerpiece


Precious puffs for your summer festivities. These easy-to-make curly Poly Deco Mesh poofs or puffs make any gathering festive!  Choose the deco mesh that matches your color scheme or theme. We've created a whole series of decorations in this yummy pink, orange and cream color way.  

This is the last tutorial in our sweet summer birthday series featuring these matching decorations. Click HERE to see the original post featuring our  Sweet Summer Birthday party ideas with tips on what to serve. Or HERE for our Curly Deco Mesh Wreath tutorial with matching  Happy Birthday Banner free printable!
Deco Mesh, How to, Tutorials, DIY, Topiary Ideas, Birthday Party Ideas, Summer Tablescape, Centerpiece

These festive puffs hanging above our sweet summer birthday buffet. Here is how we made them.

Deco Mesh, How to, Tutorials, DIY, Topiary Ideas, Birthday Party Ideas, Summer Tablescape, Centerpiece

SUPPLIES
To purchase these products from www.mardigrasoutlet.com, click on the individual product link below.
Estimated cost per poof you create is about $7.00. The above materials will make about 6-8 poofs with some leftover mesh.

You can use any number and combination of colors you desire!  We have a great selection of metallicpatterned mesh, solids, vertical lines and more!  Each poof takes about half a roll of 21" mesh to create, so feel free to try out several different color combinations.  Check out our extensive collection here: Poly Deco Mesh.

You can also use 10" mesh rolls to create party poofs. The 10" wide rolls will leave you with smoother, finished edges on both ends since you don't have to cut the strips in half like you do with the 21" mesh rolls. One 10" mesh roll makes one poof with a bit leftover. To check out our selection of 10" Mesh, please click here: 10" Poly Mesh Rolls.

Deco Mesh, How to, Tutorials, DIY, Topiary Ideas, Birthday Party Ideas, Summer Tablescape, Centerpiece

STEP ONE
Cut 7-inch wide strips of each color of mesh you would like to use.  If you are using 21 inch mesh rolls, then you will need to cut each strip/curl in half. If you are using rolls of 10 inch deco mesh ribbon, you do not need to cut the strips in half.
We cut about 5 strips of each color mesh to get started and then cut more of each color as needed. The exact number of strips you need will depend on the width of your strips and how tightly you curl them. We used about 30 to 40 strips total in our poofs. This means that if you create a 4 color poof, you will need about 5 to 6 strips of each color that you will then cut in half to create 1 poof (approx. 1 yard of each color.)
Deco Mesh, How to, Tutorials, DIY, Topiary Ideas, Birthday Party Ideas, Summer Tablescape, Centerpiece

STEP TWO
Using wire cutters, cut strips of paddle wire about 3 to 4 inches in length. You will need one piece of paddle wire for each strip of mesh you wish to attach to your poof (approx 30-40.) Feel free to cut the wire strips a few at a time as you go.

Deco Mesh, How to, Tutorials, DIY, Topiary Ideas, Birthday Party Ideas, Summer Tablescape, Centerpiece

STEP THREE
Grab a mesh strip of any color and roll it into a loose curl.
Deco Mesh, How to, Tutorials, DIY, Topiary Ideas, Birthday Party Ideas, Summer Tablescape, Centerpiece

STEP FOUR
Pinch the curl in the center, creating a V shape.

Deco Mesh, How to, Tutorials, DIY, Topiary Ideas, Birthday Party Ideas, Summer Tablescape, Centerpiece


STEP FIVE
Use a strip of paddle wire to attach the curl to your wire ball.
Deco Mesh, How to, Tutorials, DIY, Topiary Ideas, Birthday Party Ideas, Summer Tablescape, Centerpiece

REPEAT!
Continue to add curls of each of your colors to the ball in the same fashion. Keep working the ball form from all sides with mesh curls until it is full and fluffy, and the central wire ball form is no longer visible.
Deco Mesh, How to, Tutorials, DIY, Topiary Ideas, Birthday Party Ideas, Summer Tablescape, Centerpiece

Once complete, there are numerous ways to install these poofs for your next get-together.  You can hang them on string from the trees for a festive garden party, hang a cluster of poofs indoors to light up a corner, or create topiaries to frame a dessert table like we did for our summer Sweets Birthday Party Buffet!
Deco Mesh, How to, Tutorials, DIY, Topiary Ideas, Birthday Party Ideas, Summer Tablescape, Centerpiece

DIY DECO MESH POOF TOPIARIES!
Deco Mesh, How to, Tutorials, DIY, Topiary Ideas, Birthday Party Ideas, Summer Tablescape, Centerpiece

Wow! Two tutorials in one! To turn your curly poofs into topiaries, you will need the following additional supplies:

SUPPLIES
Click the links below to purchase at www.Mardigrasoutlet.com, where applicable.
Deco Mesh, How to, Tutorials, DIY, Topiary Ideas, Birthday Party Ideas, Summer Tablescape, Centerpiece

STEP ONE
Trim down a floral foam brick using a knife until it stands in your terracotta pot with the top just reaching the rim. Place the floral foam into the pot. Trim down the sides if it is too wide, or use scrap pieces of floral foam to shore up the sides if the brick has too much wiggle room. You don't want it wobbling around on you!

STEP TWO
Insert a dowel into the center of your floral foam 1-2 inches.  Make sure it is secure. If it starts to wobble, you can always add a bit of glue to keep it firmly in place.
STEP THREE
Attach your poof to the top of the dowel through the wire ball form. Again, secure with glue if necessary. 

STEP FOUR
Cut a small piece of pink crinkle sheer fabric and bunch it around the bottom of the dowel to cover the floral foam brick. Tuck in loose ends and fluff the fabric until it looks just right.

Deco Mesh, How to, Tutorials, DIY, Topiary Ideas, Birthday Party Ideas, Summer Tablescape, Centerpiece

The finished puff topiary on our dessert buffet!

Deco Mesh, How to, Tutorials, DIY, Topiary Ideas, Birthday Party Ideas, Summer Tablescape, Centerpiece


If you wish to hang your poofs instead, just tie a length of string into the wire ball form, and you're ready to go! Try positioning them at various heights to add some pizazz to your display. Deco Mesh Poofs are great for the Indoors or Outdoors, as mesh holds up well to the elements. See a few more images below for ideas on how to install your poofs.

Deco Mesh, How to, Tutorials, DIY, Topiary Ideas, Birthday Party Ideas, Summer Tablescape, Centerpiece

Deco Mesh, How to, Tutorials, DIY, Topiary Ideas, Birthday Party Ideas, Summer Tablescape, Centerpiece

Deco Mesh, How to, Tutorials, DIY, Topiary Ideas, Birthday Party Ideas, Summer Tablescape, Centerpiece


Party curl poofs are great for any season. Check out our selection of 10-inch and 21-inch Poly Deco Mesh Rolls to try out other color options, such as the 10-inch Metallic Moss and Apple shown below.

Deco Mesh, How to, Tutorials, DIY, Topiary Ideas, Birthday Party Ideas, Summer Tablescape, Centerpiece


LinkWithin

Related Posts with Thumbnails