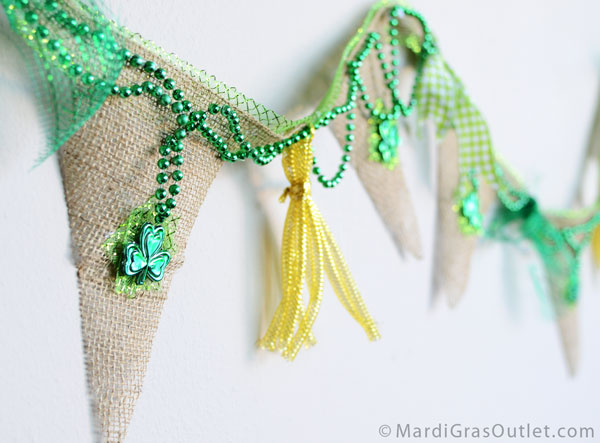
Give those Irish Eyes something to smile about during St. Patrick's Day! Create this fun burlap pennant banner. Our no-sew Burlap Pennant Banner that is both rustic and contemporary is easy to make and will really set off your St. Patty's day decorations!
The burlap pennant banner and a metallic lame wreath (from a previous post) are the perfect accent for a St. Patrick's day buffet table!
Supplies
- 9" Natural Burlap Ribbon
- 1.5" Deco Flex Mesh Ribbon: Metallic Lime Green
- Shamrock Medallion Bead Necklace
- Hot Glue Gun
- Scissors
- Ruler and/or a Paper Template
Optional Accessories
- 1.5" Lime and White Houndstooth Ribbon
- Deco Flex Tubing Ribbon: Metallic Gold
- 21" Poly Mesh Roll: Metallic Emerald Green
COST/TIME
The cost of the basic garland is $20. There will be product left over, (More than half the roll of burlap and of the Deco Flex Ribbon). This 9 foot garland took under 45 minutes to make. The cost does not include optional accessories shown on the banners below.
Step 1- Measure and Trim
Measure the burlap. If you would like a 6 foot banner with 6 pennants, you will need 6 feet and 6 inches, (78 inches total, or 2 yards and 6 inches) of burlap ribbon. If you would like a 9 foot banner with 9 pennants, you will need 9 feet and 6 inches, (114 inches total, or 3 yards and 6 inches).
Step 2- Make a Template
Your pennants don't have to be exact, but if you want them all about the same size, a template will make cutting them out easier. Simply fold a regular sheet of 8.5"x11" paper in half horizontally. Make a mark 3 inches down from the seam, and then cut towards the corner of the seam. (You end up with an isosceles triangle with a fold down the center, and both sides of your paper are equal.)
Lay the template down on the burlap, 6 inches in from the outside edge. Cut toward the selvage, but do not cut all the way through to the edge! Leave about 1-1.5" of burlap across the top, this acts a band so that there is no need to sew pennants together. See the below photograph.
Cut from the edge of the burlap towards the pennant, leaving about 1" of burlap as a band.
Step 5- Cut in 6 Inch Increments
Continue to cut out pennants. They should all be about 6 inches across, and be 6 inches apart from each other.
The finished burlap pennants- Now time to add accents!

Step 6- Add ribbon underneath the Burlap band
Begin to unroll the Deco Flex Mesh Ribbon, and place it underneath the burlap band. This provides added strength to the banner and a nice splash of color!
Step 7- Glue on a top band
Add a spot of glue about the size of a dime ever 3 inches. Be careful the glue is hot. Be sure to have wax paper or scrap paper between the banner and your work surface, as the glue will want to press through the layers.

Step 8- Trim the Ribbon
Trim the Ribbon from the roll at the edge of the Burlap band.

Step 9- Cut Ribbon Squares
Cut squares of ribbon that are 1.5-2 inches long, you will need 1-2 squares for every pennant you cut out of the burlap.

Step 10- Glue on Ribbon Squares
Use a dab of hot glue the size of a dime and apply 2 squares of ribbon so that they criss-cross. Then apply the shamrock bead medallion with a little more glue. Step 11- Glue on shamrock beads
We liked leaving some slack in the bead strand so that it will hang off of the burlap band, but you could pull the beads taught before gluing.
Finished!
After gluing on the Shamrock medallions, you have a rustic burlap pennant banner with two-tones of green. You can stop here, or continue to tie on other ribbons to match the rest of your St. Patrick's Day Decorations.
This pennant banner is accented with pieces of metallic green ribbon (scrap pieces left over from other projects) and gold deco flex tubing made into tassels. Keep reading below to see how to create these.

Simple Tassel Tutorial:
- Cut four lengths of ribbon the long enough to double over- about 8 inches.
- Fold them in half as shown
- Using a shorter length of ribbon, tie them together. Make a knot, and wrap the ribbon around the tassel a few times, tying again.
- Trim the tails of the tassel to keep them relatively even.
- Run a third length of ribbon through the top, and voila, ready to hang!

The Burlap Banner tied with extra ribbons adds color and shine to your decorations.
Erin Go Bragh!
Look for our upcoming post, Free Printable Chevron Pattern. We used it to decorate our Burlap Pennant Banner in a whole new way!


No comments:
Post a Comment