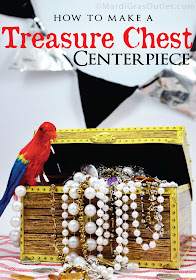
AURGGHH...Matey. If you're hosting a band of pirates for a summer birthday party, keep in mind that Beads and doubloons are good for more than just Mardi Gras festivities. These sparkly jewels are great for pirate treasure (or booty...as children laughingly call it.) A pirate treasure chest is the centerpiece of any jolly roger themed party. Let your pirate crew dress in their favorite pirate garb- think eye patches, bandannas, swords and parrots. Add in an adventurous treasure hunt to make it an event everyone will remember. This pirate treasure chest serves as the bounty and the party favors. Everyone gets to take home gold, pearls and jewels.
Check our our Pirate Party ideas board on Pinterest for more fun ideas like these:
Here's how to create our treasure chest centerpiece -
Supplies: (click on the links to purchase at MardiGrasOutlet.com)
- 1 Large Treasure Chest Box 11.75" x 8"
- 1 12" Feathered Parrot
- 3 packs of 25 Authentic Aluminum Doubloons
- 1 pack 18mm Beads 72-inch in Pearl White
- 2 packs 10mm Beads 33-inch in Pearl White
- 1 pack Skull and Bones Beads 42-inch in Antique Gold
- 1 pack Skull and Bones Beads 42-inch in Antique Silver
- 4 Dry Floral Foam Bricks
STEP 1: Construct Box and fill with Foam
This paperboard treasure chest requires some minimal assembly, since it comes flat. Assemble the chest, and then fill the bottom with floral foam (this used 3 pieces). Add another half piece of dry floral foam in the center for more height and dimension.
You can also fill the chest completely with pearl strands and coins, just get enough to fill it up (about 15 packs of beads). That way you can use the centerpiece as a party favor holder as well.
STEP 2: Fill with Pearls
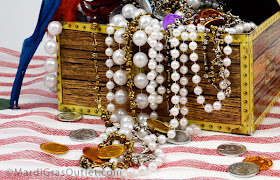
We used pearl Mardi Gras beads, which are inexpensive. Skull and bones necklaces were also added. Place enough to cover the floral foam. Let some drape over the edges, to make the treasure chest look fuller.
STEP 3: Add Coins
Doubloons were scattered in the treasure chest and around the table.
STEP 4: Add Parrot
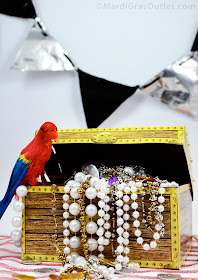
This fake red parrot adds a focal point and color accent to the pirate centerpiece. Glue or tie the parrot at the left front edge of the chest.
Using a couple specialty beads such as the Bobble Parrot Bead Necklace and the Pirate and Skull Flags Necklace, we added variety to the centerpiece. You might also consider the Bandanna Pirate Necklace, Cartoon Pirate Necklace, Fierce Pirate Necklace, Four Pirates Necklace or any other ones that strike your fancy! All these and more are available at MardiGrasOutlet.com in our Pirates, Parrots and Skulls section.
OPTIONAL DECORATIONS
We placed red/white striped poly deco mesh as a table runner underneath the centerpiece. It comes in 21" wide by 10 yard rolls, and is a type of soft plastic netting that is used for crafts and decorations. You can purchase the red and white striped poly deco mesh here: 21" poly mesh roll in red and white stripes
PIRATE BUNTING
You can also construct a pirate themed garland with triangle flags for more decorations. It's very easy to make! Keep scrolling down for simple instructions.
Supplies: (click on the links to purchase at MardiGrasOutlet.com)
- 1 roll of 26" black foil paper
- 1 roll of 26" silver foil paper
- Black twine, thin black ribbon or other similar item to string your bunting on
- Scissors
- Exacto knife or whole punch
STEP 1: Cut Triangles
If you would like, you can create a template for this part of the process out of cardboard. Use a ruler to draw a triangle that is 8" x 8" x 9" or any other size you desire onto a piece of cardboard and then cut the shape out to form a template. We made the top of our flag slightly wider than the two sides, but you could easily vary the dimensions.
STEP 2: Punching the Holes
After you have traced and cut out all of your triangles, use an exacto knife or a hole punch to create 2-4 evenly-spaced holes across the top of each triangle. Make sure the holes are wide enough that your black ribbon or thread can pass through them.
Be careful not to make the wholes too close to the edge of the triangle, otherwise the flags might rip when you are stringing them. Maintain about a quarter inch distance from the edges when punching out the holes.
STEP 3: Threading the Flags
Unravel a bit of your thread or thin ribbon from the spool. Don't worry about cutting it off of the spool until you are done threading your flags on. This way, you won't end up with too little length, and it allows you to increase the size of your bunting as you work.
Starting from the back of the flag, bring the thread up through the first hole to the front of the flag. Continue weaving the thread in and out of the series of holes until you exit the end of the flag from the back. Push the flag along the thread until it is the desired distance to create the length of bunting you would like. Alternate black flags with silver flags to create a pattern, or add in other colors of foil paper as desired!

