Pages

August 31, 2011

Halloween Wreath with Deco Mesh: A Video Tutorial


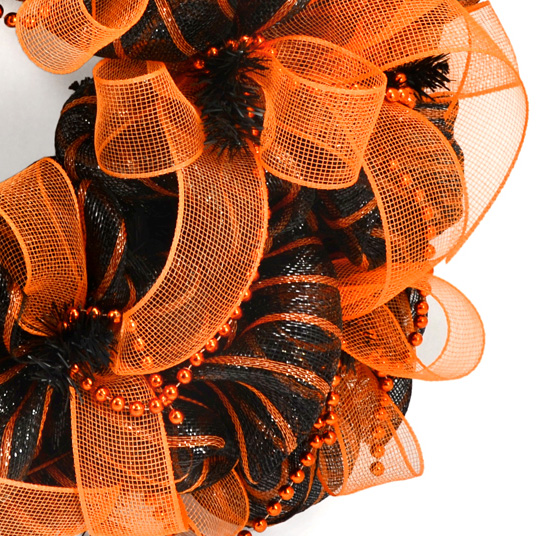
Halloween decorations and crafts are popping up all over. So we were inspired to create this cute Halloween wreath in black and orange deco mesh. The video tutorial (featured below) gives you step by step instructions for making the mesh wreath.  Start planning your Halloween decorations now!

 Supplies for this Halloween deco mesh wreath:

Orange Work Wreath Form (24")


The simple-to-use wire wreath from enables you to make this custom decorator Halloween wreath in as little as 10 minutes. The wreath form has 36 pre-attached wire ties that are used to add deco mesh, ribbon and beads to the form. Add more or less to your wreath for a custom look.

The video tutorial below is a step by step guide for creating your own custom Halloween deco mesh wreath.


For our full list of video tutorials on how to make deco mesh wreaths, bows, garland, wall trees and much more, visit Video Tutorials page.


For the supplies used to make this wreath:

August 26, 2011

DIY: Pumpkin Door Decoration with Deco Mesh


Pumpkin season is around the corner, so we created a cute pumpkin door decoration out of decorative poly mesh and an orange work wreath form. This wreath/door decoration was super easy to make and would be great for fall or Halloween.  I hope it inspires you to make a pumpkin of your own.
Happy Fall, y'all!

TIP: A work wreath form is a wire form that has tinsel wire ties attached. The tinsel ties are used to attach whatever medium you are using to create a wreath (orange deco mesh). The wreath form has two rows of ties. When creating a standard wreath you start on the inner ring and work outward. For this project, we are mainly using the outer ring. You will be adding the mesh in a zig zag pattern from top to bottom instead working around the wreath. For more information on using  a wire wreath form in the standard format, see our video tutorial: Work wreaths work miracles for crafters.


 Start with the wire wreath form in front of you. There are 10 ties on the outer ring of the form. Imagine the round form is a clock. Start in the 2 o'clock position. Gather the end of the orange deco mesh and place it in this tie. Twist the ties together to secure the mesh in place. Tuck the cut end of the deco mesh into the center of the form to hide.


 Move down the deco mesh approximately 1 foot and gather a section in your hand. Gather from each side to achieve fullness. Skip the side tie (3 o'clock position). Attach the gathered section into the 4 o'clock- wire tie. Adjust and puff the mesh as you go.  


 Gather a section of orange mesh approximately 1.5 feet down the roll. Adjust your length as needed to get the fullness you want on the pumpkin. Twist this gathered section into the wire tie at the top. Remember you are moving across the wire form from top to bottom-right to left. Adjust and fluff the mesh so it puffs out and sideways- aiming for a pumpkin shape.

 Continue across the wreath form- up and down between wire ties. Adjust the length of mesh as needed to make the pumpkin fuller in the middle. Once you reach the other side, attach you mesh into the last wire tie. Tuck the remaining end piece into the back of the form to hide.


For the stem:
1. Cut a piece of 4" ribbon approximately 2 feet long.
2. Trim the ends into a clean shape- we used an inverted V cut.
3. Fold the ribbon in half.
4. At the top, roll the ribbon into a tube.
5. Using a piece of deco flex tubing in a coordinating color, tie the curled end to secure. This will form the stem of our pumpkin.

Use the deco flex tubing to tie the stem on the top of the pumpkin. Add additional 4" ribbon to the top for fullness. The flex tubing looks like vines, so we added more of that as well. To create curling vines with the deco mesh tubing. Create two large loops and tie in the center. . Tie the tubing onto the stem.These loops can be adjusted to curl instead of hang

Fluff the orange mesh, vines and stem as needed. Be sure to tuck in any tinsel ties that are visible. Your pumpkin is complete. Cute, inexpensive, lightweight, weatherproof and will not rot- what else could you ask for in a pumpkin?

One last idea: cut out Jack-o-Lantern eyes, nose and mouth; pin onto the deco mesh. Your fall pumpkin will transform into a Halloween jack-o-lantern. What fun!

 To purchase supplies for this project, visit MardiGrasOutlet.com

August 21, 2011

Team Sports Beads


Colored Mardi Gras Beads aren't just for Mardi Gras; Team colored beads are great way to celebrate fall football games, school spirit and other school sports. Bead strands come in many different colors; mix and match them to coordinate with your school colors. Toss bead necklaces to fans at the big game to rev up the crowd. Decorate with team beads for any game, rally or school event to make it even more festive. Sell team colored beads for a creative school fundraiser- a great way to support the team and raise money!


For a football game, try these huge Jumbo Football beads that come in lots of color ways (shown here: black and gold, red and black, purple and gold.) Each football bead is 2" x 1" and the strand itself is 42" long! Pictured below are some smaller sized football shaped beads. These necklaces are 36" long with smaller football beads.These also come in many colors and are more affordable for tossing out to fans.


The swirl necklaces below are an elegant option for teams and businesses looking for products in their own colors. These are 38" long hand-strung necklaces with a pearlized satin finish, with beads in alternating colors. Each high-quality bead is about 1.25" x .5", and are separated by small round metallic beads.


Looking for less expensive beads for sporting or school events? Last but not least are these two-toned round beads. These come in affordable packs of 12 strands. Each 36" necklace has six sections of its two colors.


Whatever option you choose, Mardi Gras beads in your team colors are sure to be a hit with both players and fans!


For beads in many more team colors and styles visit,  MardiGrasOutlet.com.


August 9, 2011

DIY: Mardi Gras Bead Chandelier


Not sure what to do with your extra Mardi Gras Beads? Here's an easy tutorial on how to make a festive Mardi Gras bead chandelier with only a few inexpensive supplies. We'll even show you how to light it without electrical cords!

This chandelier was inspired by the beaded chandelier created by Heather on Dollar Store Crafts. She used a wire basket as the structure and spray-painted the beads after attaching them with craft wire. The other inspiration is 1920's New Orleans Jazz fashion and style, especially fringes from flapper dresses (photo: Fashion Lover). Our Mardi Gras bead chandelier has a tiered shape and looped fringed edges (from leaving the strands uncut.)


For supplies, you'll need:
    Box Wire Wreath Form, 12"
    Hot Glue Gun or Skillet Glue & Drink Stirrer
    Strong Craft Wire
    4 packs of 12mm 48 in. gold Mardi Gras beads (12)
    1 pack of green 12mm 48 in. Mardi Gras beads (12)
    1 pack of purple 12mm 48 in. Mardi Gras beads (12)
Optional: Battery-Operated Lights

Of course, you can use any color or size beads that you already have, or you can customize the chandelier to your taste with different colors. Just make sure you have a lot of beads.

1. First, heat the skillet glue in a crock pot. Skillet glue is like hot glue, but comes in granules that melt when heated. Applying it with a drink stirrer worked best for this project, but a plastic spoon or knife will work too.


2. Attach the end of an uncut gold bead strand to a spot on the inner ring of the box wire wreath form. Make sure there is glue underneath and over the strand to secure it properly. If you don't have hot glue, use short lengths of thin craft wire to secure the bead strands. This takes longer, but works just as well. It helps to do this over a table edge with the frame weighed down.


3. Continue filling in the inner ring all the way around to make the longer inside tier. Add in a purple or green bead strand after every 3 or 4 gold bead strands.


4. Once the inner ring is done, add beads to the outer most ring, this time draping each uncut strand in half over the wire frame so that the outer tier is shorter, revealing the longer inside tier.

Just like for the inner tier, add a purple or green bead strand after every few gold beads for color accents.

Don't worry if the strands don't line up perfectly along the bottom edge; this gives the chandelier some variety.


5. In order to hang it, use some strong craft wire and attach 4 long pieces to the top of the box wire wreath frame at even intervals. Loop each end under and twist several times. Twist the 4 wires together at the top, leaving one to form into a loop.


6. Optional: This chandelier was easy to light with battery operated LED lights. Hide the black battery box on the inside of the chandelier. Attach it to the wire wreath frame with some craft wire.

These battery operated LED lights consist of 36 amber colored lights on a wire. Pull this lighted wire down through the middle of the chandelier. Wrap the light wire around the strands of  beads a few times to keep it secure. This a super easy way to create a lighted chandelier with out bulky electrical cords...perfect for outdoor or temporary events!


And that's it! This project only took a few hours to do. You can find all the items we used for this chandelier at MardiGrasOutlet.com.